
mod crayon roll tutorial (with leather accents)
As an Amazon Associate I earn from qualifying purchases.
 The summer before I entered second grade, our family took a cross country Amtrak trip. It was fantastic for so many reason, not the least of those being that my parents took four kids ages 8, 6, 4 and 2 on a cross country train trip! Whoa mom and dad!
 But also, my mom is the best at making every day things super exciting, and this was no exception. For this most epic of train trips, she packed a back pack for each of us filled with snacks, travel essentials and little extras. Because of her aforementioned uncanny ability to make things like travel backpacks sheer magic, I still remember most of the items she packed for us. In those backpacks, we each got extra socks, a coloring book and note pad, fruit snacks (a BIG DEAL since my mom was truly ahead of her time in her commitment to fending off sugar) and a crayon roll up. Sheer glory in my eight year old mind.
 Perhaps because of that trip, or maybe because they’re just so functional, crayon roll ups continue to hold a special place in my heart.
And using some leftover leather scraps to make them extra fabulous just sweetens the pot a teensy bit more.
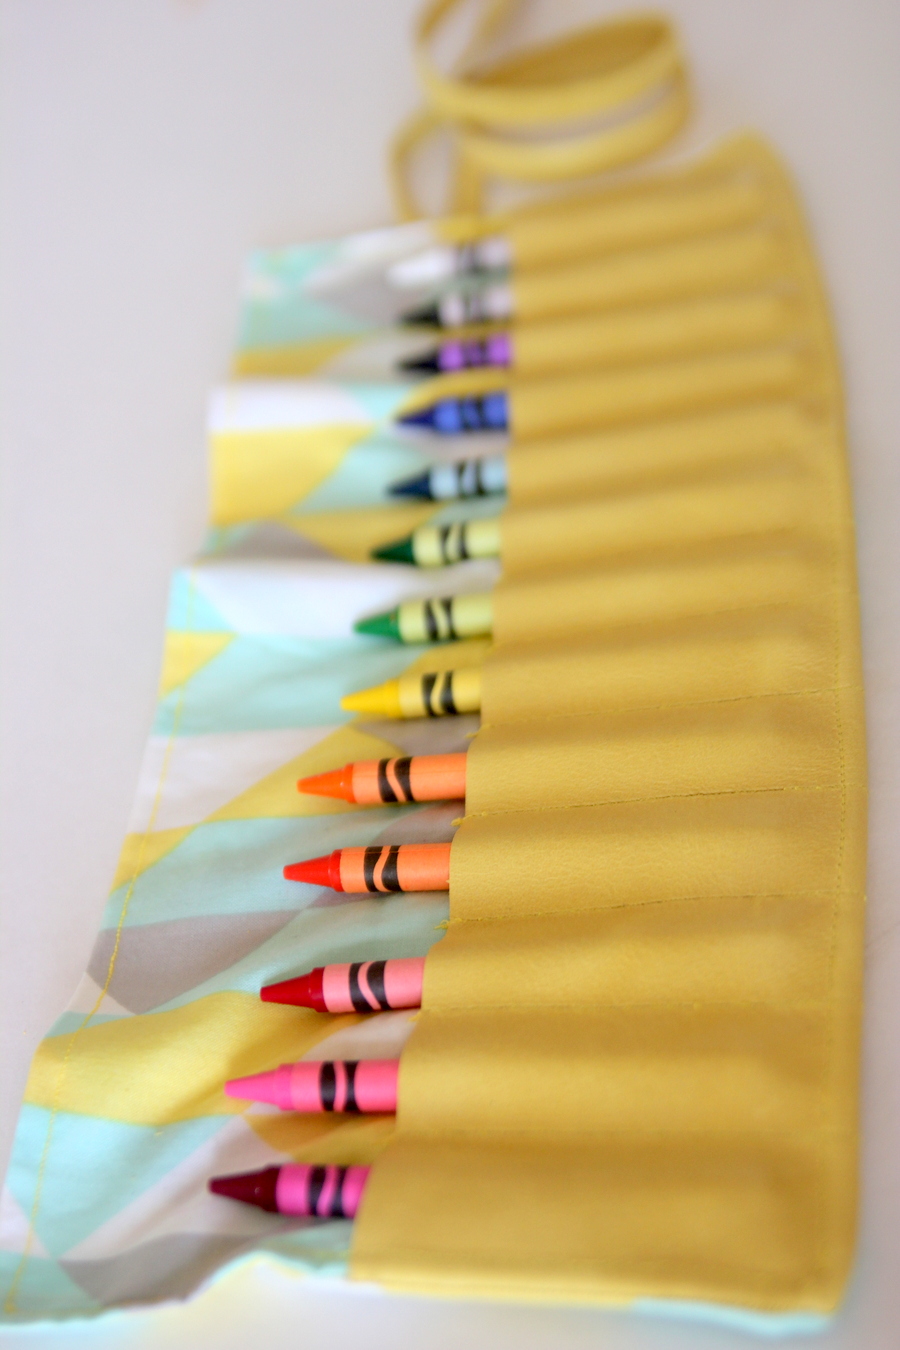
To make a crayon roll up with leather accents-
 Cut out a 15″ x 12″ rectangle of fabric, a 12″ x 3.5″ rectangle of coordinating leather (I got mine from Leather Hide Store to make these clutch purses and had some leftover!), and two lo-ong thin ‘ribbons’ of leather (mine are about 20″ long and 1/2″ thick).
Match up the leather along the bottom edge of the rectangle. Sew the bottom edge of the leather to the bottom edge of the fabric. Sew crayon ‘gussets’ spaced one inch apart on the leather (leave an extra 1/2″ on both sides).
Pin the leather ‘ribbons’ to the large piece of fabric, situated just above the leather crayon holder. Tack in place with a few stitches. Fold toward the center of the roll up, making sure that none of the edges are towards the perimeter (or they’ll get sewn in place accidentally).
Fold the top down to the bottom edge, right sides facing each other. Sew around the entire perimeter, leaving a few inches of opening from the leather ribbons to the folded edge of the roll up.
Pull the roll up out though the small opening, turning the crayon roll up right side in.
Tuck the raw edges of the opening back in and press in place. Top stitch the opening closed, being sure to sew all of the raw edges in place. Continue to top stitch around the entire roll up.
 Fill with crayons and you’re done! Send to a friend or tuck in a backpack or even give as a gift- these things are fabulous!


This post brought back so many memories!! I also have some great memories on Amtrak. Sounds like our mothers have a lot in comon.
Very cool! I’ve got a Craft Gossip post scheduled for this morning that links to your tutorial:
http://sewing.craftgossip.com/tutorial-mod-crayon-roll/2015/02/13/
–Anne
Thanks Anne! 😉