
pottery barn inspired tote tutorial
As an Amazon Associate I earn from qualifying purchases.
 Hello, I am Tasha from over at Creation Corner and I am so excited to be here participating in this fabulous knock off series. I love a good knock off. I would have to say that 80% of my ideas start from seeing another product and trying to figure out how to make it myself.

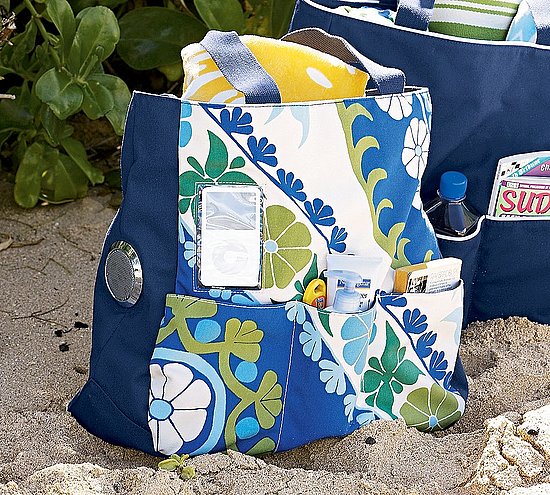
As Summer is just around the corner I have been getting in the mood for a new pool/beach bag. During the summer I find I tote around 3 times as many things (which is saying a lot since I am the mother of 3 boys) then I do any other time of the year. Which means…I need a good big cute bag.
Where did I find my inspiration to knock off today…


5. Get one of your main body fabric pieces and lay it out right side up. Take the ironed ruffle and place it on the main body piece where you want it. Pin it in place.
6. Set your stitch length back to normal and sew the ruffle down. The ruffle side of the bag is done for now. Set it aside.
Pocket Side of Bag:

7. Grab your pocket piece of fabric. Fold it down about an inch and iron it flat.
8. Sew it down.
9. It should look like this when you are done.
10. Grab your second Main Body piece of fabric. Line the pocket so the bottom (non-sewn part) meets at the bottom of the main body piece.


15. Grab the Main Body Piece with the Ruffle sewn on and the Bottom Fabric Piece. Place the Ruffle Main Body Piece right side up. Take the Bottom piece and pin it right side down (so both right sides are facing each other) to the main body fabric piece.
16. (I am serging all my inside sewing so I do not have any raw edges.) Sew the piece together and follow up with serging it. (If you do not have a serger just sew the pieces together. You can pinking shear the edges at the end so they are not as raw if you want to.)
17. Once you have done that iron the fabric open. Then grab your Pocket Main Body fabric piece. Pin the other side of the bottom piece to the bottom of the pocket main body piece.
18. It should be where your raw edge of the pocket fabric is. Sew/Serge it together. Iron this piece open as well. Now, you should have 1 big long main body piece.
Sewing on the sides of the bag:

19. Open your 1 Main Big Body Piece up. Lay it right side up. Take one of the side pieces. (This part can be pretty tricky. Do not get too frustrated. You may have to unpick a little, but that is okay. Read carefully.) Lay the side piece right side down ON TOP of the bottom piece (that is now sewn to the two main body piece.). It should be directly over the bottom piece.
20. Pin it in place at the top.
21. Sew along where you have pinned it BUT only where the bottom piece is at. Do not sew the whole length. Cut out two small squares in the top corners. This is going to help you sew the sides.
22. Now turn the side and pin it to the Ruffle main body side.
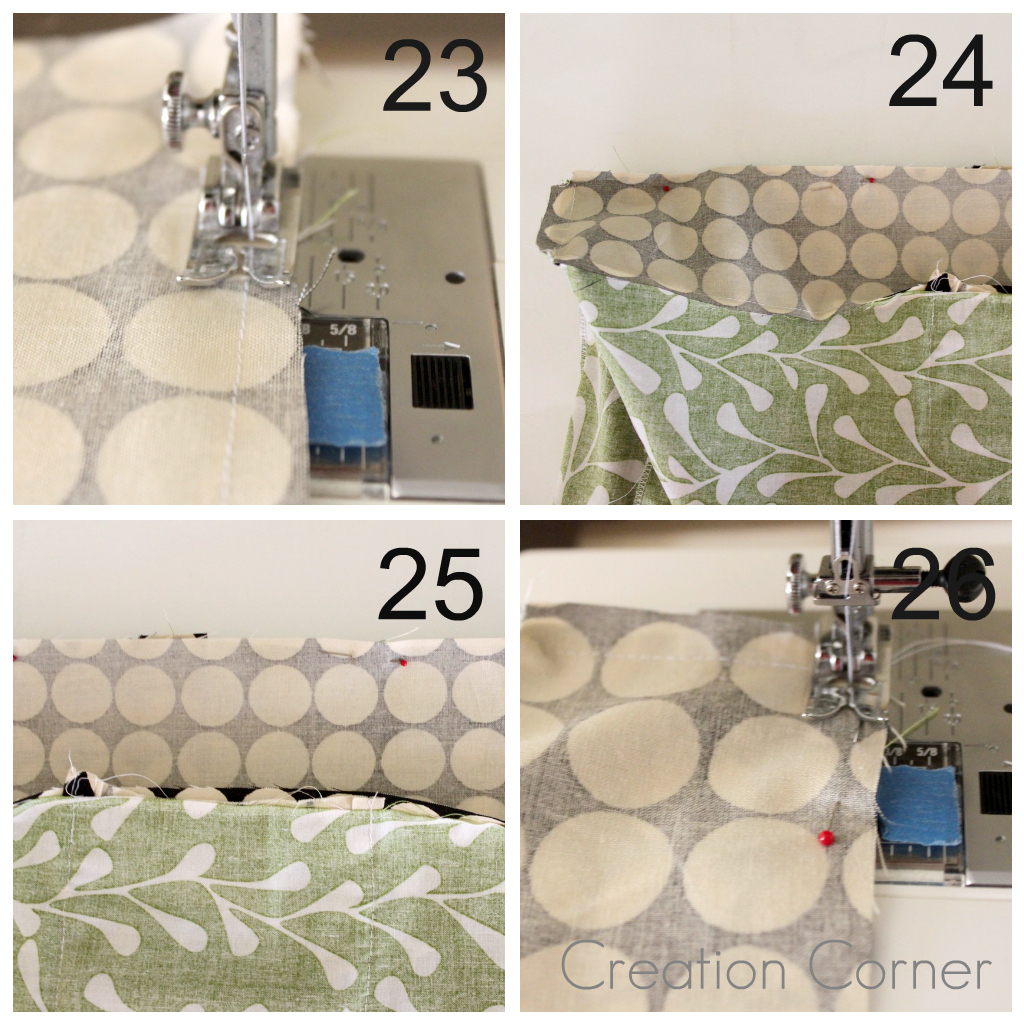
23. Sew that side down.
24. Now it is even trickier. Turn the bottom piece to the last side you have not sewn. (On this same side of the bag) Can you see how one side of your bag is forming?
25. Pin it down
26. Sew/Serge it down. (Do not serge until you are done and are sure all 3 sides are sewn right and you like how they all meet.)
NOW DO IT TO THE OTHER SIDE! (Repeat steps 19-26 with the other side piece of fabric) When you are done BOTH sides will be in place and your bag should be formed!
If you are anything like me your will let out a happy sigh of relief because you are almost done!
Finishing the Top of the Bag:

27. Now that the bag is basically formed we are going to finish off the top and then add the handles. First, finishing the top. Grab your iron and the top of your bag. Turn down the top towards the inside of the bag about a 1/4 of an inch.
28. Then turn it down again so there is no raw edge. Pin it in place.
29. Sew down all the way around the bag. Somehow I forgot to take a picture of this step, but you can see how it should look like in this picture.
Making the Handles:
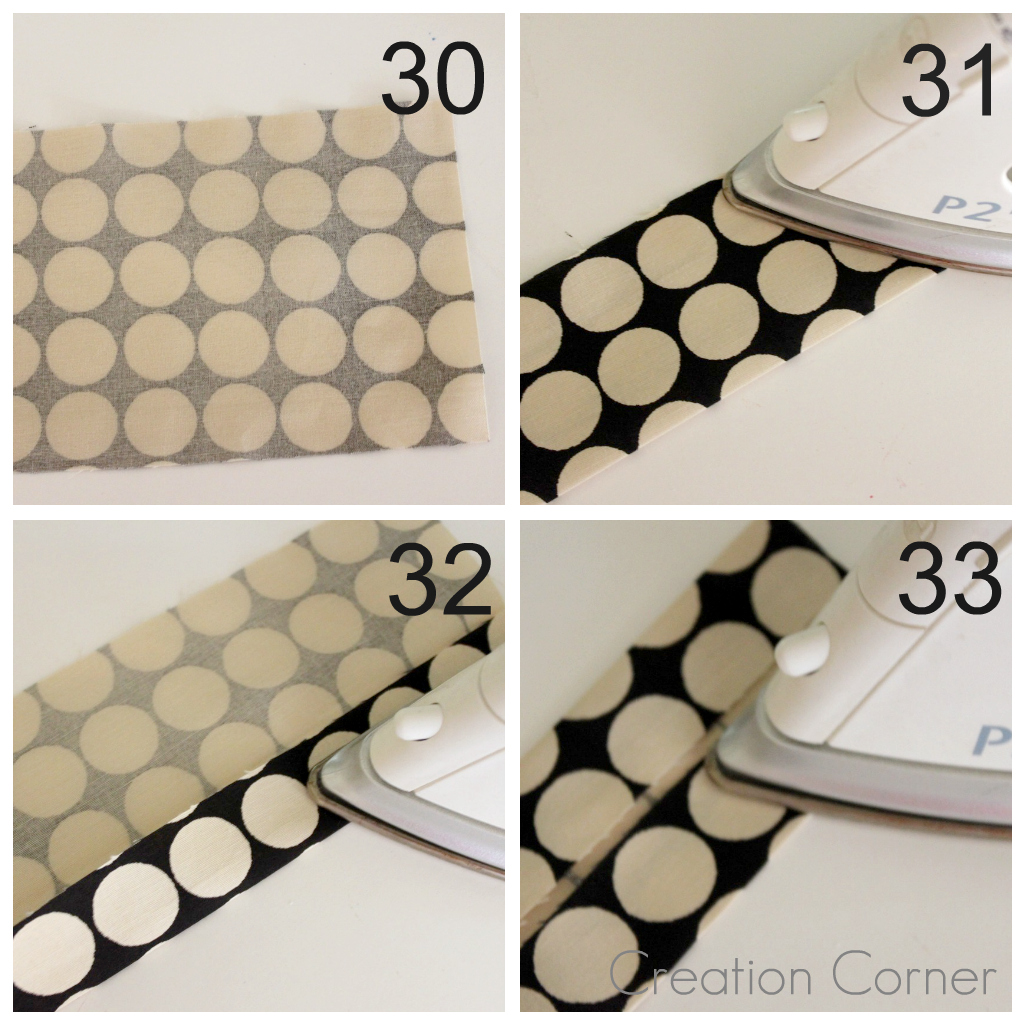
30. Take your two handle pieces of fabric.
31. Fold each of them in half. Iron them down.
32. Open them up. Using the ironed middle crease as a guide fold the bottom up to the middle crease and iron it down.
33. Turn the fabric and do the same to the other side. Iron them down.
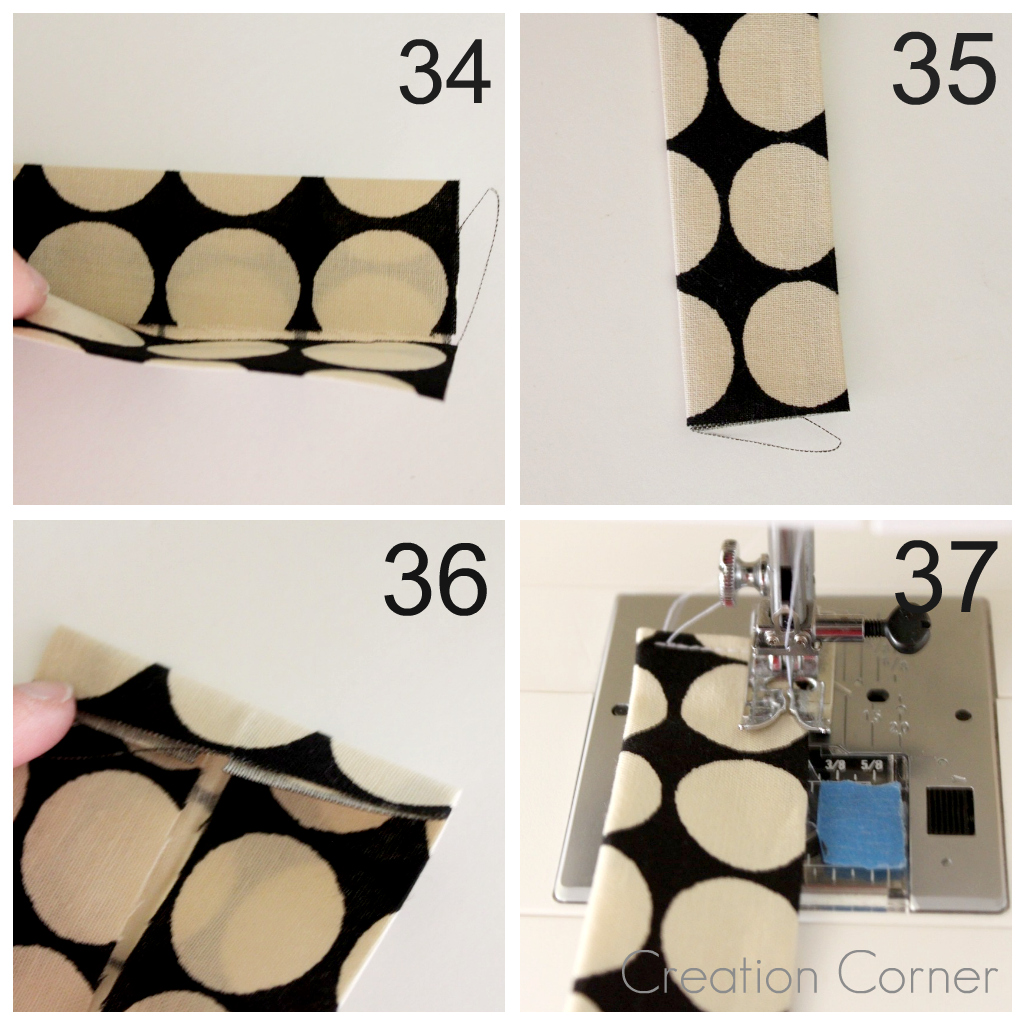
34. Fold it back up along the crease. Iron it down.
35. It should look like this.
36. Open up all 4 ends and fold down about a 1/4- 1/2 of an inch and iron it down. Fold it all back up and iron flat.
37. Sew along all the edges. Do this to both handles.
Sewing the Handles Down:

38. Mark the middle of each side with a pin. Then place your handles where you would like to stitch them down.
39. Place a pin in them and sew the handles down on both sides.
40. and 41. You are now done!!! Happiness!
It should look something like this!


Speaking of wow, Vanessa from Little Big Girl Studio is sharing a fantastic mini Boden knock off at Craftiness is Not Optional today- definitely go say hi.


Great tutorial! I will be making one of these for summer!
Hooray for Tasha! She's come up with another fantastic tutorial. Thanks for sharing!
Fabulous tutorial. I love all of Tasha's stuff she is so talented!!
I love it! This is going right on my must do list for summer. Thanks so much!
Oh I've got to find time to attempt this!!!
Thanks!!!
Seriously, wow! I want one! I love the fabric combo too.
I love this tote! It would make a great travel bag, too. Definitely putting this on my "to-make" list!
Stopping by from Craft Gossip. Have a great weekend!
Gorgeous bag! I love how big and roomy it is. Really nice.
I love this bag! I am linking back here on my little blog http://www.craftybalancing.blogspot.com
Love this bag!! I found it at the perfect time too, I was just wondering what I was going to do with the rest of the fabric I bought for a diaper bag that didn't work like it should have. Thanks so much for sharing how to make it!!
OMG! This bag is fantastic! Thanks so much for sharing the tutorial!
Thanks for the tutorial- the instructions were pretty easy, except for the straps (I don't have a serger so I think that made a difference). I made it through and now i have a gorgeous new big bag, and made a smaller version for my mother in bright spring fabric. We both love our new totes!
Well, I just wanted to let you know that I got one made. Yay! I deceided to just do the "pocket" piece on both sides instead of the "ruffle". I love my new tote…it's a big one!
This bag is WAY cuter than the Pottery Barn's version!!!! I definitely want to try it if I can find the time! I would like to make it as part of my niece's graduation gift, but I am not sure I'll get it done this month . . . we'll see! Thanks for the great tutorial! Can't wait to try it!
Oh my! Your bag is WAY cuter than Pottery Barn's! I would love to try to make that as part of my niece's graduation gift. Hope I can find the time to try it between now & the end of the month! Thanks for the tutorial! I can't wait to try it!
Awesome!! I absolutely LOVE this tutorial!! Now I have another thing on my big, overstuffed, to-do list. LOL! Can't wait to make one!! Looks like it would make the perfect shopping bag…carry coupon binder in the center, shopping list and other necessities in the outside pockets….YEP, I'll have to make myself one. 🙂
Very very cute!! Great job! If I were sewing, I'd be making myself one too!
How much fabric do you need to start with in each type of fabric? Where do you think is the best place to buy this type of sturdy fabric? Thanks!
IS there a printable version of your directions/pattern ?
Going to give this a shot .. thank you 🙂
Thank you so much for the tutorial. I am new to visit this site and am feeling very inspired.
🙂
Thanks Michelle- so glad you stopped by!
I looooooove it. My husband & I have 6 monkies(kiddos) so I may make 2 bags. Thanks for sharing.
Celsa- you NEED two of these. 🙂 How fun!
I made this bag today and love it! I linked back to you http://hollyannebrady.blogspot.com/2012/05/swimming-bag.html.
Ooooooh- LOVELOVELOVE! Way to go Hollyanne!
Awesome job, Tasha! This seriously does seem like it would be absolutely perfect for summer! 🙂 Great tutorial too!
Sky- isn’t it great? That Tasha- she’s so talented! 🙂
Love this bag! I just made mine last night, wasn’t hard at all! The longest part was just cutting out the fabric…thanks for the pattern!
Dawn, that’s so great! You should send a picture or two over!!! 🙂
Just wanted to share the bag I made using your excellent tutorial. This bag is huge and very useful. Thank you for making the tutorial!
http://thehandmadehomemaker.blogspot.com/2012/06/beach-tote-and-easy-chicken-recipe.html
So glad it’s been helpful- I bet it is perfect for summer!
I haven’t visited a blog before that requires an invitation. How does that work?
Love her bag, pins and bows.
Kimberly, I tried that recently as well and couldn’t get over there. No idea why (maybe I’ll email Tasha to check in). I love her too, though!
I can’t access creative creations. Does anyone know how to ask for an invitation?
Megan, I can’t get over there either! I don’t know what the story is!
Just wondering, can someone let me know the final measurments of this- just of the main body? I was thinking of doing this for my final in my sewing class…and as I am traveling with two toddlers from Scotland to Seattle over Christmas, I was thinking this would be a perfect carry-on bag. I just need something with lots of pockets, so would probably do them on both sides instead of the ruffle. Thanks.
Hey Angela, I don’t know what the finished measurements are (and Tasha’s blog is no longer public). When I make bags, they end up being an inch smaller than the cut out dimensions.
I think this would be a great carry on bag, by the way! 🙂
I can’t wait to make this into a bag for carrying my little ones things.. 🙂 Thank you for this pattern .. Others cost.. You are awesome 🙂
Sure! It really is the perfect summer bag… 🙂
Wow! what a great bag! I absolutely adore the fabric you selected! You have awesome taste…. 🙂
hugs x Crystelle
Crystelle Boutique
Awesome bag – roomy & with lots of pockets! I love the fabric design & colours, too! 😀
Привет я впервые на форуме , как тут поживаете
It is beautiful I have been searching and you supplied the pattern.
Thanjk you
I’m going to try my hand at this bag. I plan on making it a tad smaller all the way around and adding pockets on both sides, inside and outside, and a zipper closure. Omit the ruffle. Thanks for the tutorial.
Sounds awesome!
Gonna give this a try! After hours looking for the “perfect pattern” I found this!
Thansk!
Awesome Bag!
I was just dreaming of making one. Thanks for the great tutorial.
I have a question for you. I am wanting to put grommets on the bag with a soft twisted rope, however, I cannot find rope that is soft unless it is 3/4″ wide which is too wide. Any ideas?
Thank you
Carolyn
Carolyn, could you use larger grommets? I haven’t seen the softer rope in a smaller width, but perhaps larger grommets would work???