
how to make a custom stamp (and a feather stamped pillow)
As an Amazon Associate I earn from qualifying purchases.

Our lovely guest of the day, Cherie from You & Mie, is amazing, y’all. Just a few of her projects that I am smitten with (though it’s hard to choose)- her mini boden jacket knock-off, the oh-so-stylish color blocked tank top, the faux leather clutch remix and the most fabulous of all Fantastic Mr. Fox film petite dress.

Hello! My name is Cherie from you & mie and I’m so excited to be here today! I love the beauty of winter and this series is the perfect way to celebrate it. So today I have a simple and elegant throw pillow to add a little of that winter beauty to your home.
 The pillow cover is a simple cotton/linen envelope style pillow, but the real character is from the hand carved feather stamps and the gorgeous metallic paint (unfortunately, I wasn’t able to capture the shimmer in my photos, but trust me, it’s lovely)!
So I’m going to walk you through carving your own stamps and printing fabric, if it’s something you’ve never done before. I looove carving stamps and you’ll find that once you start, you’ll be addicted! You can use it to personalize any fabric or paper projects – the possibilities are endless!
So let’s get started.
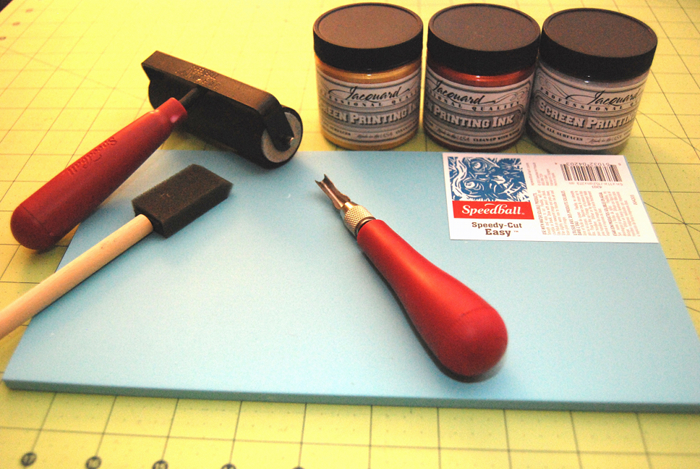 You’ll need:
– a carving block (I use Speedball Speedy Cut because it is soft and readily available)
– carving tool/linoleum cutter
– fabric paint (more on that below)
– paint brush or foam brush
– rubber stamp ink
– brayer (totally optional)
– fabric (about 3/4 yard)
– newspaper or magazine to protect your work surface
(all the stamp carving materials can be found at fine art supply stores)
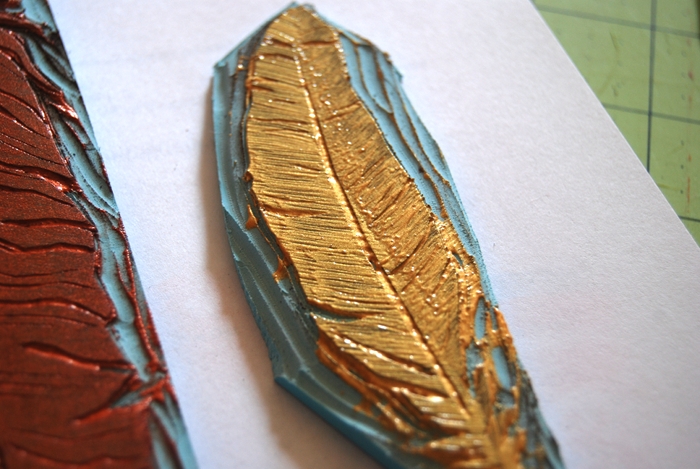
 I used these gorgeous Jacquard Screen Printing Inks in cooper, gold and silver because I could not resist their beautiful colors and shimmer. This paint can be used for screen printing, but can also be painted on. There are plenty of other fabric paint options out there, but be sure not to use any of the “dimensional” paints and also look for paints that say “soft.” Many fabric paints dry stiff and scratchy. Another option that I haven’t personally tried, but I’ve heard great things about is using a textile medium to turn any acrylic paint into a fabric paint. Be sure to read and follow all directions carefully for whatever paint you’re using.
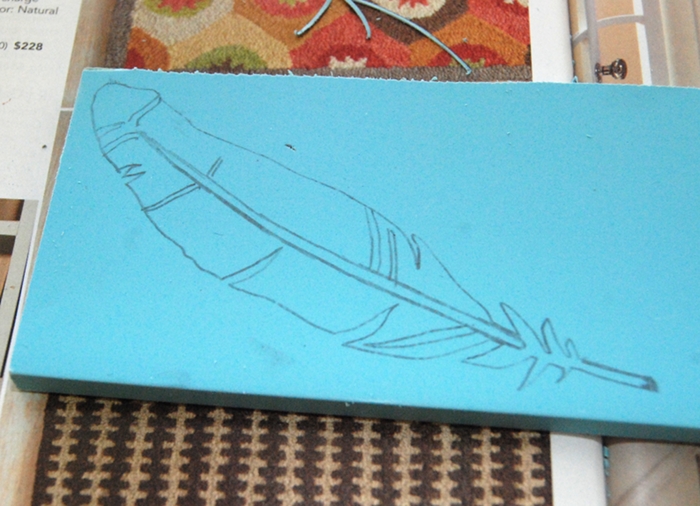
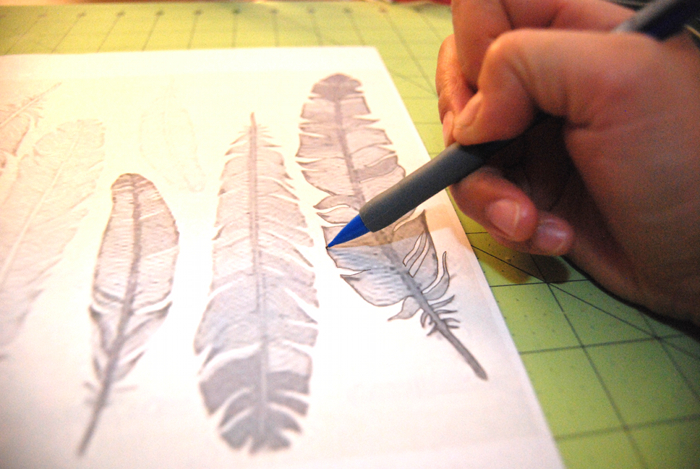 Find an image you want to use to carve your stamp, or draw one freehand. For a project like this, search “feather silhouette” for tons of images to get you started. Using a regular pencil, trace the outline of your image.
 Color in the image, just the way you want your stamp to appear.
 Cut your image out and place it face down on your carving block.
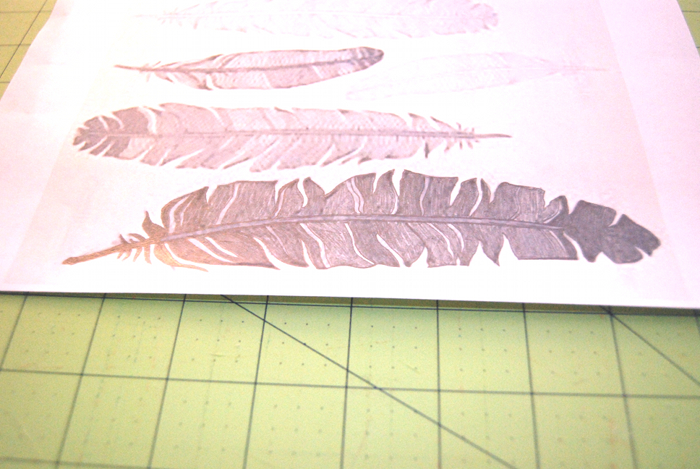
 Using your pencil, shade over your drawing making sure to get all the edges of the image. As you apply pressure to the paper, the lead from your feather drawing will be transferred to your carving block.
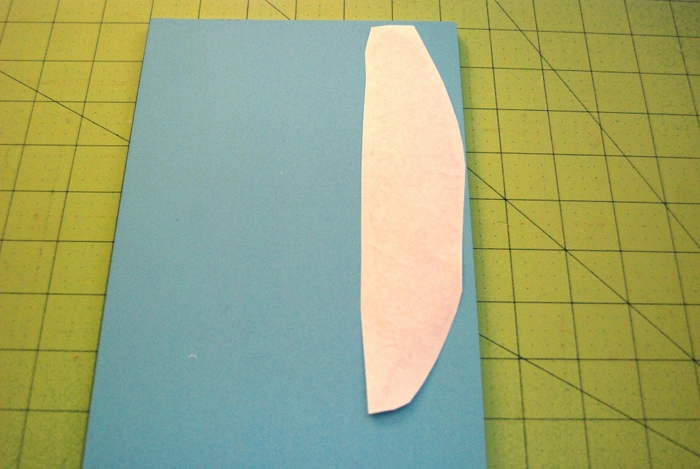
 Cut the carving block down close to your image.
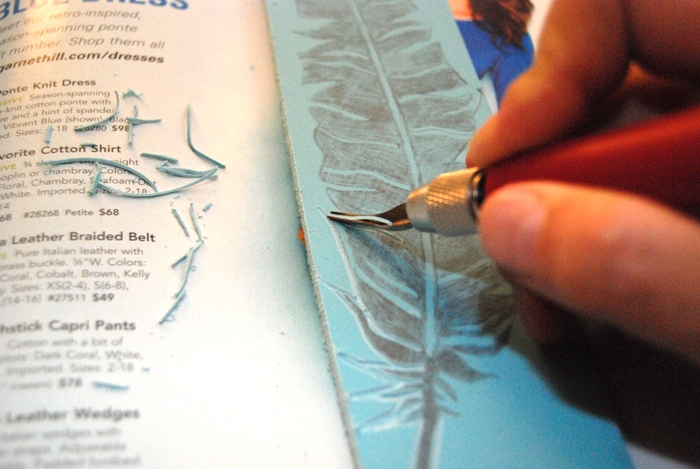
Now time to carve! Here are some tips:
– Always cover your work surface to protect it from your carving tool.
– When you carve, don’t dig deep – push your carving tool parallel to the surface. Not at a downward angle – sideways.
– Always push the carving tool away from you, not towards your body.
– Start with a fine nib and carve around the outside of your image. Try to carve away from the center of the image towards the outside edge of the stamp.
– Remember to carve conservatively. You can always carve away more if you need to, but once it’s carved, you can’t put it back.
– When you start moving into larger areas that need to be carved away, switch to a large nib.
Once you’ve carved the outline of your image and the area around the image, go back and do all the details on the side of your image. Start with the feather “vein” first, then the rest of the lines.
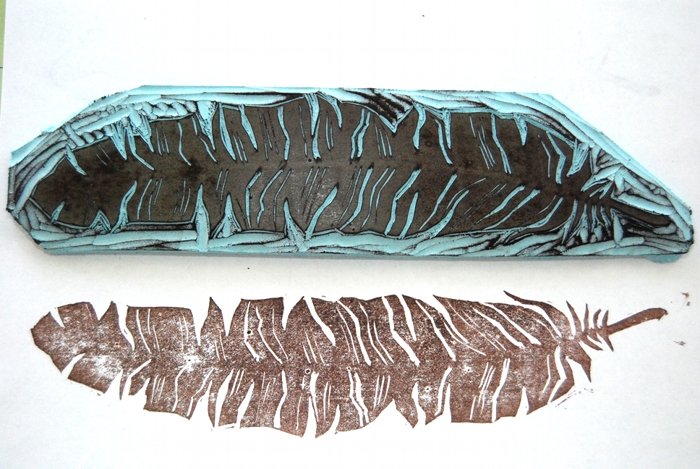
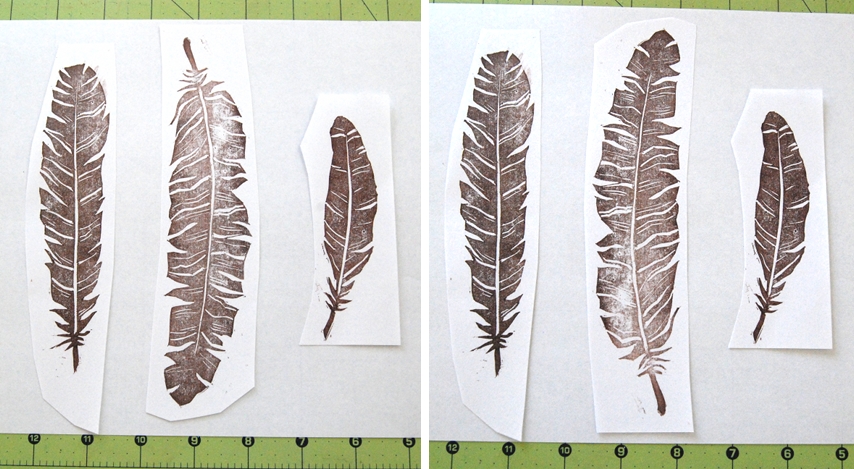
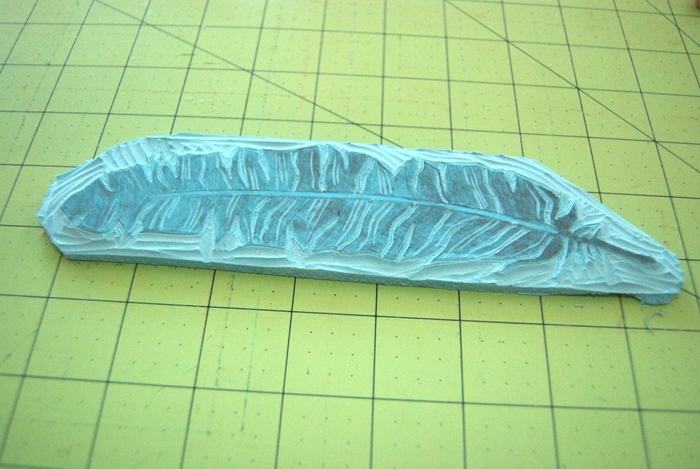 Once you have finished carving, test it out on paper using rubber stamp ink. This is my absolute FAVORITE part of the whole carving process. I like being able to see the image for the first time.
 I realized that I had forgotten to carve out the center vein of the feather. Often, there are areas around the outside edge that need to be carved down, and other details you want to add or enhance. Continue to carve and test until you’re completely satisfied with your stamp!
I made three different feather stamps, but you can stop with just one if you want. Once you feel more comfortable with carving images, you won’t have to spend as much time with the first few steps and transferring too much detail from your original image. By the third feather stamp I made, I just barely outlined the shape of the feather and a few details and carved the rest as I went along.
 After I finished my stamps, I used my paper tests to play around with formations a bit.
 Now you’re ready to print on fabric!!
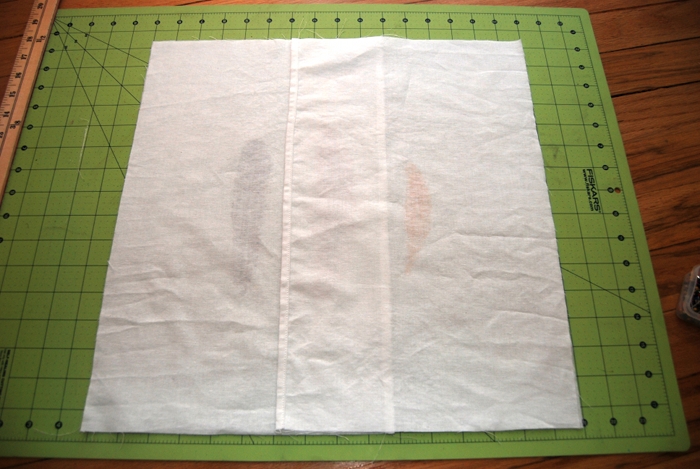
My pillow is 16×16 inches, and I like to make my covers fit nice and snug, so my finished pillow cover is 15×15 inches. In order to make a 15×15 inch cover, cut one square 16×16 inches (to allow for a 1/2 inch seam allowance) and for the envelope back, you’ll need two rectangles that are 10.5×16 inches.
You’ll definitely want to practice on some fabric before you go for the real deal, and I’d recommend using the actual fabric you are going to make your pillow out of since each fabric (with different textures and weaves) will pick up the paint different.
Normally, using a brush to apply paint to your stamp has a huge disadvantage. You can see the brush strokes in the printed image – so you end up with a streaky or stripey image. But for feathers, this is actually a huge advantage! Using your brush, apply the paint to your stamp and be sure your brush strokes go in the same direction of the feather barbs.
 As you test your stamps on fabric, play around with the amount of paint to use and how to apply even pressure to your stamp so that you get the image you want. Usually, a brayer is used to apply paint evenly to stamps, but for this project, I used it to apply even pressure to the back of my stamps while making the impressions. If you don’t have one, just use your hands to apply pressure. Carefully peel away the stamp to reveal your stamped image!
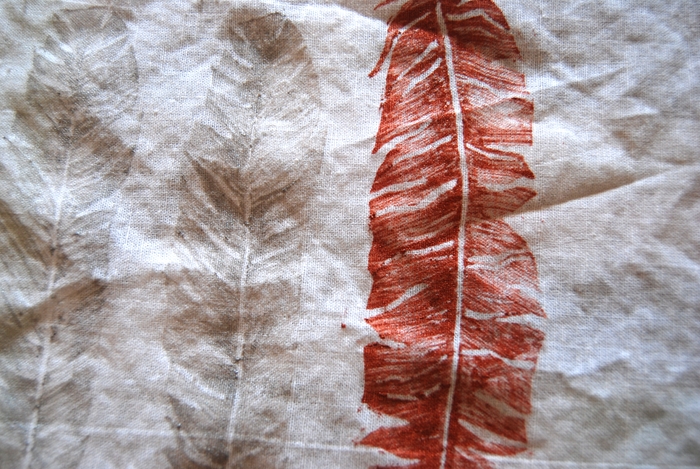 Look at the detail you get from those brush strokes!!
It helps to have extra fabric for this project in case the images don’t come out the way you want them to. I ended up printing mine 3 times and I’m still not totally satisfied with it! 🙂
Once you have your stamped fabric, make sure to read the paint directions about drying time and possible heat setting.
To clean your stamps, wash them with warm water and pat dry. I like to store them in a plastic container or baggie. They can be used again and again, but the rubber can break off, especially small details, so be gentle with them!
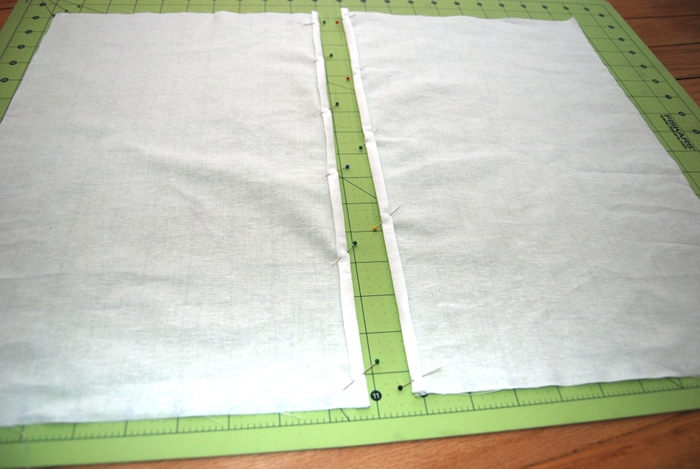
To sew up your pillow cover, take the two rectangular pieces of fabric and hem up one 16″ side for each piece. To do this, fold the fabric towards the wrong side about a 1/4 inch and press. Fold it another 1/4 inch and pin. Sew along the folded edge.
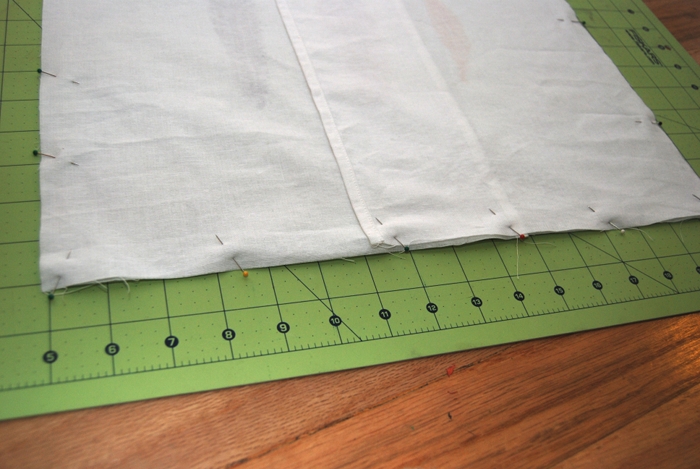
 Place the front pillow cover piece (the stamped square) right side up. Lay the rectangles, right sides down with hemmed edges towards the center of the pillow, lining up the outer corners.

 Pin around the entire square, sew using a 1/2 inch seam allowance and turn it right side out through the envelope opening.
 You’re done!
Now stuff your pillow form into your cover and enjoy.

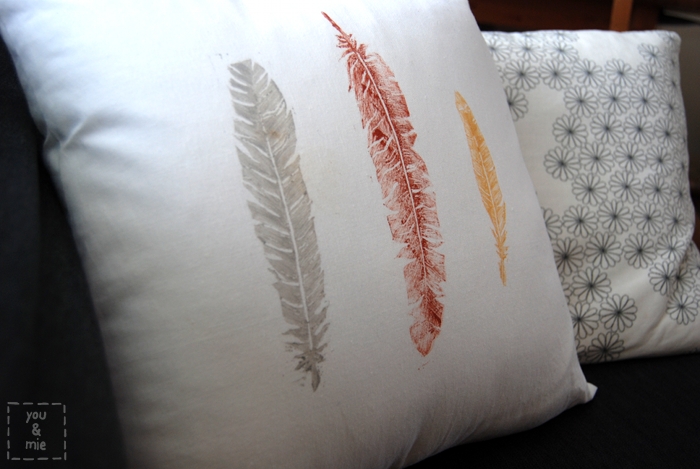 And now you have some beautiful feather stamps that can be used over and over again! I can definitely see this print on some linen napkins or a shirt – even some framed wall art. Like I said, the possibilities are endless!
Hope you can add some winter beauty to your home. If you have any questions or just want to pop over to say, “hi,” you can find me at you & mie. I also love to see your creations, so if you use this tutorial, feel free to add it to the you & mie flickr pool!
Thanks so much for having me, ladies!!

 |
 |
 |
 |
I am in LOVE with this project! I got addicted to stamp carving in December and carved some super fun stamps, but feathers are amazing!! So simple looking and sweet. Love it!
PS: K, you’ll be getting an email from me later today…gotta take pics of the finished product and I ran out of light yesterday…you know how that goes. 🙂
Alicia, isn’t it great? Love the project, love Cherie (she has such a great eye for design!). 🙂
And totally understand waiting for light. 🙂
This is gorgeous! I love the idea of making your own stamps & this makes it seem attainable and do-able! Thanks!
Meg, totally with you. Can’t wait to try this myself. 🙂
This is gorgeous!! What a great result! Also, you have the patience of a saint carving feathers into your carving blocks! They look fantastic.
Great job!
Isn’t it fantastic??? Oh my.
Cherie does it again! So beautiful my friend. Block carving looks like fun. I’ll have to give it a go!
Isn’t it fabulous? Love Cherie, love the pillow!
Thank you so much for inviting me to be part of your series! I really had fun with this project and am super psyched that I can use these stamps over and over again. Awesome series, ladies. Thanks again!
How much did I just learn in this post ?~! Thank you, Cherie, for this fabulous tute. The simple directions for the pillow cover won me over !~! I need to go find Cherie’s blog and read read read it, many thanks.
These are so beautiful. I love birds and feathers!
Sabine- YES! Especially metallic feathers- so pretty!
Very artistic! I love the gorgeous metallic paint. You rock, I adore it!
Isn’t Cherie talented? Can’t wait to try this out!