
blue tutorial- vintage aqua pillow case
As an Amazon Associate I earn from qualifying purchases.
 Today’s guest, Ashley from Mommy by day… Crafter by night, is one of our favorite girls! She always has fun things going on (like So You Think You Can Sew earlier this year… and her current Zig Zag Quilt Along), she makes great stuff (love this kindle cover and this messenger bag), and I love seeing her holiday ideas (loved her Valentine’s Day lineup in February). I had the opportunity to meet Ashley at SNAP (when I met Rach, incidentally- the two of them are BFF in real life) and adore her. Fun fact- her hubby is in dental school currently- so we bonded over Board Exams, etc.
And we love it that, today, Ashley is here sharing a tutorial using her fave color (and mine!)- aqua!
Hi Kojo-Design Readers!!!

I am Ashley and I blog over at Mommy by day… Crafter by night. I blog about all of the crafty adventures I go on while my kiddos are asleep at night!
I had the opportunity to meet Kirstin at SNAP and I LOVE HER! She is so fun and such a sweetie! So- that being said, I am so thrilled to be here to share a fun tutorial with you all for the Color Your Summer Series!!
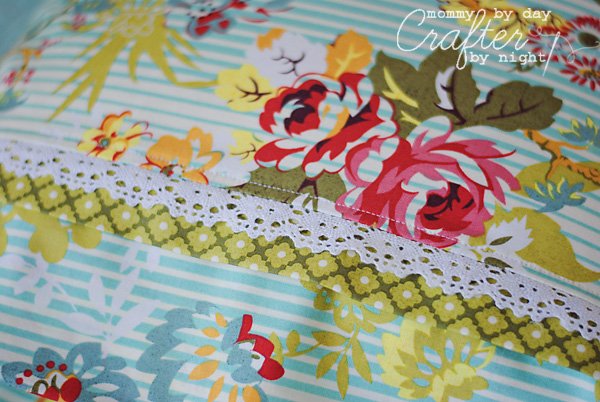
I chose the color Aqua Blue. It is by probably my very favorite color in the whole world! I also love all things vintage. So I thought I would combine the two and came up with this fun Vintage Lace Pillowcase Tutorial.

While I was home visiting last month, I had the opportunity to raid my grandma’s sewing stash full of vintage treasures. I even inherited a vintage robin egg blue sewing machine. Among the boxes and boxes full of notions, I found an entire box full of vintage lace. I had never really sewn with lace before but it was so beautiful to pass up, so I grabbed pretty much all of it.

When I got home and started brainstorming what I wanted to make for my tutorial to share today, I got thinking back to my childhood days of going to summer camps. At almost every camp I attended, I was presented with a fun homemade pillowcase to use for that week. Each time I used the pillowcase, it was such a fun reminder of the adventures I had that. {I still have a handful of the pillowcases- although they are ratty with years of use now}

So I thought it would be a lot of fun to make each of my girls a fun summer pillowcase. With my love of vintagey things, I wanted to use some of the old lace and pair it with a vintage feeling print. For this project I used the Blissful Fashionista fabric from the Hello Luscious line by Basic Grey for Moda. I love this fabric. I think it looked perfect with the old vintage lace and my little girl loves it- especially since it has “Great Grandma Betty’s” lace on it! 🙂
So here is how I made it…
SUPPLIES:
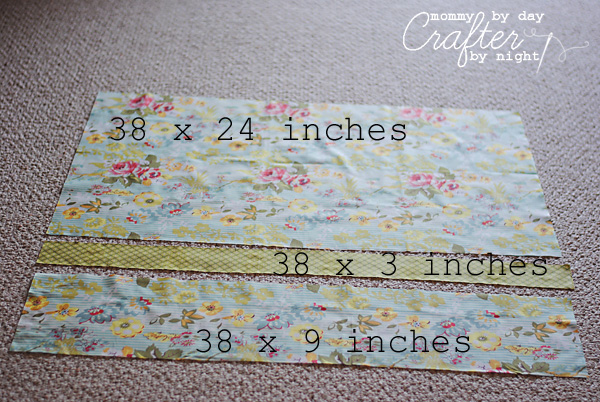
– 1 yard main fabric
– 38 x 3 inch strip of contrasting fabric
-38 inches of lace (I used 1 1/4 inch wide lace- you can use any size you want, but if you decide to use wider lace, you will need to adjust the width of the contrasting fabric to make it wider than 3 inches so that the lace will fit on it)
Cutting your fabric:
With the yard of fabric, cut one piece that is 38×24 inches and then one piece that is 38×9 inches. For the contrasting fabric, cut a strip that is 38×3 inches. And then you will need your 38 inches of lace.
Once your fabric is cut, you are ready to start…
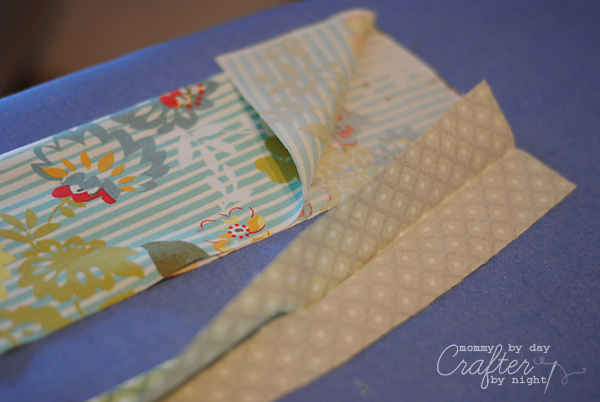
Step 1: Take both the 38×9 and 38×3 inch pieces and fold them in half and press with your iron.
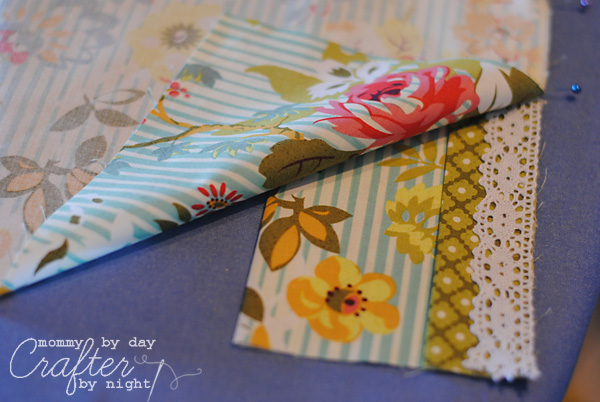
Step 2: Lay the folded contrasting fabric on top of the folded main fabric (raw edges to the right side) and then lay your strip of lace on top of the contrasting fabric.

Step 3: Next lay your 38×24 inch piece on top of the lace/contracting fabric/fabric cuff right side down and pin.
Step 4: Sew along the pinned edge (using a 1/4 seam allowance). After you are done sewing along that side, zig zag or serge along the raw edge to prevent it from fraying. (sorry no picture for this step)
Step 5: Open up the fabric and press with the seam going towards the inside of the pillowcase. Then top stitch on the right side of the fabric to hold that pressed seam down and give it a finished look.
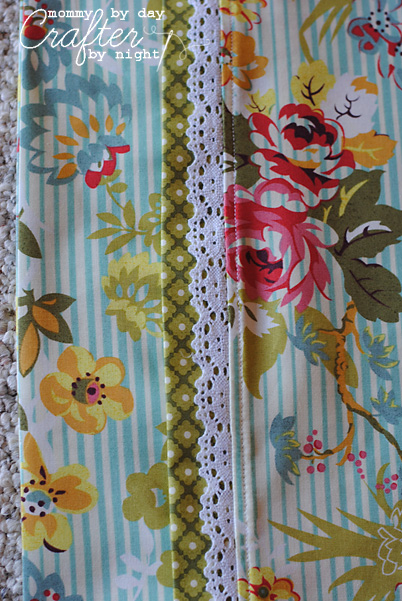
Step 6: Next, fold your fabric in half right sides together. Be sure to line up the lace trim on the sides. Now pin edges together and then stitch along the edge. After you are done stitching, zig zag or serge the edge to prevent from fraying.
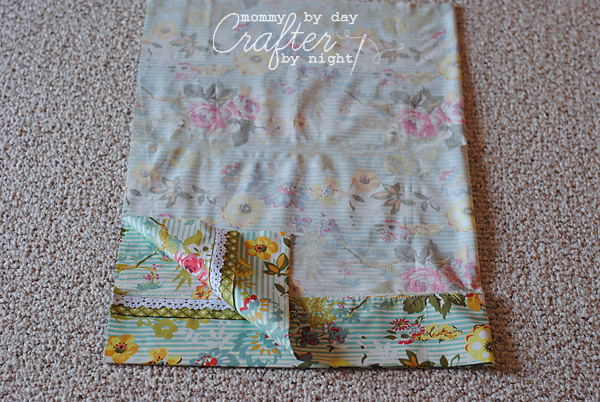
Step 7: Turn your pillowcase right side out and press.

That’s it. You are done. Now you can enjoy your fun summer pillowcase!

Thanks so much for letting me come visit! Hope you all have a fun summer full of COLOR!! Feel free to stop by my blog, follow on Facebook, Twitter, or Pinterest and say hi anytime!! xoxo, Ashley
 Love the blue (and LOVE the way she incorporated her grandma’s lace into something for her girls!). For more blue goodness, head over to delia creates for a blue hooded poncho towel today!
what a great idea! I have plenty of hand tatted lace made by my grandma and great-grandma that is just taking up space in a box in our bathroom closet. With our white duvet this tutorial will allow me to make the perfect pillow cases for our bed!
Thank you for sharing!!
Love that- you’re right, that’ll be perfect with white!
Thanks so much for letting me be a part of this summer series! Had so much fun making this!! xoxo
So cute! Great job Ashley. That fabric is gorgeous!
Isn’t it??? LOVE! And love your blue towel, btw. Your boys are so cute!
Beautiful! Love the tatted lace.
Me too, Robin! I love it even more that it’s from Ashley’s grandma’s stash (I need to find one of those!). 🙂
How pretty! I think I’ll be following this to make pillow cases for Reese’s room!
YES you definitely need some. Oh sweet Reese! 🙂
So fresh and fun! Perfect for a summer nap.
Seriously. 🙂