
make your own sewing blocks
As an Amazon Associate I earn from qualifying purchases.
 I have to admit, hosting a Sewing for ME! series was a little (or a lot) because I knew that there would be so much I could learn from a series like this. And I have not been disappointed. Today’s post by Ashley from Art with Ashley about how to make your own pattern blocks is right along those lines- helpful, useful, beneficial information that I can use to sew for myself.
 Hello all!!
I am so excited to share something new with you this week.
When Kirstin asked me to participate in this series I was kind of freaked out.
Since I haven’t been sewing for very long I have found out that there are some crazy learning curves with sewing. I thought I might pass along one of the most helpful tips, I have recently found, for making dresses.
Today we are going to talk about how to make your own sewing blocks.

Step 1: Start out with a piece of clothing that fits you really well!! It should be an article of clothing that is a similar fabric to what you will be working with in your finished garment. I chose a jacket that had a pieced bodice.
Step 2: Turn your article of clothing inside-out and smooth out any wrinkles. Make sure you flatten the fabric down around any seams.
Step 3: Grab some tabloid sized paper (11in x 17in) or any other large sheet of paper on hand. Tracing paper will also work wonderfully. Have a ruler handy as well!
Step 4: Select the part of the clothing piece that you will be copying first. Make sure all your seam lines are smooth and visible.
Step 5: Place your paper on top of the area you are copying.
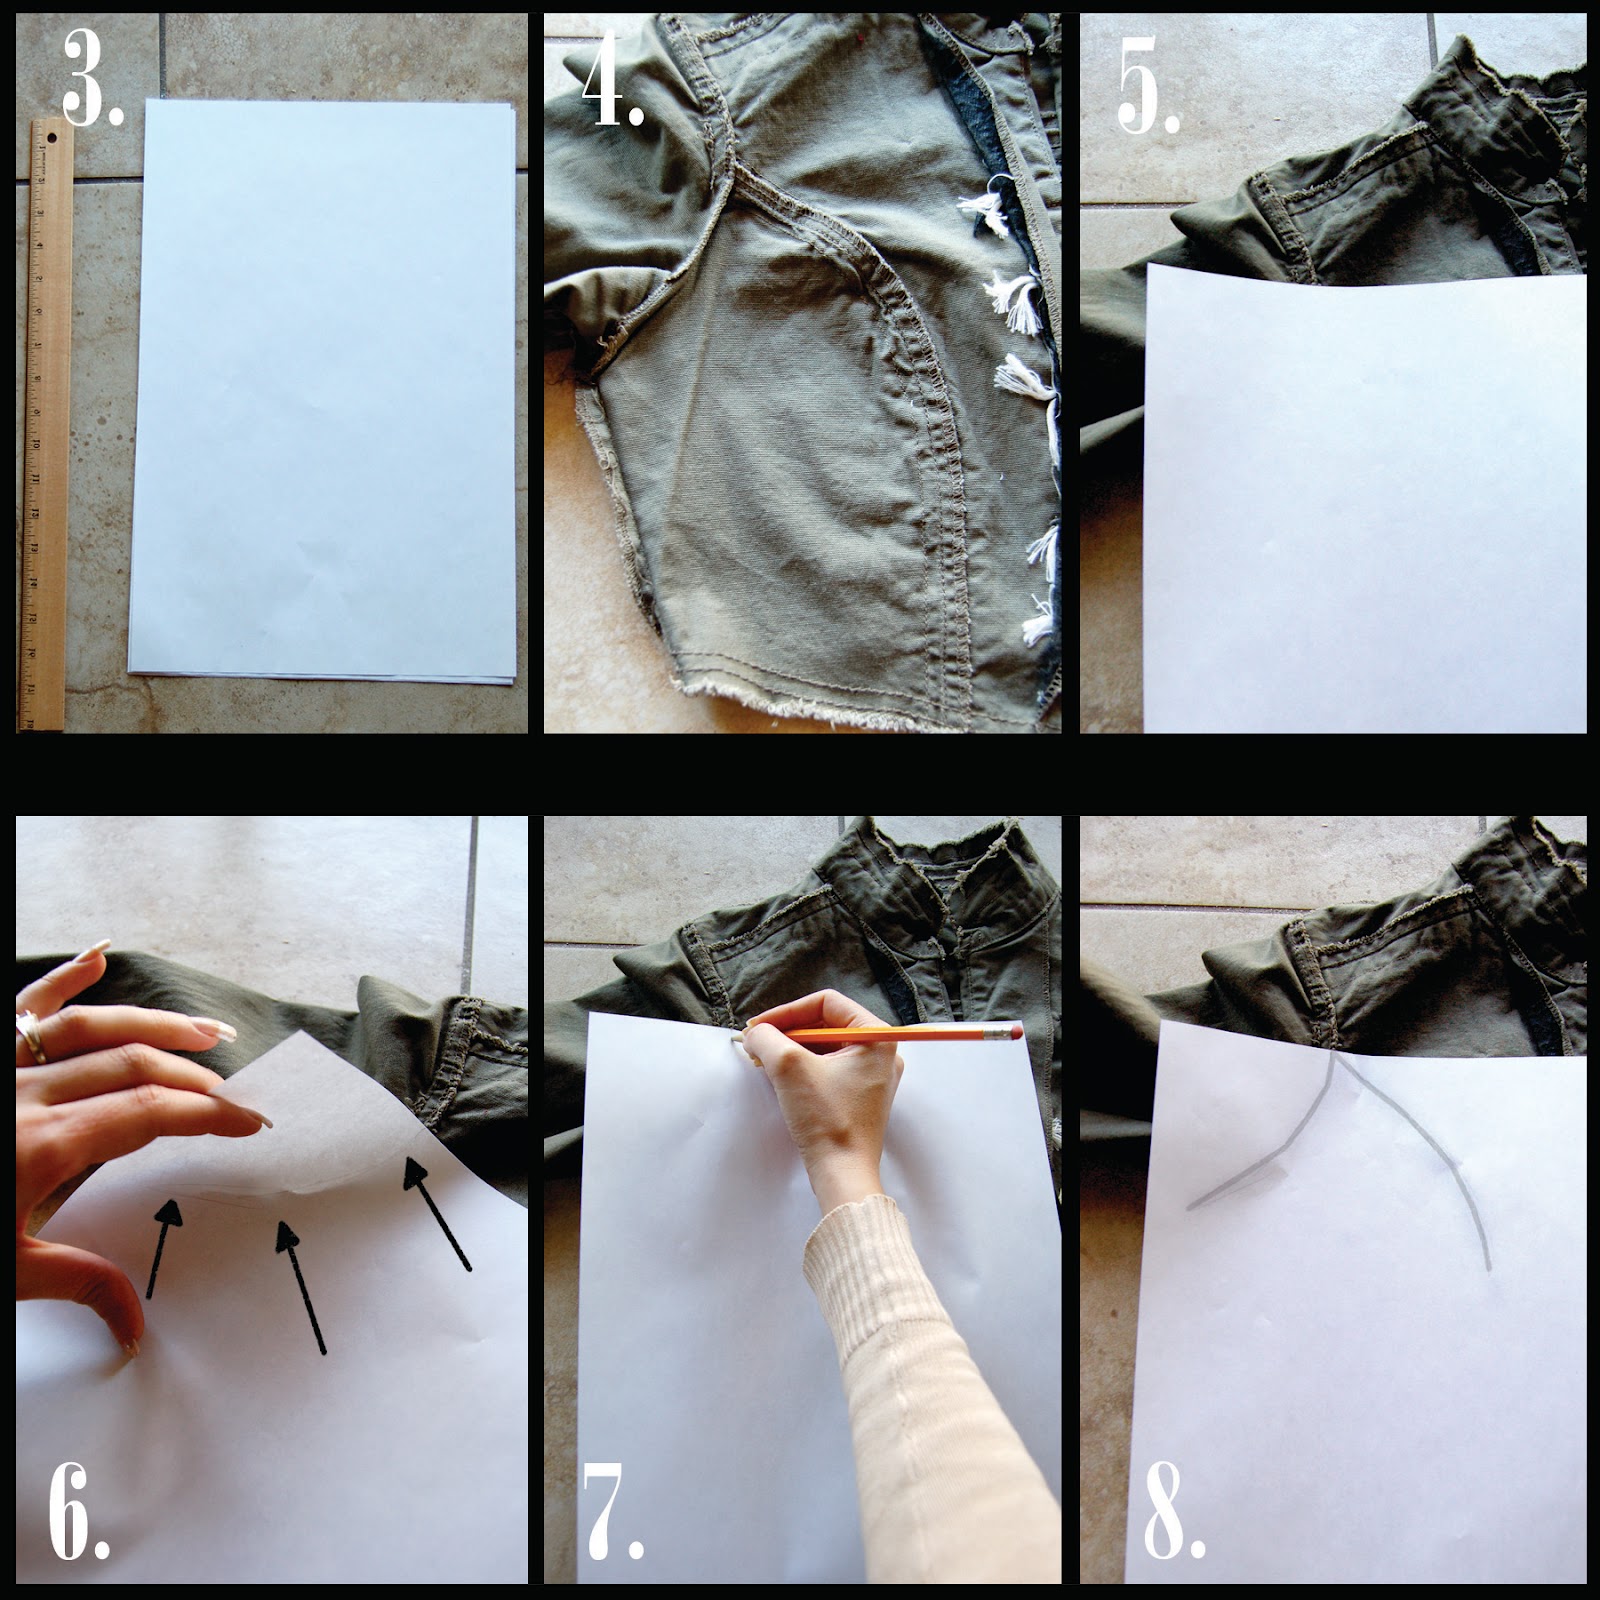
Step 6: Try and do this next to a well lit window so that you can see the clothing under the paper.
Step 7: Now slowly follow the seam of the clothing. (If you have ever done a texture rubbing with your kids, this is kind of the same thing.)
Step 8: Take your time and make sure you are tracing the outside edge of your seams.
Step 9: If you carefully lift the edge of your paper up you can see if your line matches the same curve as the seam.
Step 10: Continue tracing the outline until you have gone all the way around your pattern.
Step 11: Now you can move your paper to the side
and see if they look the same.

Step 12: Pull out your ruler and measure the seam allowance on the clothing. For this pattern it is about half an inch.
Step 13: Measure and mark the same seam allowance on your own pattern. I like to make mine with little dashes to indicate a seam line.
Step 14: It should look something like this.
Step 15: Cut out your pattern and place it on top of your clothing. It should match up perfectly.
Step 16: After you have confirmed that your pattern is correct, make small pencil markings around the curved edges of your pattern.
Step 17: Cut out tiny triangles on those marks but DON’T go all the way to your dashed line!

Step 18: It should look like this.
Step 19: I like to fold my pattern on the dashed lines to make sure I don’t need to add any extra triangles. It’s also a good way to make sure your pattern is right.
Step 20: Give your pattern a label.
Step 21: Now you can move on to the center piece.
Step 22: Flatten your seam lines out completely.
Step 23: Place your paper on top and sketch away.

Step 24: When you get to this point mark the middle of your garment.
Step 25-26: Using your ruler, draw a straight line down the center of your paper.
Step 27: Now you are ready to draw your curve. Since you already created your curved panel pattern, place it on top of your other paper (matching up the underarm area)and draw your curve.
Step 28: It should look like this.
Step 29: Add your dashes for your seam allowance.

Step 30: It should look similar to this.
Step 31: Cut out your pattern, including your triangles.
Step 32: Place both patterns on top of your garment and make sure they match up correctly.
Step 33: Flip your clothing item over.
Step 34: Using your ruler, find the widest part of your garment.
Step 35: Place a small chalk mark to indicate the center of your garment. (Since we will be folding our fabric in half we only need half a pattern since this will be symmetrical)
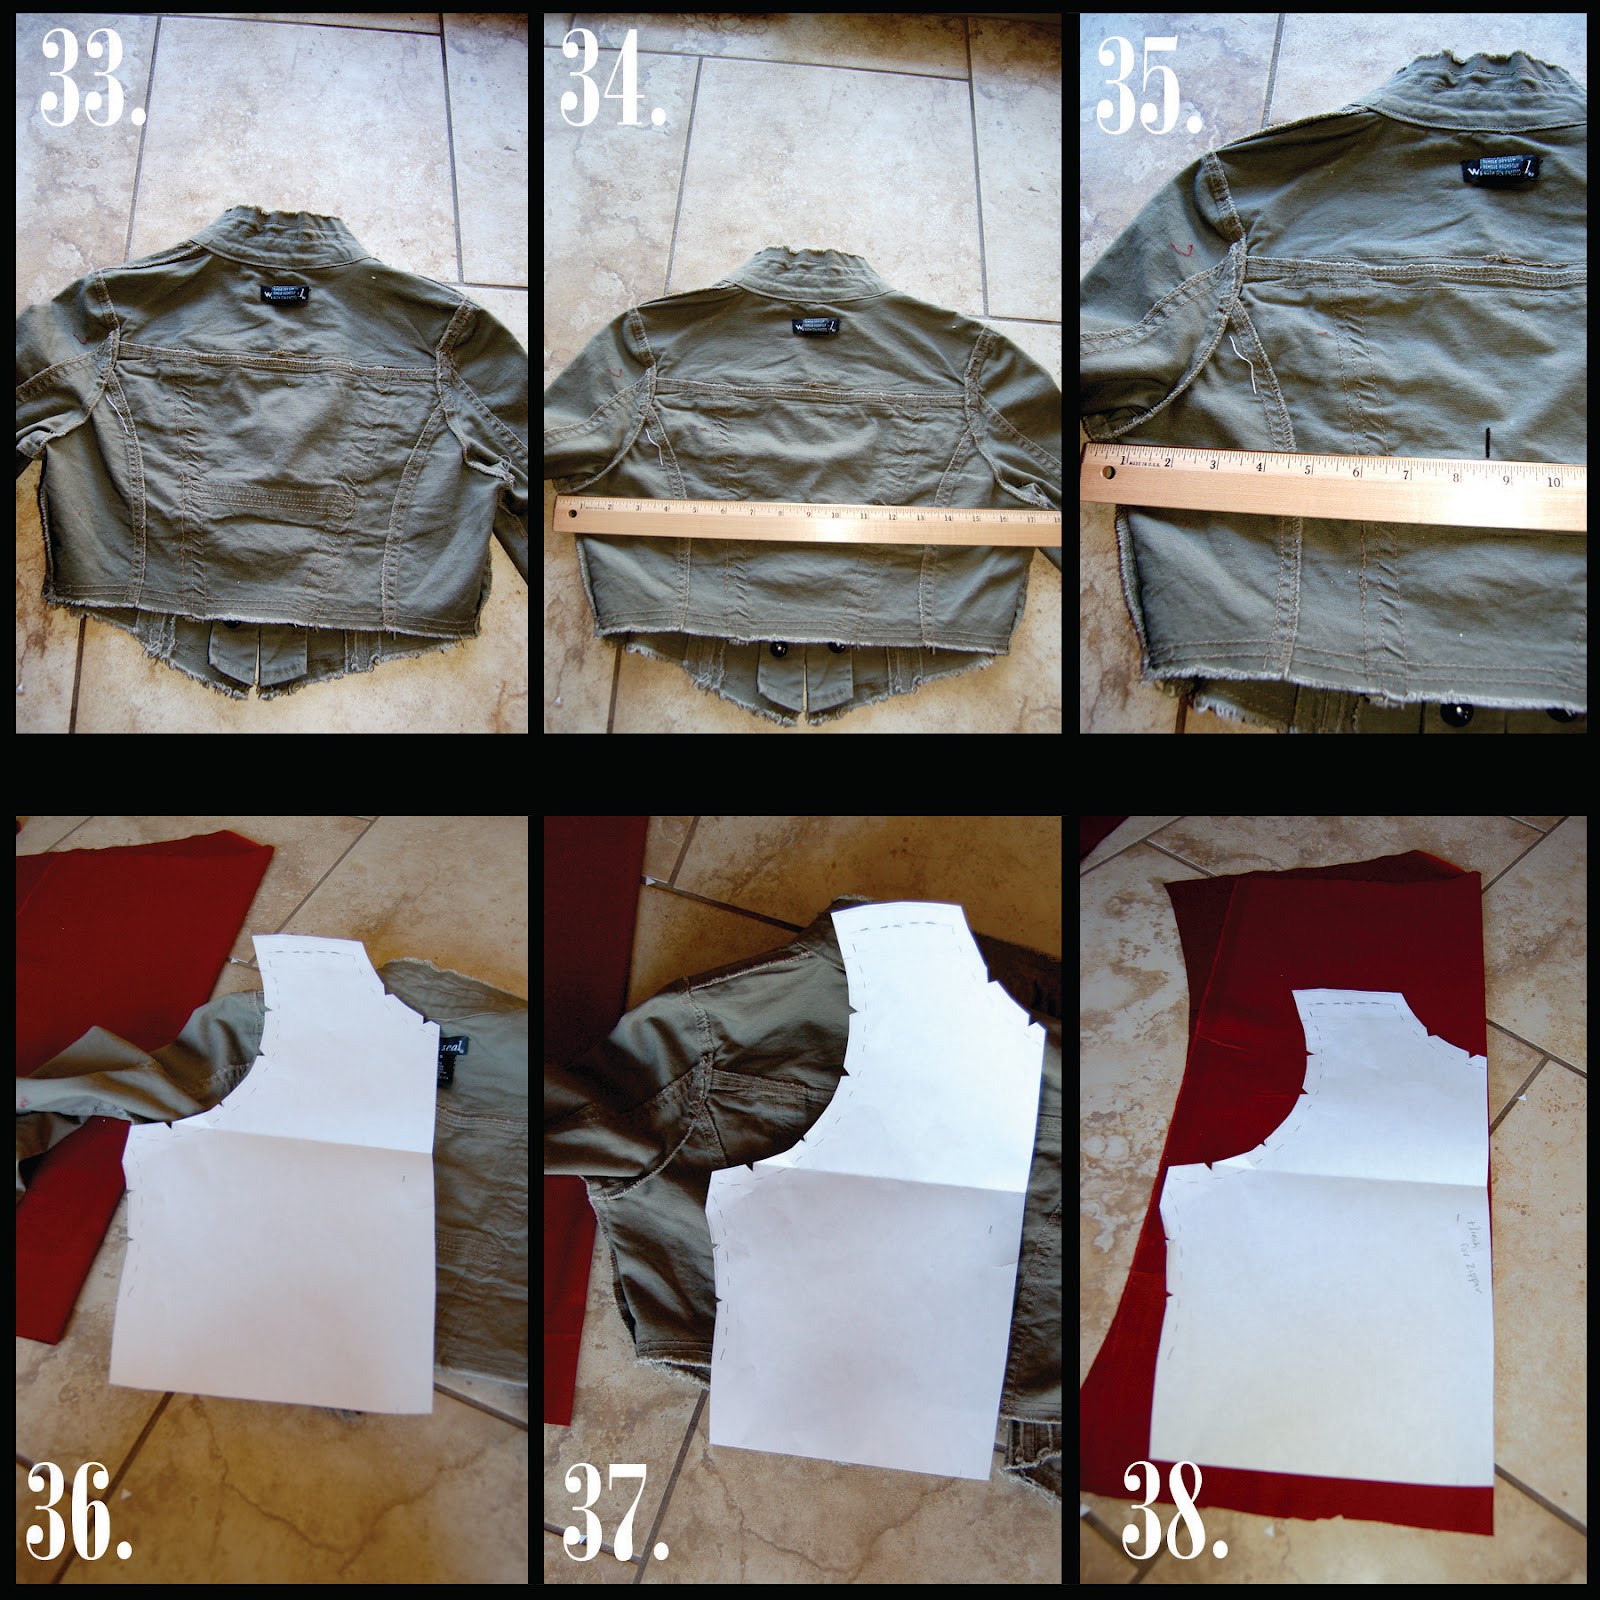
Step 36: Do the same steps as listed above. Only this time add an extra inch to the center measurements. (This will help us put in the zipper more easily)
Step 37: It should look like this.
Step 38-44: Fold your fabric in half with the wrong side facing out. Chalk your lines and cut out your pattern.

Step 45: Now you are ready to pin your pattern fabric together.
Step 46: I pressed my seams open to make pinning everything a little easier.

Step 48: Here is the back portion.
Step 49: Pin in a few places and cut in half down the center.
Step 50: Run a basting stitch down the two pieces and press open. (Now your ready for a zipper)
Keep your basic pattern blocks and mix and match sleeves, necklines, and skirts. Here are two of the dresses I made using this basic block!

I hope you have learned something new. I know that I did.
Thank you so much for having me Kojodesigns and No Man’s Land I am excited for the rest of the Sewing for ME series!

Isn’t Ashley fantastic? Head on over and check out the goodness at Art with Ashley! Be sure to go check out a few of my favorite projects that she’s made- the leather and lace dress (totally making one of these this summer!), the alligator skirt, her refashioned top and skinny jeans, and this Shabby Apple knock off dress. Talk about Sewing for ME! fabulousness- wow!
And don’t forget to stop by Sewing in No Man’s Land for more Sewing for ME! fabulousness today!


thank you so much! this post is gorgeous!
Thanks- Ashley is so talented! 🙂
This is an excellent tutorial! Thanks so much for sharing.
Great tutorial- but what about grainlines?
very interesting. thanks for that, makes it look very easy, will give it a go.
Wow this is really awesome. I’m really new at sewing and this helps a great deal.
Wendy- isn’t it great??? Super helpful to me too! 🙂
Wow – great job describing the process you use. I am a new sewer on a tight budget – and you’ve really inspired me to use (well fitting) pieces I already have as templates for future garments. Thank you!
Lisa Marie, love it that you’re starting sewing! And I love using my own clothes (esp ones that I already know I love the fit) to make new clothes. Ashley’s blocks = such a great idea to help with this! 🙂
Love this!!!
Was just a bit confused on one thing. Should’nt you be adding the seam allowance from the traced piece (around the outside) instead of in the inside. It seems to me that would be making the traced (fitted) pattern piece that much smaller.
Thanks for the tut, you’re awesome!
Encontré lo que buscaba, excelente . Gracias