
aqua chair redo tutorial (how to reupholster a tufted chair)
As an Amazon Associate I earn from qualifying purchases.

My search for a perfectly girly chair for Piper Jane’s nursery was long and tenuous. In fact, while I patiently waited for the right chair, I temporarily repurposed one of our living room chairs to Piper Jane’s room.

However, when I laid eyed on this gem at Mile High Thrift (my favorite thrift store in Denver), it was love at first site. Ok, well, actually, more of love-of-possibility! Even though the chair was a little beat up, and the green velvet was hideous, and the seat was super uncomfortable due to some crazy springs and a worn cushion, I could envision it redone in aqua linen and was smitten.

But the first time I saw it, it was still $40. So the answer was nope. Imagine my delight when I went back a few weeks later and The Chair was still there- but marked down to $15! And then my even greater delight when I checked my go-to for linen on etsy and Nicole was having a sale- the turquoise linen was $3/yard (it’s $4/yard now- still a STEAL). Me and this little chair were meant to be!
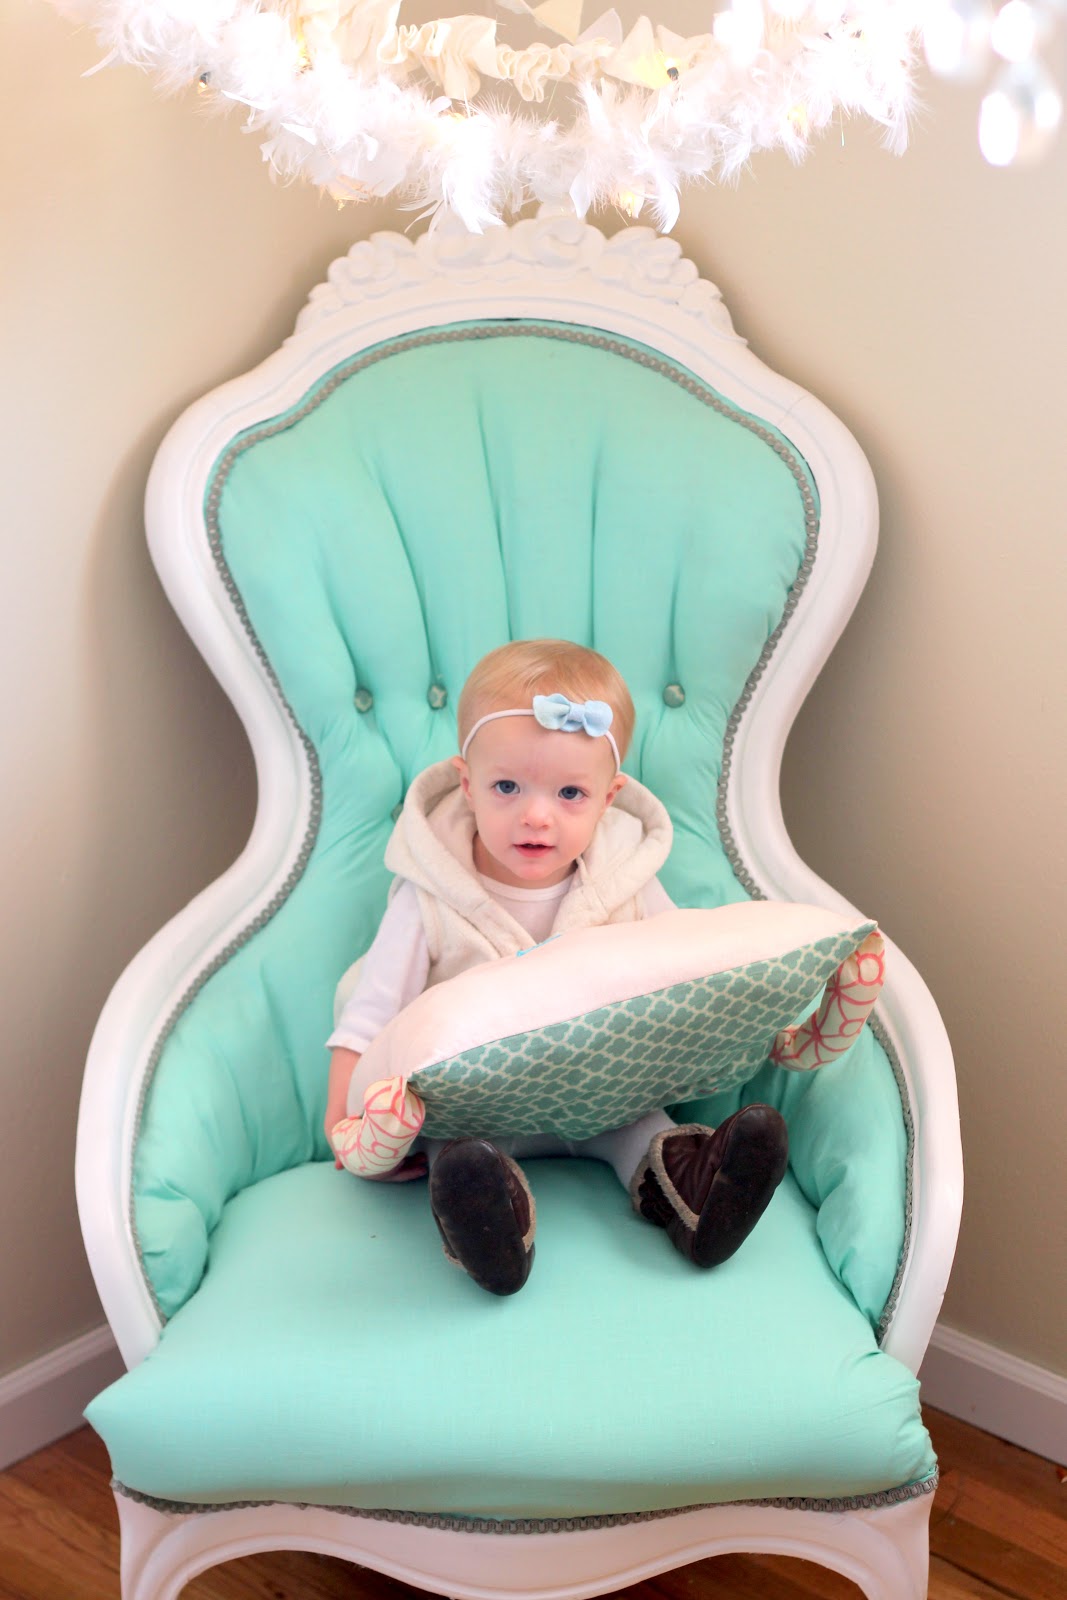
Isn’t she pretty all fixed up? Piper Jane thinks so, that’s for sure.
Now, before we start this little how-to, I should tell you that this is the first time I’ve tried anything like this. I am not an expert, by any stretch, and most likely will not be able to answer any questions you have about a different chair. And I don’t want to lead y’all astray (if you know how to reupholster and you’d like to chime in, please do!). But I am going to answer the email/comment call for a how-to. Just consider yourself warned.

To give your chair a makeover, first check to see if the frame is solid. If the wood is coming apart, wood glue and clamp together.
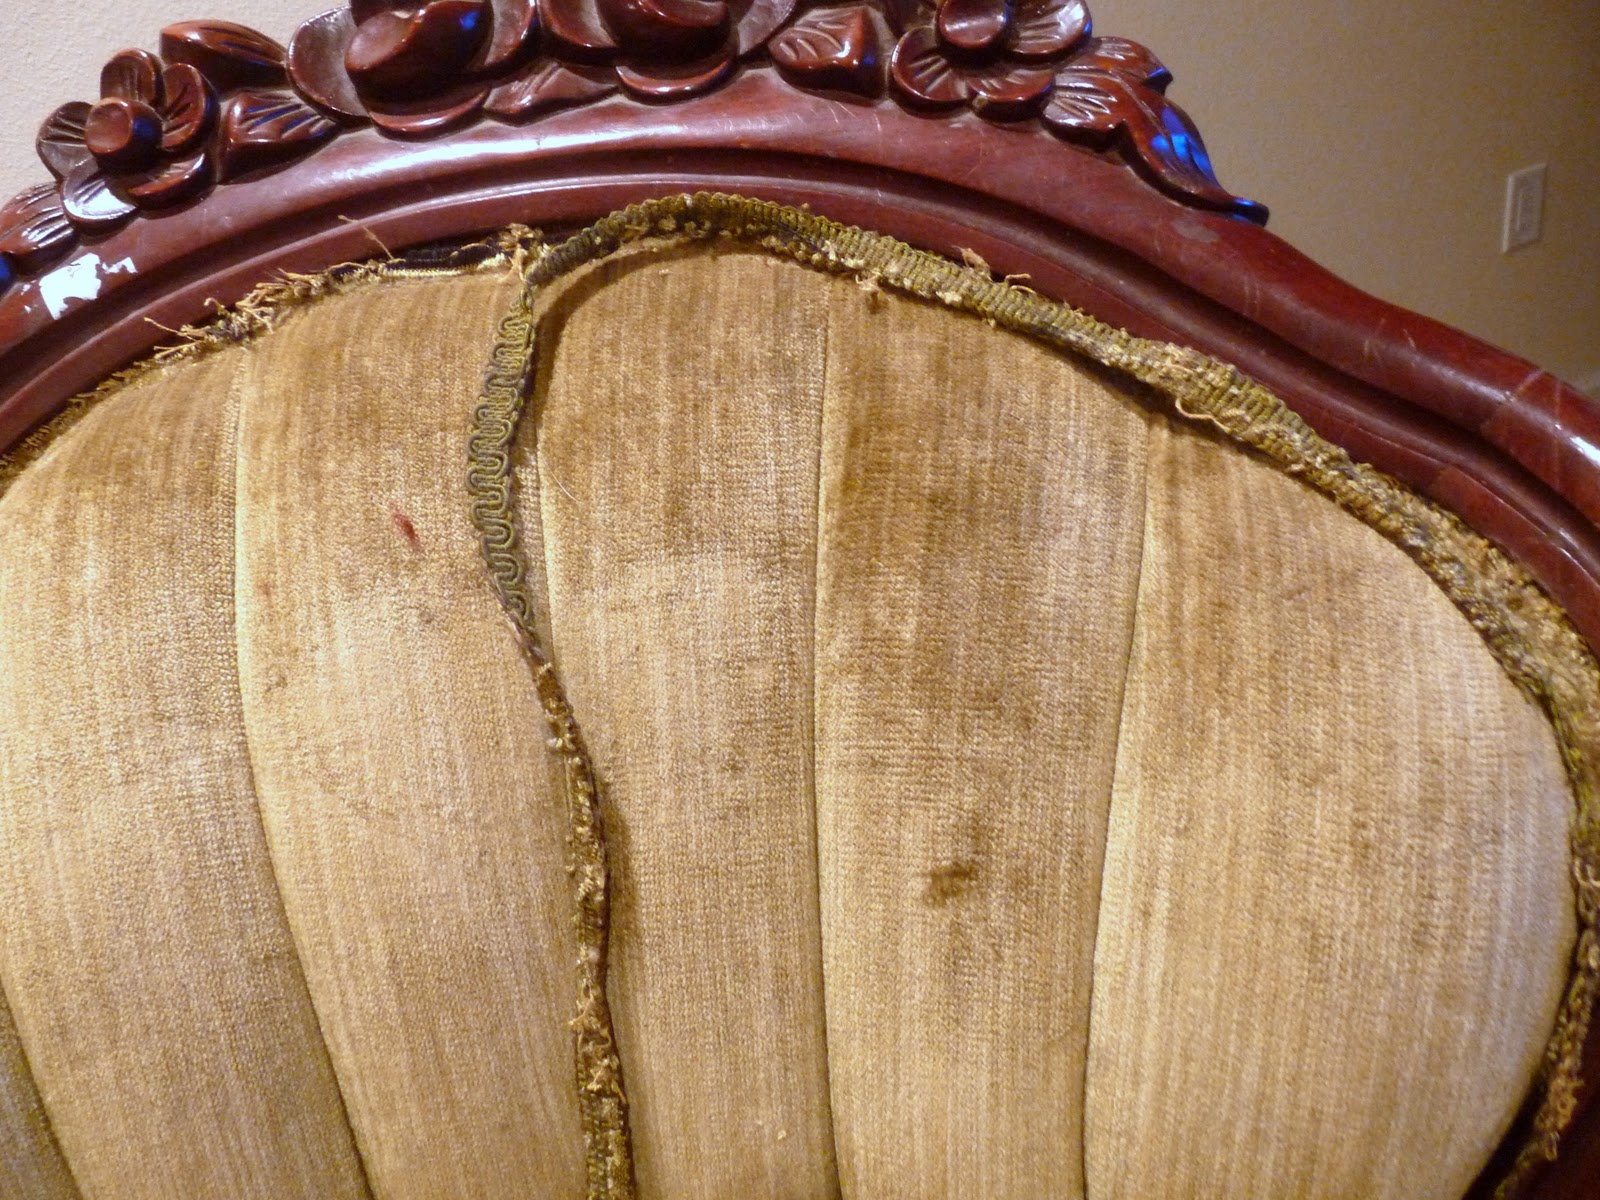
Then, take off all of the trim.

Remove stapled seams to get upholstery edges free. We did the chair backing first and then moved to the seat and then the back. Use a screwdriver and a razor blade for leverage. The stuffing started coming out as this point. Take pictures as you go, so you remember what goes where.

If you have button tufting, remove the buttons and set aside. Remove all staples and excess scrap fabric that is hanging onto the frame.

Roughed up with medium grate sand paper. Prime the wood with primer and let dry for a day. Paint the wood. It took us two coats plus touch ups.

To make the upholstery pieces, seam rip apart all sewn edges, taking care to note which pieces went together (I marked them with a fabric pen). Trace all of the individual pieces onto the fabric you’ve chosen, leaving a wide margin (at least an inch… it was even helpful to us to have a few extra inches of margin in the seat).

Cut out all of the pieces and sew together to match the originals that were your template.

Once everything is cut out and sewn together (and the paint is dry), begin to attach your pieces to the chair. Test fit first to make sure you have plenty of fabric. Start with the seat. Replace the foam if needed (we needed!) and cover with your seat piece (made by tracing the old piece like a stencil and leaving tons of room around the edges). Make the front edge clean and then tuck in the back edges. If you can reach them through the open back, staple the back edges down.
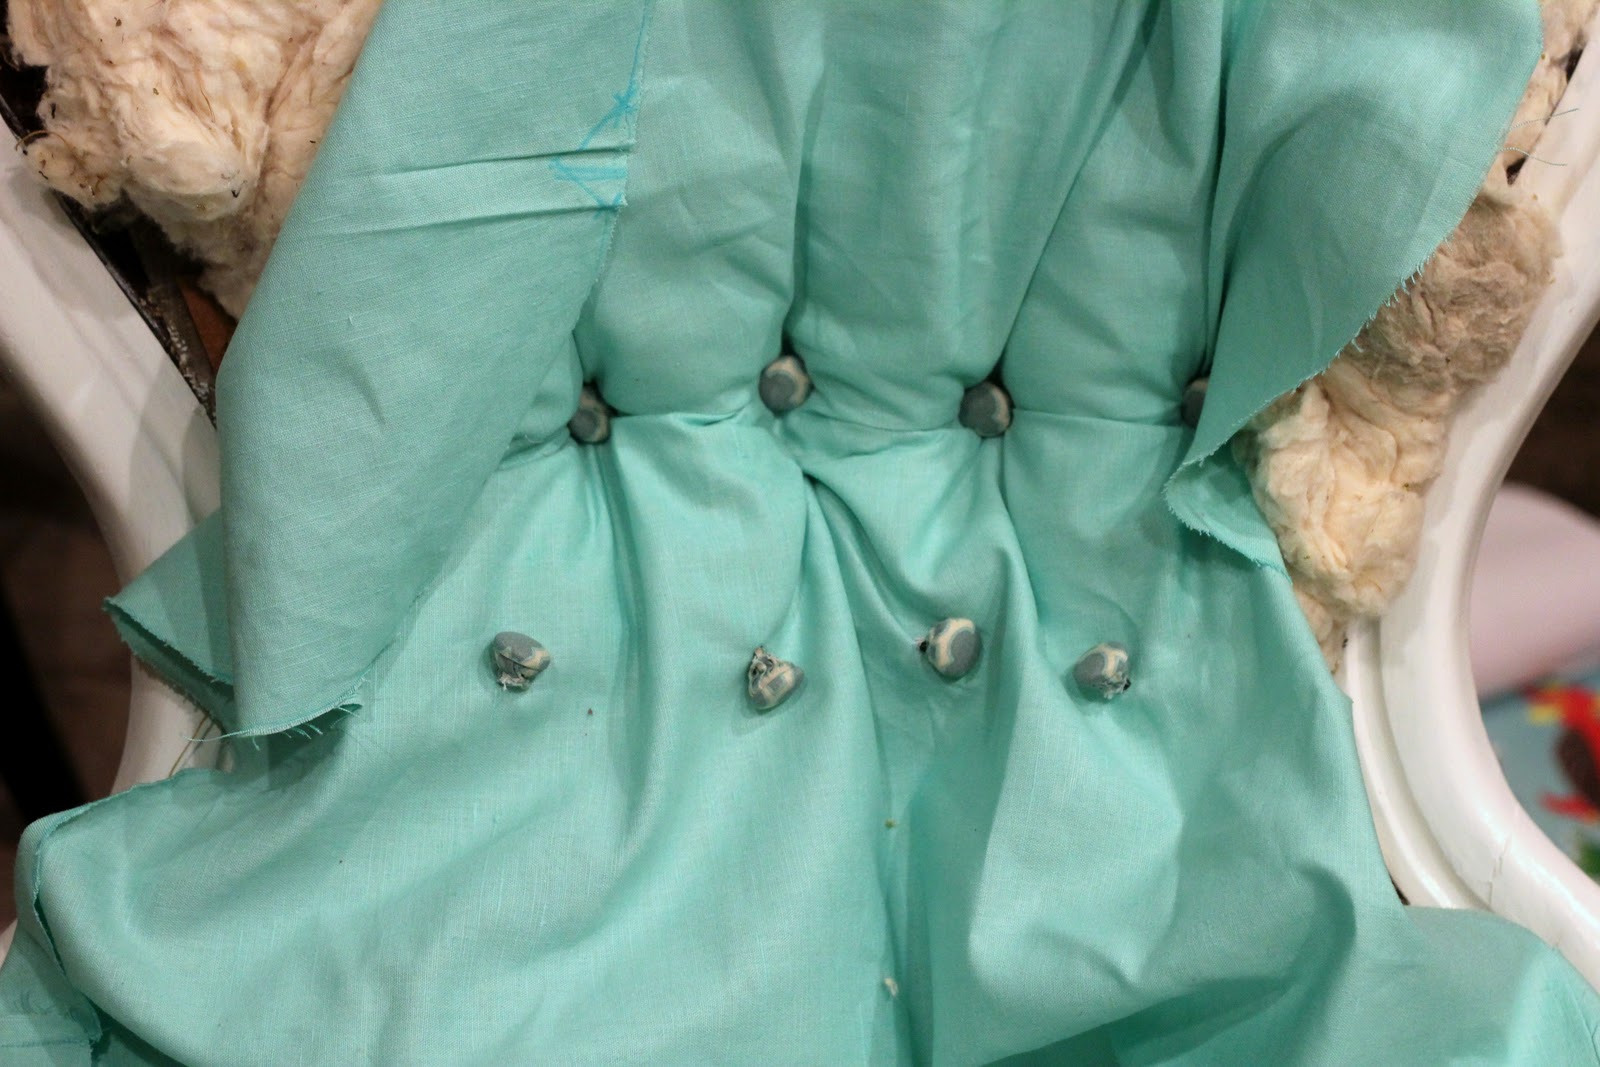
Then, if you have buttons, mark your button holes according to the backing piece you removed. Cover the buttons with your fabric. Poke through your marked template holes and pull through the back of the chair.

Begin stapling the upholstery to the chair. Start in the middle at the top (that was easiest for us at least), working your way down on each side. Also, use lots of staples (LOTS of staples). Pull taut as you go, matching the edge where the trim will be as closely as possible.
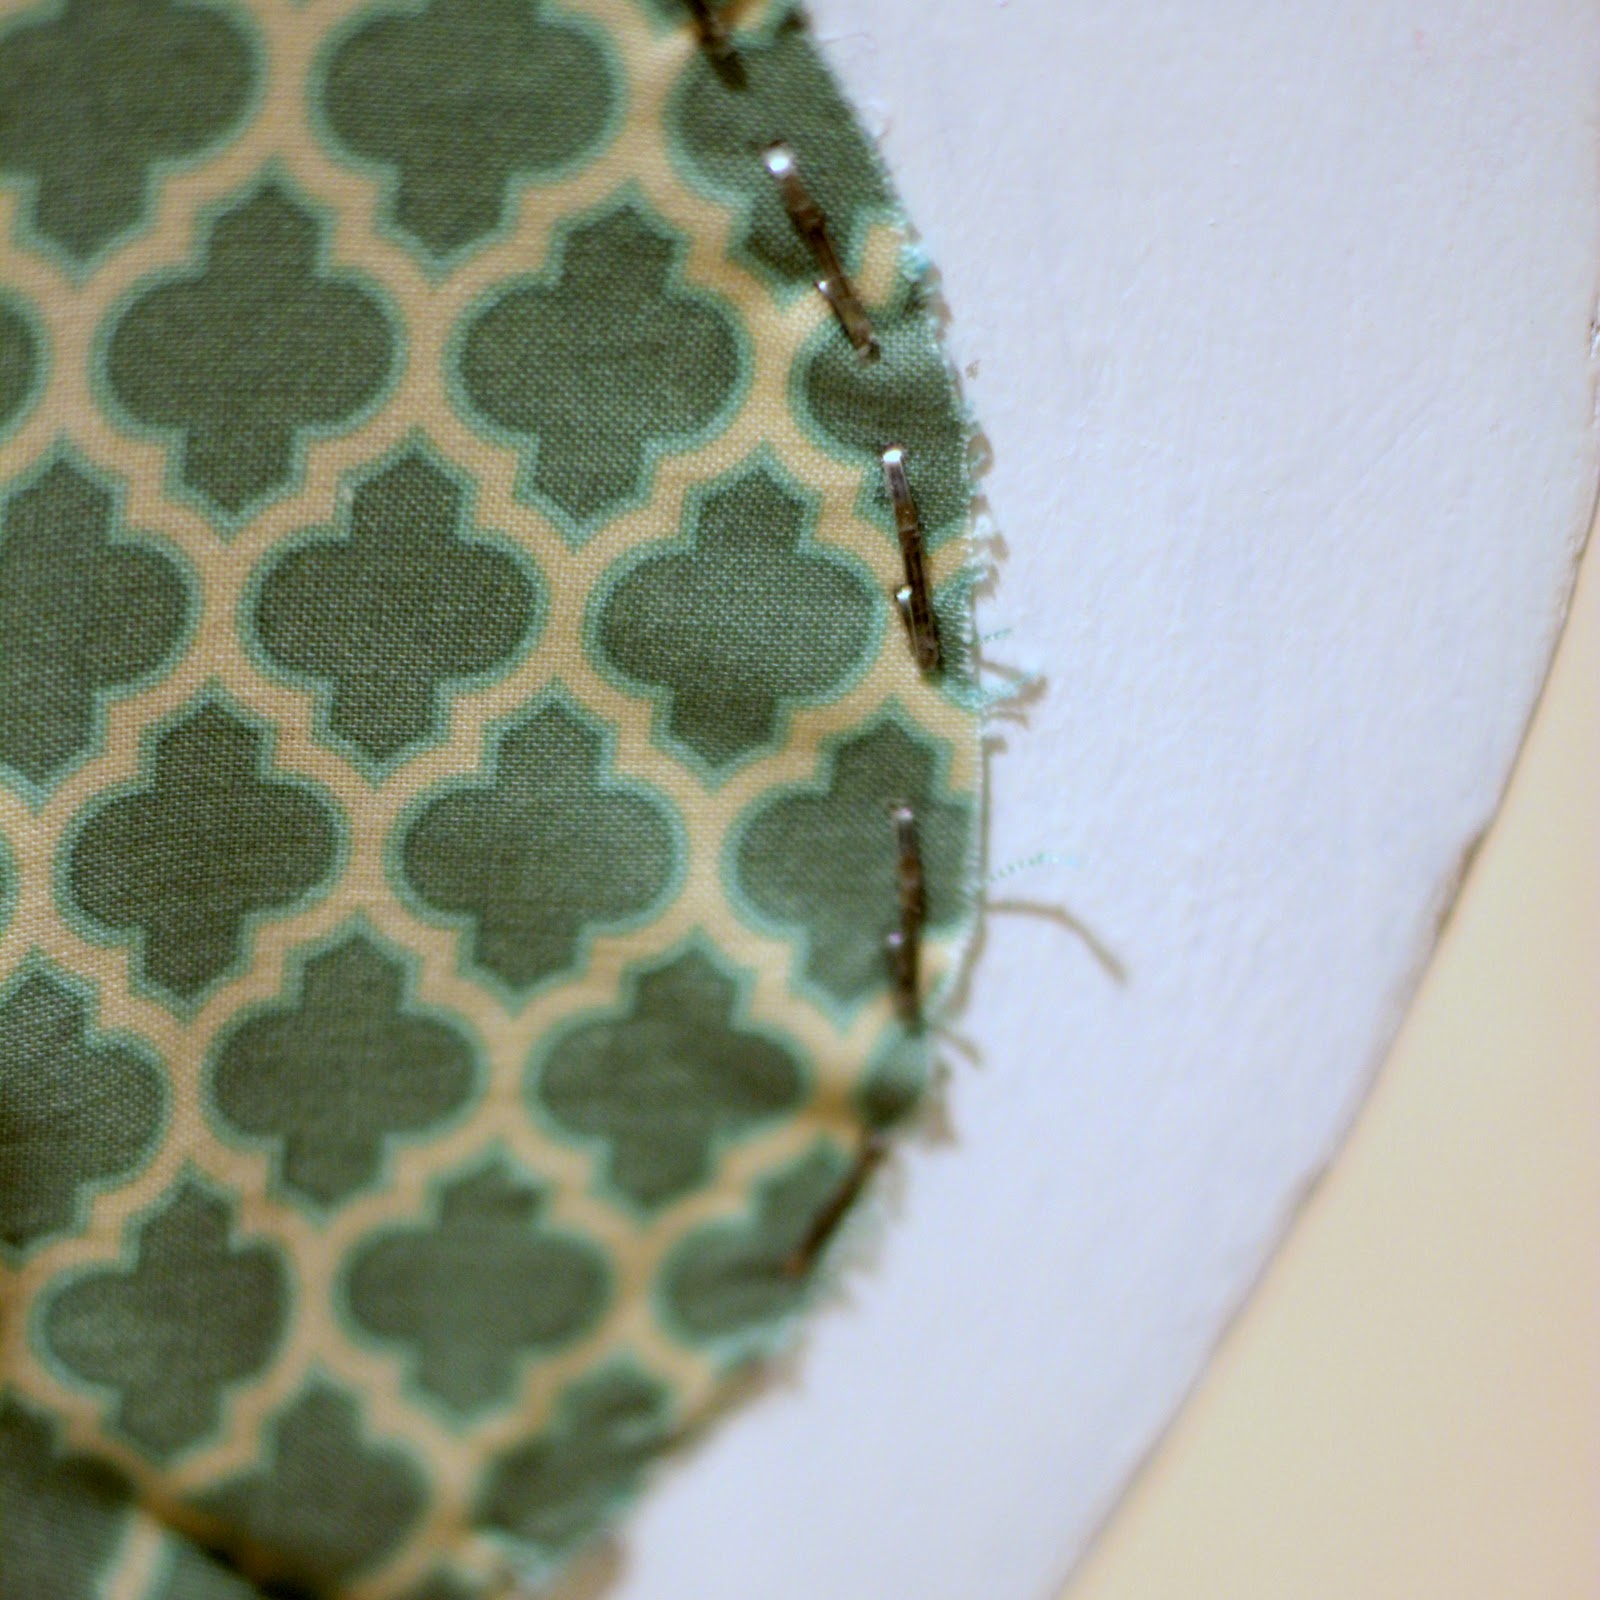
Repeat with the fabric on the back of the chair, again starting in the top of the middle and working your way down, pulling taut as you go and using tons of staples.

Once everything is stapled in place, begin hot gluing the trim in place over the rough edge. This is the place where you can make the frayed, stapled, kind of crazy edges look clean and nice again.

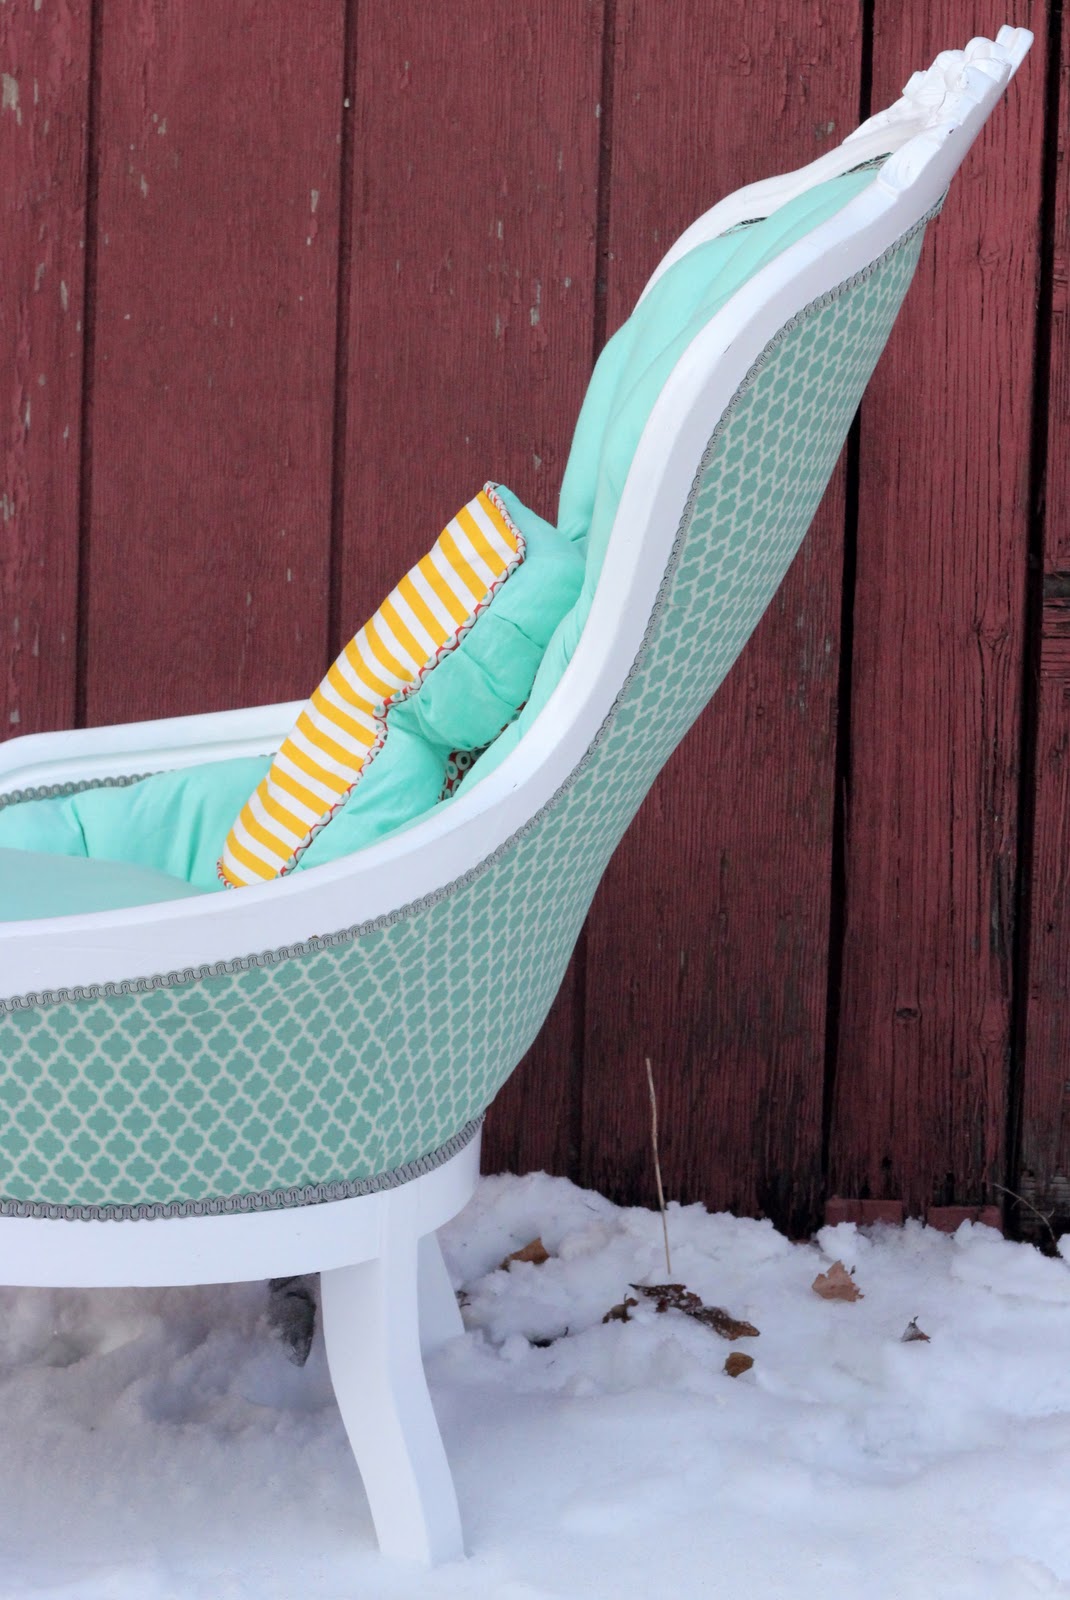
Repeat with the chair backing, trimming out all of the edges until the whole thing is clean and ‘finished’ looking.
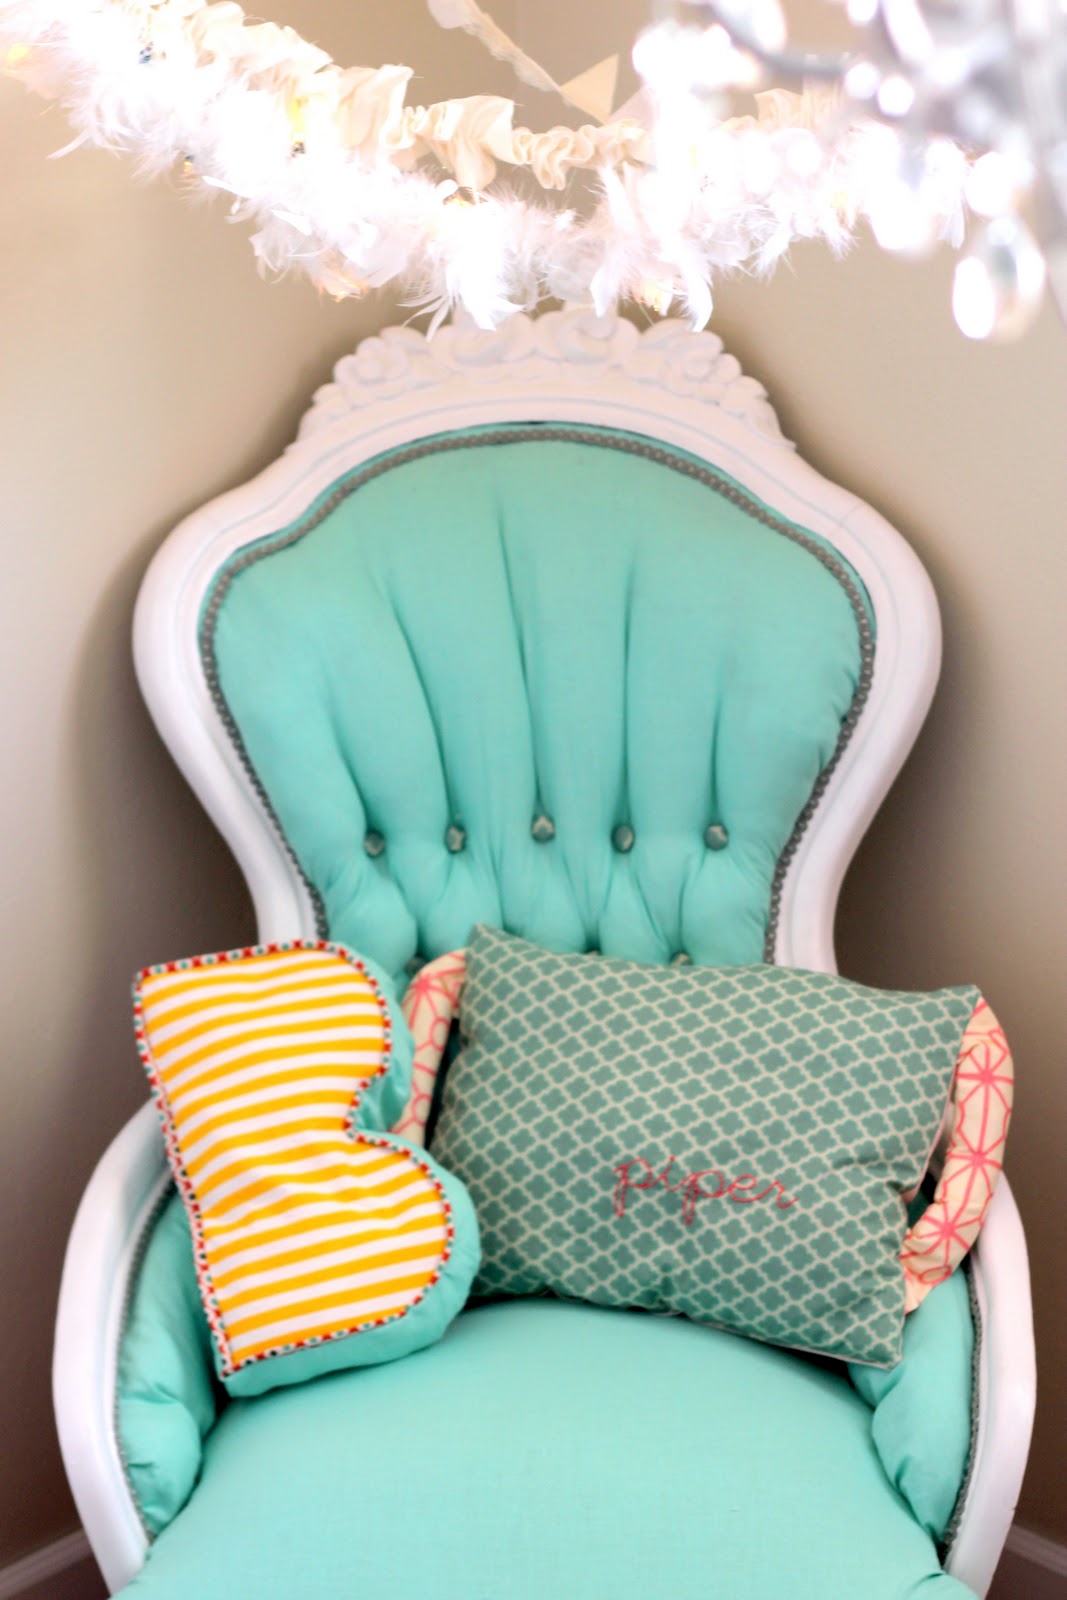

Add modern pillows (monogram “B” pillow tutorial here, Land of Nod knock off pillow tutorial to come!) for a little extra sass, and add to the girly goodness in a nursery near you!


This is AMAZING! The chair is gorgeous (as is the baby!) and this task is inspiring!…but too labor intensive for me…hehe. Kudos!
Love the chair! I’m sure your daughter does, too 😉
I am venturing out into my first reupholstering project soon, so I really liked your photos and helpful advice. Nice site – I’ll be back.
The chair is fantastic! The color of the fabric is what caught my eye. It is hard to print the picture and it look like what is on the site. However with the mention of the names of the color I think I can find what I want in paint for a room I have been wanting to update!
So glad I saw it on Money Saving Moms. I think the chair looks like a fairy princess chair! What an outstanding job you did with paint, material color and contrast plus accessories for the chair. Kudos to you!
Thanks for all of the compliments, Tara!
Just for your reference, I got the linen fabric at this etsy shop- http://www.etsy.com/shop/FitsAllWhoFitIn?ref=pr_shop_more
She still has some left, I believe. And I think if you convo her beforehand and let her know that I sent you over, she’ll give you another 20% off! 🙂 Also, the patterned fabric is Joel Dewberry. I think it’s called Lodge Lattice. Hope that helps if you need to get fabric.
Again, thanks for stopping by!
Fabulous makeover! I love turquoise and the fabric you chose are beautiful. I am definitely pinning this great tutorial for future reference.
Thanks Tanya! I have a thing for turquoise. Love it. 🙂 If you redo a chair, send over pics- we’d love to see it!
So gorgeous!! I can’t believe that is the same chair. The fabrics are lovely! Pinning this!
Thanks Jenny! We are quite smitten around here too. 🙂
I just found your blog from the U-create post…your chair turned out beautiful! Your whole blog is wonderful! I’m now following.
Sally
loveofhomes.blogspot.com
Thanks Sally! I love it that you stopped by. 🙂 Also, I had no idea about Kari’s feature- thanks for the heads up. 🙂
Beautiful re-do. Love the fabrics used No wonder I can never find anything great at Mile High (also my favorite thrift store in the Denver area), you are already grabbing the great deals. 🙂
Hey Teri (did I get that right? It looks like there is a whole team of bloggers at your lovely space)! I love it that you live in denver!!! SO FUN! Maybe we’ll run into each other at Mile High Thrift sometime???
BEAUTIFUL! I see chairs like this all the time and I am so scared to try it. You eased my fear, just use the current fabric as a pattern, duh! So, I have to ask, does the trim stay put? I have never been a fan of hot glue, is it holding up?
Hey Terri! The trim is staying put so far. And, I have to say, my kids aren’t super gentle, which is a good sign for the general wearability. 🙂
This chair is beautiful! After the re-do that is. I’m intimidated to attempt upholstery, but the results make it so tempting!
Thanks Melissa. It IS intimidating, isn’t it? Makes it easier if you can find a $15 chair and sale fabric to practice with. 🙂
I am so unbelievably in love with this redo. I about gasped out loud when I read the words ‘aqua linen’. Yes PLEASE!! LOVE everything about this- you did a fabulous job. I’ve never tackled a chair with tufting before but you make it look manageable 🙂 I’m sharing this on my facebook page!!
Haha, Kelsey- thank you!!! Aqua linen is one great combo of two things I love- glad you share those loves. 🙂 And thanks for the shout out on FB. 🙂
Oh wow! I seriously love this! I have a chair in my garage that I tore apart and painted white last summer but never decided on the color of fabric! I might just have to go with an aqua! This is stunning! Great job!
Thanks Natalie. I am a bit partial to aqua- I bet it’d look great!
Hello! I too post about all things sewing and enjoyed this tutorial. I think it’s important that we show how something that looks very complicated really isn’t-it just takes more steps. Lovely photos, too- 🙂 PS-my blog is http://www.stitchdrapery.blogspot.com in case you’d like to take a peek.
Christine, love your blog! Those pillows are fantastic. 🙂 Thanks for stopping by!
GORGEOUS!!! And perfect timing….I have a chair disassembled and painted in my living room floor as we speak. It’s time to start putting the new fabric on and I’m scared to death, LOL. This gives me motivation to just “get ‘er done.” 😉
Erin, that’s so fun- send over pictures of the finished product! 🙂
LOVE the chair! I am wanting to attempt a similar job with I chair I bought at a consignment store. I am so glad for your tips! What kind of paint did you use? Did you brush or spray it on?
Hey Mandi! I love it that you’re doing a chair too!
I used high gloss paint and brushed it on. You could probably spray if you covered all of your padding really well, though. 🙂
I think your chair came out incredibly beautiful. The color itself is beautiful. I came across your page and saved it knowing that I knew I would want to come back to it. Now, I have a chair that is similar in style to which you have reupholstered and I want to do the same just nervous that I might completely mess up the chair. Any tips?
thanks for the compliments april!
and you will do great (it’s easier than it seems!).
also, my friend shelley (at slipcovers by shelley http://customslipcoversbyshelley.blogspot.com/) sells a dvd about making slipcovers. even though it’s not exactly the same as reupholstery, I love the dvd, so that might be helpful to you too???
can’t wait to hear all about how it turns out!
Great looking chair! I actually have this same exact chair, plus the match to it that I’m about to have recovered! I love that I get to see yours completed! Can you please tell me how much fabric you used? Thanks!
Hey Missy- that’s so funny that you have the same chair!
I ordered 5 yards of fabric but had at least a yard left. Also, I had to cut the chair for the seat three times (user errors- be sure to cut bigger than you think and then trim if it is too much!). 🙂
Send over a picture of yours when you’re done!
Thank you so much for this tutorial! I have the same chair too! Some neighbors around the block were selling a pair and a matching sofa at their yard sale today, although I didn’t know until after the fact. As I was driving by around 5pm I saw them on the curb. Didn’t have room for the sofa and couldn’t convince the hubs to let me stash it in the attic till we found a place for it but at least I got the chairs! Yours is the first tutorial I’ve found for a more ornate chair. It doesn’t seem so daunting now. Thank you and beautiful job!!
I was actually contemplating a similar color, can’t decide if I want to do white or silver for the wood thought.
Ashley, I love it that you got the same chair. I was seriously intimidated as well- but (as you can tell from the tutorial) it wasn’t nearly as bad as I’d thought!
Send over pics when you’re done- I’d love to see them!
love
k
Found your tutorial on pinterest. I have this same parlor chair in my 4yo daughters room. I bought mine on craigslist…seems you got a killer deal, lol. I kept the original walnut frame and I reupholstered it when she was a baby with cream fabric. I love the idea of the different fabric on the back. I have been toying with the idea of redoing her chair again (my first trip into the world of reupholstery was certainly a learning experience). I may steal your idea of the two fabrics! BTW, when your daughter is a little older, dress her up in pearls and have her picture taken with that chair. We did that recently with ours, and it came out ADORIBLE!
Robin, I love it that we have the same chair. Do you want to know something tragic (that I haven’t announced on the blog or FB yet)? We are moving and my kids are going to be sharing a room, so we sold the blue chair on Craigslist last weekend! Tragic right? Though, there is no way the girly blue would go in their new shared room.
Along your pearls-picture line- a photographer here in Denver bought the chair. I am sure it’ll be put to good use. 🙂
Let me know if you redo it again- I’d love to see pics! 🙂
Woah! Way to go WonderWoman! Gorgeous! I will be taking on a similar project soon so thanks for the info!
Thanks Conni! Send over a pic when you’re done with yours- I’d love to see it! 🙂
Great Job! I recently was given a family loveseat that matches your chair the fabric is very ugly and wood is dark. Seeing your chair has given me the inspiration to keep the loveseat (and actually use it) with a paint/fabric update. Thanks for posting!
Lori 🙂
That’s so fun Lori! Send over a picture if you redo it- I’d love to see yours!
I have two of these exact chairs that I am dying to redo this summer so I was thrilled to find this how-to on pinterest! Thanks so much for the tutorial and you have given me to push I needed to make my chairs fantastic. I’m on the hunt for the perfect cloth now. I hope my turn out as terrific as yours did. Thanks again for the confidence boost!
Trudy, I love that! Can’t wait to hear about how it turns out…
Thank you so much for posting this step by step 🙂 I just purchased a vintage sofa & chair set & am a tiny bit daunted as to how to go about starting to re upholster but you showed me that it may not be quite as bad as i thought. Your chair is stunning! Thanks again!
Thanks for the kind words. It is definitely a daunting project- but not that difficult in the end (just sort of time consuming). 🙂 Good luck on yours!
Wow! I’ve fallen in love! This chair is to die for! Great job!
Thanks Shaunah!
This is absolutely gorgeous! I love the mix of fabric.
Thanks Cara!
I have the exact chair that was found on side of road. tutorial was great. my springs are also a mess. how did you deal with that?
Joy, too funny! I think we added a thin layer of foam on the top of the stuffing to control those springs (honestly, I can’t quite remember- isn’t that awful?).
I’d love to see yours when you’re done- send me a pic if you think of it. 🙂
Thank you!! I’ve been looking for a tutorial for almost this exact same chair!! And the colours you have chosen are also the same as the ones I want to do. Gorgeous. I bought my chair at our rubbish tip for £5 (about $10). I couldn’t believe that someone was throwing it away!! Their loss, my gain 🙂 This tutorial has really helped so thanks again!
I love that Nicola! Can’t wait to see what you do with yours (send a pic if you have a chance). 🙂
I have this EXACT same chair with lighter fabric and gold frame! I’m glad to see what I’m getting myself into!
Jenna, that is awesome! You’ll have to send me a picture when you finish yours!