
anthropologie inspired knotted bedding part 2 (putting it all together)
As an Amazon Associate I earn from qualifying purchases.


Before we get started piecing a PILE of knotted squares together, do you want the backstory on this little Anthro-inspired gem?
First, you should know that I’m a bedding junkie. I LOVE wandering through Pottery Barn, Restoration Hardware, Crate and Barrel, Anthropologie (at Park Meadows in Denver, those stores are all conveniently located near each other as well) to see their bedroom displays. My ever-changing bedding crushes are a constant around here.
So a few years ago, I found this Thai Silk Bedding at Restoration Hardware and fell in love. I have a bad habit of loving expensive things, and this was no exception. We were still in the dual-income-no-kids category at that time and so Adam surprised me with the dream-bedding. *Note, I tried to find a picture for you, but turns out five year old bedding isn’t very popular in google images. 😉
Fast forward to this fall when my oh-so-beautiful Thai Silk Bedding RIPPED. Yep, you read right… it was destroyed, not functional and, worse, not fixable! Since the era of able-to-splurge-on-bedding-we-love is long gone, just replacing the duvet cover is not exactly an option anymore.

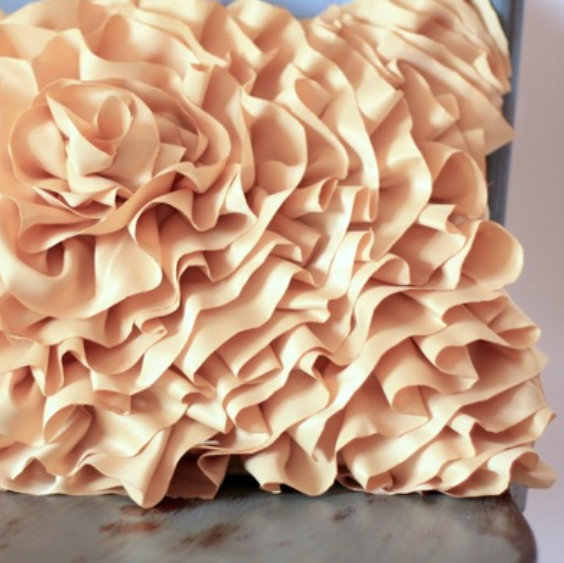
But then, of course, I went and fell in love with the rosette bedding at Anthropologie. It shares all sorts of things with my Thai Silk Bedding… it’s beautiful, and lovely, and totally out of our price range. Isn’t that how things go?
When I saw the rosette bedding at Anthro, I had this idea in the back of my mind that perhaps I could try to make my own vision of knots and loveliness… but shelved it to pursue more immediately important matters (like tending to a new born baby, and creating things for sytyc, and getting ready for the parties I was throwing, and trying to stay somewhat on top of normal life). And then we made it to the Wild Card finale for So You Think You’re Crafty. What better chance to try out my crazy bedding-making idea?
And thus the Anthro-Inspired Knotted Bedding was born. Thank you, So You Think You’re Crafty, for giving me a chance to attempt something I might not have otherwise. My husband thanks you too. Because instead of spending $400+ on the quilt at Anthropologie (or, more likely, settling for something we didn’t love nearly as much), I made this little getup for around $30. Glory, sheer glory.
Ok, now onto the tutorial. 🙂
To put your ‘quilt’ together, you’ll need:
–56 knotted squares from part 1 (for a king sized quilt)
-a king sized duvet (I got the thinnest one I could find at Ikea… it was $29… fabulous!)
-sewing machine and supplies
-TONS of pins

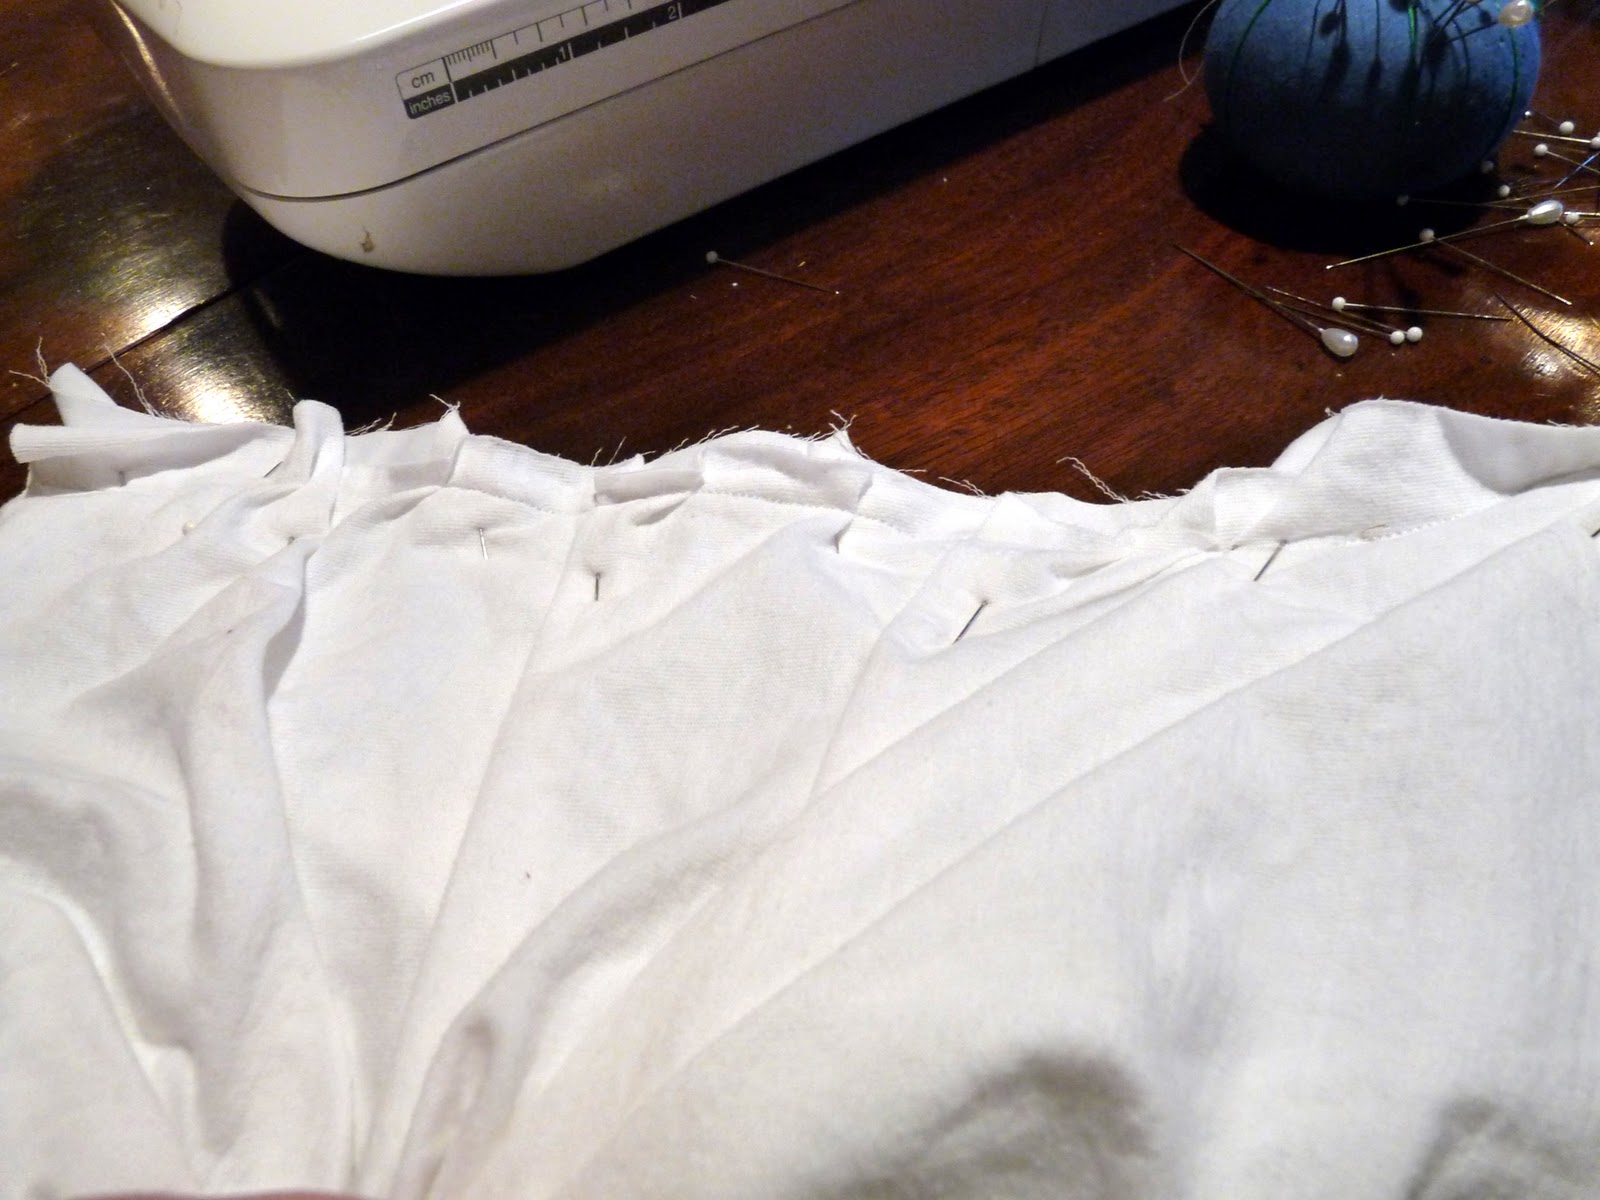
1. Start by piecing one row of squares together at a time. Your finished product will have eight rows of seven squares. Here’s the thing- in order to achieve that wonderful, gathered look, you have to create the gathers as you go. I did this by pinning little pleats in place before sewing squares together. To be more specific, I pinned five pleats along the length of each square (one tip- if you pleat both squares and pin, this will go more quickly). So, pleat, pin (right sides together) and sew.

2. Repeat and repeat and repeat until you have eight rows of seven knotted squares.
3. Now, you’re going to sew the rows together to make a big square-ish mass of knotted squares. It was easiest for me to pin first where the edges between squares met up and then pin more pleats in place. Remember, every time you sew two squares together, you have to ‘create’ little gathers. As you’re sewing the rows together, this means that you have a lot of pinning to do before you sew. Also, be sure to pin the sides right sides together. When you’re finished you’ll have the top part of your ‘quilt.’
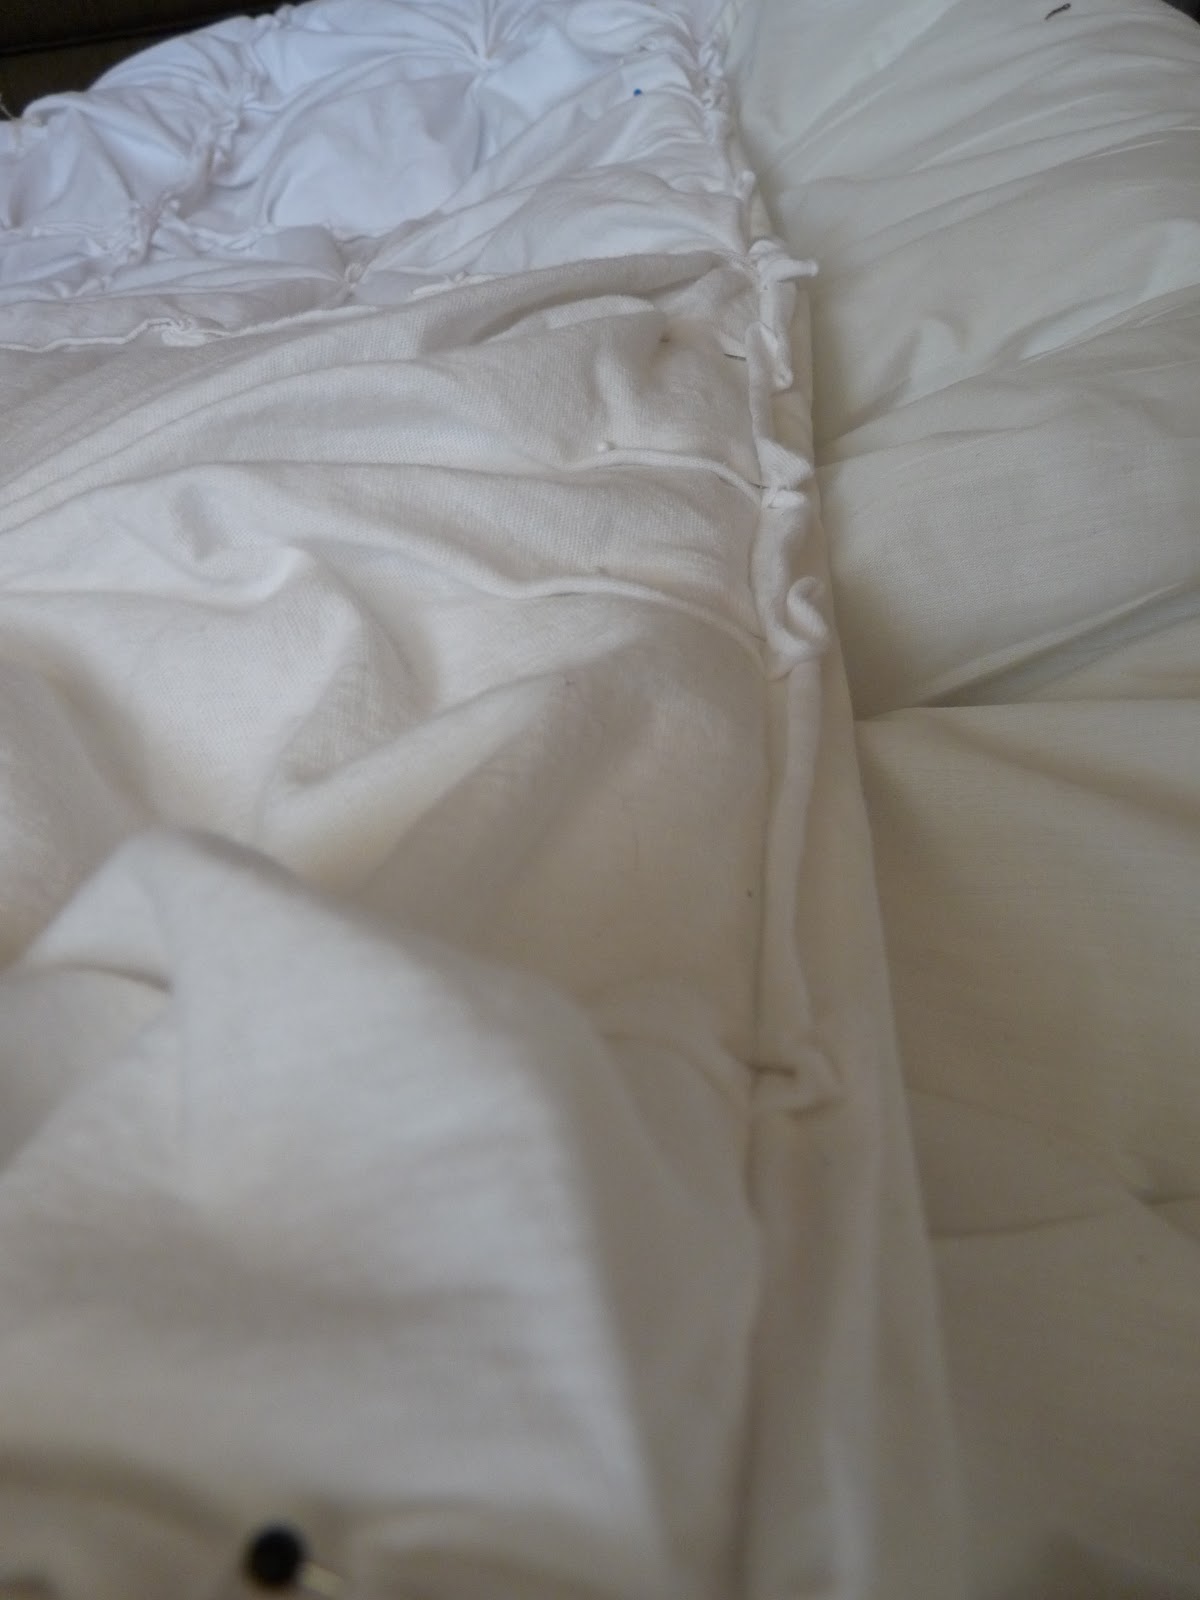

4. Lay out your duvet. Place your quilt with the right side (the side with all of the knots) facing down on top of the duvet. Be sure to match so that the longer side of the duvet is lined up with the row of eight squares and the shorter side of the duvet is lined up with seven squares.
Pin all the way around the edges, again, pinning pleats in place. Lucky for me, my duvet was divided into seven sections that matched up with my squares, so that was a good guideline on the short edge to make sure I was pinning evenly. On the long edges, I folded my duvet in half and marked where the middle would fall then folded it in half again and marked the quarters (on both long edges). This became my guide for even pinning on those edges.
Sew around the entire perimeter, leaving one square open. Pull the duvet through the one open square, turning the whole thing right side in. Sew your one square opening shut.
*Note- I can’t say this enough, go over the ENTIRE quilt and make sure you got all of your pins out. Once you sew this baby shut, you don’t want little pins pricking you. And they like to hide in the pleats, so check thoroughly!
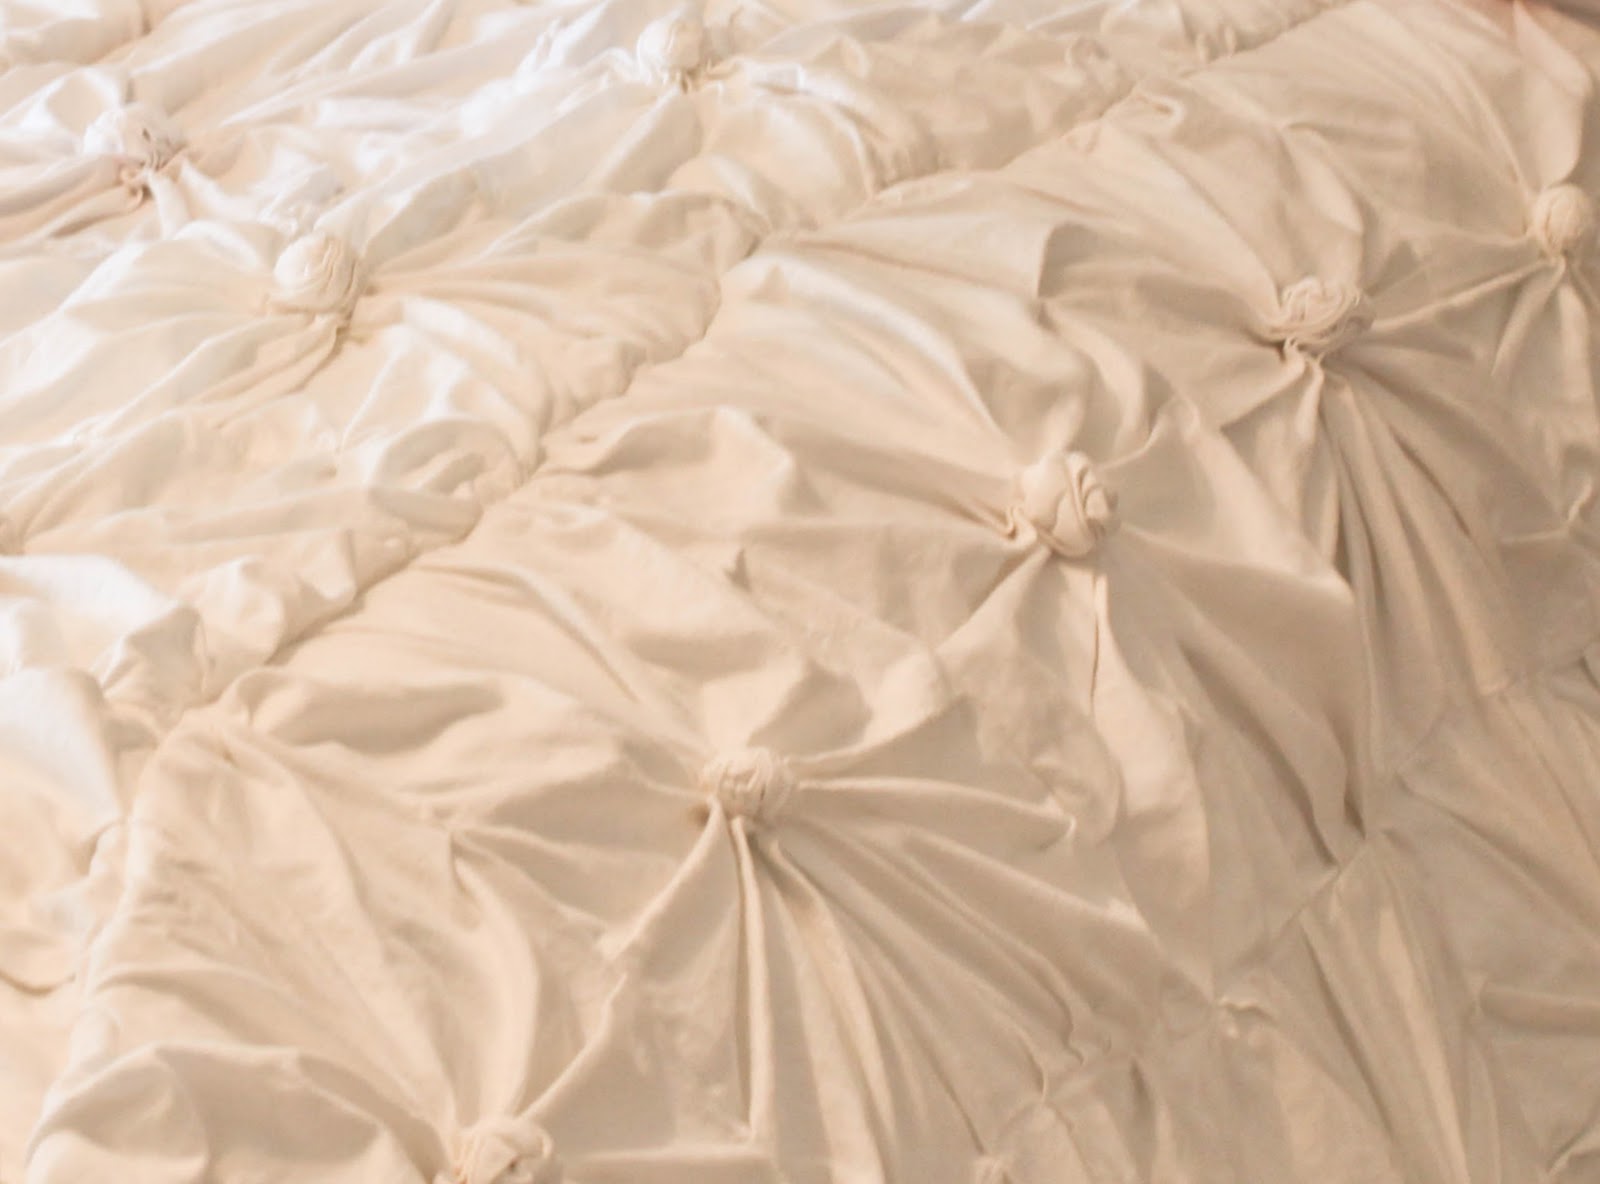
5. Fluff your almost quilt. It almost looks right, doesn’t it? Almost done! Now you’re going to pin your rows in place and ‘stitch in the ditch’ (I followed this tutorial on youtube- haha!) so that your squares stay put and don’t shift all over the place. I sewed down every other row, but feel free to do as many as you please.


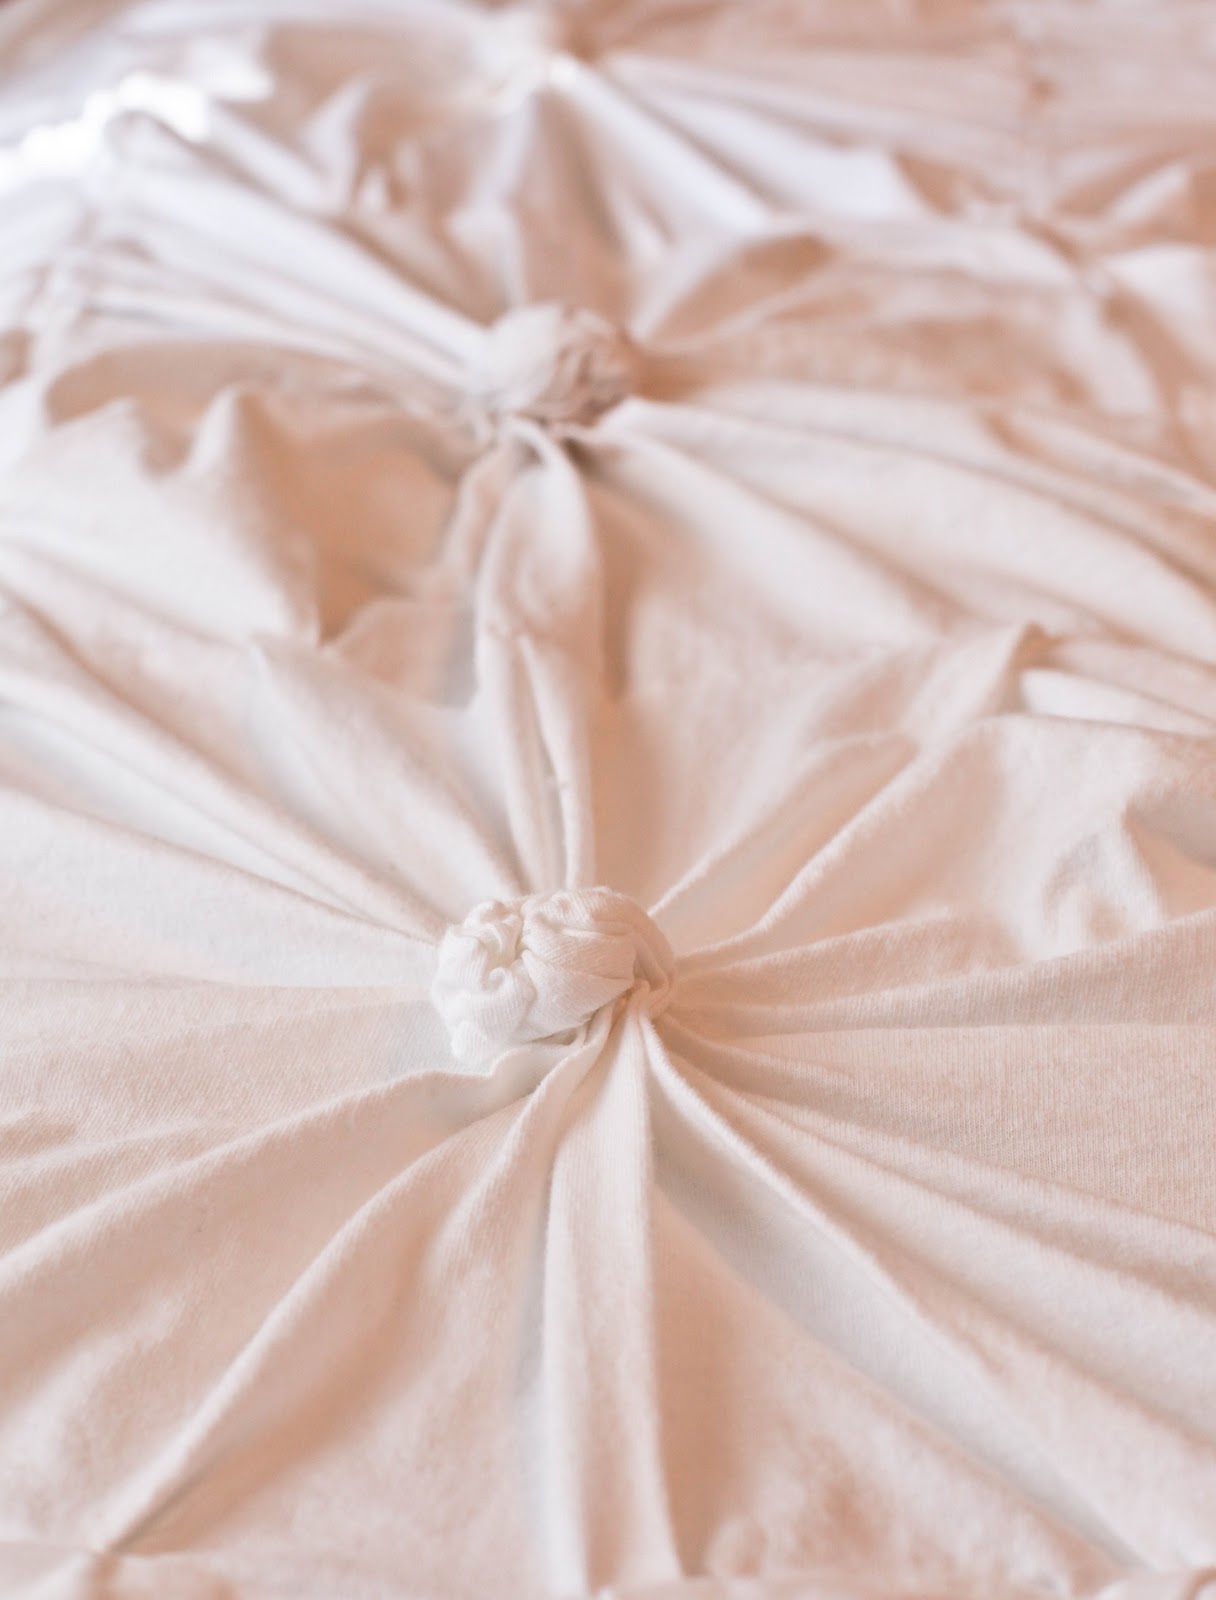
6. Can you believe it? You’re done! Put this vision of loveliness on your bed and admire!
If you’re looking for part 1 of this tutorial, it’s here.
There is also a post answering common Anthro Inspired Quilt FAQs here.


This is beautiful. I've seen style before, it is expensive. You are awesome for getting it done for $30! Go you = )
Hello, I agree kudos to you for doing this with $30! I’m a little confused by the assemblage steps. So, after you’ve sewn the strips together are you sewing each together with piece of backing fabric? I’m just not understanding the finishing part! Sorry, I know this was like forever ago that you made it but I just happily found your blog today!
Hey Daniela- sorry I’m just answering this now. You sew the whole thing together (all of the squares into a grid) and then sew the whole thing to a duvet. Make sense?
Can I just say I honestly think yours looks even better than the original! So fluffy and comfy looking! I saw this and anthro too and wanted to make it for myself instead of paying the big bucks but I am soo happy you did it and showed me how so I don't have to mess it up 🙂 Thanks!!
wow, this is gorgeous! I would love to make one of these.
That turned out fabulous! Love love love it! Now to find time to take on such a project. lol
WOW!! Ladies, you are so talented! I still can't believe you made this!!! Amazing!
LOVE! brilliant. I can't stop thinking about this since I saw it on sytyc
I bow down to your amazing-ness. This is really cool. I love the look. Really…gorgeous!
Oh and congrats on winning SYTYC! I knew you would! 🙂
It is seriously GORGEOUS. Oh, how lovely. I am more then impressed. Although, I do not know why. Between the two of you everything (yes everything) you make is fabulous. I am in love with this one though. In love.
gorgeous. just stunning!
I love this your version…super cute..i am following the blog,with ~~ LOVE ~~
Well that is the cutest thing! I don't know if I have the patience for that though. Honestly I can't even tell which one is yours and which is the original… You caught me, I skimmed. But the fact that I can't tell is a good sign, right?!
Oh I love this soooo much I am so glad you made a tutorial for it. Now the only question is when . . .
Wow, this is beautiful! I will be adding this to my list of things I want to make—–one day!
I love this!!! Just beautiful! Did you end up using it as a quilt or as a duvet? Either way, what a good idea!!
WOW!! Found this tutorial from Onepretty thing. As another bedding junkie, I think this may be THE BEST tutorial I have ever seen!!! Really thank you for putting this in plain english and making something so awesome!!!
Park Meadows Mall?! I've from Parker! What a small world! I almost cried when I read that Restoration Hardware was going out of business there….at least we still have Anthropologie and there others.
Obviously a "I Don't Sew at ALL" question: When you're making those knots, do you flip the fabric over at all when you are stitching? I couldn't tell if the fabric poof was poked down completely through and stitched or it everything was created and stitched from the top side. SEE! I told you I don't sew Ü
How much did you spend on the knit fabric?
Hi, I found your blog from a link on Vintage Revivals and I love this quilt. I'm getting the stuff to make it but have a question on your pleats/gathers. You said you did 5 on each side of the square but about how big were they? Or about how big were your squares AFTER pleating? Thanks!
this is so great! I was wondering how many squares i should do if i want to make one for a full bed?
I love love love this! It's been put on my To-Do list.
Also, those floral print pillows in the last picture, did you make those too? I love them!
Do you sell your work as well.. Is this something you would recreate and sell?
EXCELLENT!!!! BEAUTIFUL!!! WTG!!!
Shannon
http://www.akadesign.ca
Absolutely gorgeous!! I am attempting to make my daughter the Cirrus duvet because I couldn't even wrap my head around how to make this one! It looks so beautiful!
Wow! Yours is AMAZING! I believe it is actually BETTER than the one at the store!!!
WHat an awesome thing to get it for under $30 and more sentimental since you made it yourself!
All your work is truly fantastic!!
I can't believe how beautiful this is. So talented! I skimmed the tutorial — hoping I was "smart" enough to follow and make one for my bedroom. We have lived in this house for 4 years now — and my bed still does not have bedding. (I mean bedding that I really want and love!) Thanks for sharing.
CANNOT wait to try this. Quick question…how big do the knotted squares end up being after you pleat them and sew them together?
How beautiful! It really is wonderful and I love the white bed you have it resting on. Just lovely
How beautiful! It really is wonderful and I love the white bed you have it resting on. Just lovely
How beautiful! It really is wonderful and I love the white bed you have it resting on. Just lovely!
Simply gorgeous!
I too, am wondering how big the squares end up being after sewing in the pleats. I would love to make one for my king-sized bed, but I'm worried I'll get the measurements wrong.
Thanks for the beautiful tutorial!
Love, Love, Love it! awesome job! I might have to try & make my own one day 🙂
holy crap. this is awesome! I'm so totally shocked and impressed. wonderful job.
I just watched both segments and am stunned with amazement. I would never dream of being able to do this! I love your step by step tutorial and am eager to try it. Yours looks amazing and def gives yuor room the "wow" factor. Stunning! oh so stunning!
Oh Em Gee I love this! It is so beautiful! Pay you to make me one??? 😉
This is awesome! Do you have any idea if two king sheets would be enough to make a queen size?
dominiquesboutique@yahoo.com
dominiquescraftcouture.blogspot.com
Hi, I absolutely LOVE this! I was so excited when I came across it!
Can you please tell me the wash and care instructions? I would hate to put all this work and time into it and then absolutely destroy is the first time I wash it! Thank you!
Madison, if you’re making this with the jersey tshirts/tshirt sheets, just throw it in the washer and dryer. I bleach ours every once in awhile too…
Aaaaaaaaaaaaahhhh!! I've been eyeballing that bedding over at Anthro too and just cannot justify the expense! It's so gorgeous though and I haven't been able to stop thinking about it and now I bumped into your blog. YOUR version is even more gorgeous and affordable too! I love it!!!! I'll definitely be making one of these for my bedroom now! Thank you, thank you!!!! 🙂 (P.S. I'm not normally a multiple-exclamation-point kind of woman, but I'm just so excited! lol)
I love it! I was wondering how big each square ends up after it's pleated? I would love to make one!
Found this through The Lettered Cottage FB post and am truly amazed. I smock and sew lots of stuff but this is just so tempting….it's so not your mother's (me!) bedspread! Think at my age, this might be just the trick….
Question…You started out with 18" squares….when you "scrunched" them to sew to the duvet, what size square did they end up being?
Just found your blog and I am in love. I have wanted this bedding for my daughter, but couldn't justify the price tag for a teenager who may change her mind soon. I am off to copy your version. Thanks for an awesome and inspiring tutorial post!
Do you think a ruffler foot would work to create the pleated effect? Just trying to save myself the time and frustration of all those pins :O)
didn't leave an email, and I'm not sure it's linked right.
trischeetah@hotmail.com
thanks!
Shaunna at Perfectly Imperfect linked to this today. I LOVE it…even better than the Anthropologie version. The jersey gives it a more comfy casual look. I will be making this someday!
xx,
Jami
Sell this to me. Please. Not joking. -Shelley {howdoesshe.com}
I LOVE this… your bed looks fabulous! Oh I am inspired. I'm glad I found you by accident this morning.
According to Anthro a Queen size bed is 92"x 96" Which would equal to having 8 rows by 8 rows of 18 in squares (it would acutally be a little bit more wide but I'd rather it be a little too wide than not wide enough. The normal size queen quilt is 90" x 90" which equals 7 rows by 7 rows or 49 squares the Full is the same and the Twin is 68" x 86" which is 6 rows by 7 rows which equals 42 squares. Fabric wise you can get 4 18 inch squares our of 1 yard of fabric if you go that route. If you use sheets I am not sure how much you will get out of one sheet. I hope this helps some of you!
@Suzanne of Pieced Pastimes
The bed is made by Corsican Furniture, called the CENTENNIAL
http://www.corsican.com/itemDetails.aspx?Sid=9677
You have an eye for good taste!
Thanks for the fab tutorial. I love this project and just finished making one for my bedroom.
You can see the finished quilt here:
http://laura-griffin.com/blog/2011/03/13/all-done-with-the-anthro-inspired-quilt/
Wow. I thought making this quilt wouldn't be THAT hard. Fairly simple right? Oh my. I am in the middle of it now and it is SO time consuming! I'm wondering if I got in over my head ;o) Until recently I haven't had a craft bone in my body…how did I think I could conquer such a task? Ca-razy.
Anywho, I've been waiting for the tutorial on the shams. Did you ever finish them? Is there a tutorial in the works? I'd love to make them like the gray bedding from Anthro. I LOVE the big square knotted shams that match the quilt. If you don't show me, I might have to try it on my own and I'm rather scared!
Thank you for the step by step. It's SO cute!
keifersgirl@hotmail.com
Gorgeous! I can't wait to make it!
Love this! Am making one now. Did you use a duvet cover or sew it onto the actual duvet insert? Thank you for this wonderful tutorial.
Love this tutorial. Thank you so much. Did you sew the blocks onto a duvet cover or to the duvet insert itself.
So awesome to run across this through pinterest! Your directions in part one and two were wonderful. If I read them & the comments correctly, the finished squares end up being close to 12" x 12" (but may vary…and that's ok, it's knit and forgiving). Also, I love that you took a duvet and sewed the puckered top right to it, making it part of the quilt (saving tons of steps!). Genius! I'm guessing you do the same steps, but different sizes for the pillows/shams, adding about 4" to the finished size for the top. Love, love your bedding! Thanks for sharing the tutorial!!
I saw this in antro and couldn't stop thinking about it!!! I then came across your tutorial and am now in the process of sewing all my "knotted" squares together! Wish me luck! I am making this in ivory instead of white and so far my knots look like yours. YAY me! Thanks so much for this tutorial. Now I will have MY dream bedding.
I love, love, love this! I posted it on my Tutorial Tuesdays post today! 🙂 Thanks for the incredible detail and awesome inspiration!
#1
Where did you find ivory jersey fabric? I'm looking all over
I'm also having trouble finding Jersey fabric/sheets, I can only find sets and they are pretty expensive and well i only need the flat sheet. Do you think this would work with regular cotton sheets or the look wouldn't be the same?
@onelove1748
I just saw some at Target online. They might have them in the store!
They do. They have a gorgeous lavender one. 🙂
I know- LOVE. 🙂
I loved your tutorial! I just finished making my "quilt" It turned out wonderfully! Instead of using jersey fabric (which I am not particularly fond of) I used cotton sheets. They worked out just as well, but I had to use a little more stitching to get the knots to look like knots. It came out great! Thanks!
Wow! I love how you turned those simple fabrics into a very beautiful bed sheet. Thanks for the tutorial, eh.
Cheers,
Cathy@nursing scrubs
How beautiful! It really is wonderful and i love the white bed you have it resting on. Just lovely..
Thanks for sharing with us..
Bed Sheet Sets
Beautiful!!! I had a question for you…What is your seam allowance for stitching the squares together? Did you just run along the very edge? Thanks!! Going to try this soon!! 😀
@Kim
Hey Kim! You'll have to send a pic over when you finish!
My seam allowance was 1/4" With the pleats pinned in, it ends up varying a little as you sew, though.
Hope that helps!
love
k
love it! i didn't know you were a fellow denver-ite. cool!
I'm nearing the end of this project and so far it looks great. Just need to sew the last 2 rows of squares on. Thanks SO much for the tutorial! I do have a quick question though…
Since you sewed the quilt directly to the duvet, how do you go about washing it? Is it safe to wash the quilt with the duvet still attached? Would it also work out to sew the quilt onto another flat sheet the size of the duvet, leaving a few squares open to slide it in (basically making a more traditional looking duvet cover and keeping the duvet itself separate)?
I also want to know if I could sew this finished knotted top on to a thicker piece of fabric in order rather to make a cover for douvet instead of sewing directly onto a douvet?? Purely for washing as all my douvets are down and being white will need to be washed regularly. Thanks
Roz, I think you could definitely make a duvet cover from this instead!
Thanks so much for this tutorial! I've just about finished attaching it all together, just got 2 more rows to go but so far it looks great 🙂 I do have a question though….
I was wondering about how you go about washing it? Since you attached the quilt to the duvet, can you just throw the whole thing in the washer? Would it also be alright to attach the quilt to a flat sheet instead and basically make a more traditional duvet cover (keeping the duvet itself separate)? Do you think this would then be safer to wash?
Thanks in advance!
@Jill
Hey Jill! So excited that you're almost done.
I just washed mine this weekend, actually. It does take FOREVER to dry (three times in the dryer and then sitting out for a bit), but it holds up in the washer just fine. Plus, then you can bleach it (which is necessary for me with the a toddler and a baby around).
I think the duvet cover option would work just fine as well!
Send pictures over when you finish up!
love
kirstin
I have been wanting to make this for a while–It is FABULOUS!! Like Jill, I’m thinking I want to do a duvet cover that I can remove. I’m a beginner sewer and I’m wondering if I could do this in a different fabric? I have a bias against jersey….my husband has this jersey knit sheet set from Walmart that is all funky shaped and the pillow cases are all twisted (because of shrinkage i’m guessing?) So I’m worried that this blanket will go all crazy on me when I wash it. Or is that prevented by washing the fabric before using it? What do you think?? I kind of like the idea of a silkier texture. Not silk, but something with a tiny bit of sheen, ya know? or something similar to the duvet I have. I don’t know how to describe what it is. HA
Also, I noticed that you bought the Jersey in a sheet set rather than JoAnn’s or a fabric store. Is there a specific reason for this? cheaper?
Thank you so much for posting this tutorial!!
Hey Kendra! Glad you love the project- I think it’d definitely work as a duvet. 🙂
And I think it’d work in any fabric, really. I think several people have made this using cotton and it’s worked out fine. And yep, I bought the jersey as sheets because of the cost difference (sheets are such a great deal for fabric yardage).
When you get yours done, send the pictures over (or add them to flickr). We’d love to see them. 🙂
So-o-o-o beautiful—-looks like a joint project for my daughter and I for my grand daughter’s graduation. thanks so much for this tutorial.
ooooh, I love that! if you take this project on, send over pictures of your finished product. we’d love to see your take on it! 🙂
First off I just wanted to thank you so much for this tutorial! I have just completed my full/queen sized quilt. It took one comforter (86×86) from Ikea, 9 yards of jersey fabric (JoAnns) and tons of pins and patience. I was able to finish mine in one week (gifting it so it had to be done), but I would definitely recommend doing a little at a time. My finished product has 49 squares (7 rows of 7) and looks absolutely gorgeous! Thanks again so much!
Alysa- wow, one week to get this done is moving FAST my friend. And, oh my goodness, it is not a small undertaking, right? CONGRATULATIONS!
If you took pictures, you should add them to our flickr pool- I’d love to see them!
http://www.flickr.com/groups/kojodesigns/
When putting the squares together–what size did each square end up being after adding the pleates? I could not find an answer in the instructions.
They were approximately 12″ x 12″. I’ll add that in the tutorial!
Love this quilt.Your quilt is really beautiful and so much work. Now I want something like it. I visited Anthropolgie and found a quilt I want. It’s the one with the fans. How I wish I’d saved money for my bedroom instead of buying fabric. I want to thank you. I am going there tomorrow and look around. Now I know what I want. Thank you!!
Can you recommend a good tutorial for the pleats? I’m new to sewing and cannot find a tutorial and I don’t want to mess this up!
Thanks!
Hey Kelsey- this is a great project to start with (the jersey is super forgiving). Basically, you want to overlap the fabric on top of itself periodically until the finished edge is only 12″ and then pin in place. After you’ve ‘pleated’ each side, pin the sides to each other, right sides facing in. Try it. If you have questions, let me know. 🙂
do you put pleats all the way around the block or how .
Hey Peggy- yep, pleats on all sides.
Hello, I am hoping to make this for my daughter for Christmas, but I have a quick question. I was wondering how soft this blanket turns out to be, like is it uncomfortable to seat on top of the blanket due to all the knots? My daughter loves soft blankets and I wanna make sure this fits the bill for her lol
Thanks
Hey Heather- I love it that you might take this on. The blanket is pretty comfy- not super soft, but also not uncomfortable. The tshirt material is especially nice for the soft factor. 🙂
I saw the anthropologie coverlet and knew I HAD to have it (I am currently redecorating my room), but then I found an almost exact coverlet at target–only difference if color (lavender–my favorite!) but it is still $80. Now I REALLY want to make it. Can you please post the sham tutorial? I am dying to have this is my room, but I am on a budget. Plus, this way I can make it super fluffy for much less $. PLEASE post the sham tutorial! Thanks, whether you do or not, at least I have this tutorial. (:
Hey Missy- I ended up making a throw pillow, but never made shams. I bet there are tutorials out there, though, for the shams! Send over a picture if you make this- we’d love to see it!
Where can I send the picture? And I am definitely making it, I am getting the supplies this weekend so I can have it finished in time for when I get my new bed. I think my mom likes how this is one of those quilts/coverlets/blankets that looks sort of vintage, because the bed I am getting is an old four-poster one we have had a long time and she didn’t want neon bedding or anything (not that I would actually buy neon bedding.).
Oh, and one more question. How long do you think this takes to make? I think I can probably set an hour a day aside for making it, but I would like to know how long it might possibly take.
Thank you for this tutorial! It is amazing! I’m not an experienced sewer, and I’m struggling on the second part. I’ve started sewing the squares together for my first row. My pieces look buckled and the sewn line down does not lay smooth and straight like all the photos I’ve seen.
Do I need to pin the 5 pleats and also sew additional little gathers as I sew each one together? I feel like the spacing in between the 5 pleats is causing it to not give a complete straight neat line in between each one. 🙁
Hey Starr- I love it that you’re attempting this project. You could definitely add other little gathers in there. Also, when you sew the quilt top to the duvet, it’ll straighten out your lines (my duvet had lines on the back that I matched up to the square lines to make it foolproof). 🙂
Send over a picture when you’re finished- I’d love to see it!
I’m wondering….does it hurt to lay on top of?
nope. the jersey just sinks into itself (and the duvet attached to it). 🙂
This is such a beautiful bedspread! I’m wondering if it would work with a fine flower-printed cotton or does it have to be jersey in order to drape right?
I think a flower printed cotton would work great! 🙂
Hi,
I really loved your knotted bedding but what i liked most was your iron bed. Where did you buy it? Any suggestions?
Hey Juliana, the bed is vintage (from like 30+ years ago!)- sorry that doesn’t help much!
Would anyone happen to have an estimate on how many squares to use for a twin sized bed?
Hey Abigail. Since the squares are 12″ finished (after the pleats), I’d take the dimensions of a twin duvet and divide by 12″.
Hope that helps!
OK. I started making this and I thought you sewed the top layer to a duvet cover. It sounds like you actually sewed it to a down comforter. That makes TOTAL sense! Just wanted to add that for all those of you that are confused like me. 🙂
You got it, friend. 🙂
(There is actually a question after my rambling! ) I saw the Anthropologie quilt a while back and absolutely fell in love. However the $300 price tag broke my heart. We have 4 kids so even if I worked that price into our budget and I found myself finally being able to afford it in say one or maybe two years from now…my kids’, let’s call it energy, would be another very sensible reason why we can’t buy a $300 “blanket” as my husband calls it. BUT THEN, I came across your website and I’m doing a great big happy dance because I get my blanket and can sleep with it too! Ok, a silly made up reference to the cake and eating it thing. Anyway, I’m so excited to get started. I get exactly what I wanted at a fraction of the price and absolutely no guilt to having such a luxury with little (dirty) hands that can and will touch it!
Ok, after all of this rambling I do have a question…I want a purple quilt. I am thinking I might have a difficult time finding the exact same jersey sheets to match a comforter for the back. Has anyone done a quilt where they use a different color comforter for the bottom? Maybe, gray or black is what I had in mind…just incase I can’t find matching purples. Maybe it will it take away from the beauty of the quilt, give it a “cheap” look? Just thought I could get some expertise on this…THANKS!
Hey Niki- I love this! Can’t wait to see how yours turns out.
I bet it’d be fine with gray or navy… or perhaps you could RIT dye the back? Just thinking out loud.
Whatever you do, send us a pic- we’d love to see your take. 🙂
i love this so much!! I am doing this for my own!! thank you so much for posting this!!
Thanks Kiana! 🙂
Hi I’m making this and I’m almost done sewing it onto the duvet. My question is how do you sew the last square once you’ve pulled the duvet through? Am I overthinking it?
Hey Leslie- tuck the raw edges in and sew the opening shut. This tutorial shows you how-
http://www.positivelysplendid.com/2013/02/sew-a-pillow-closed-by-hand-blind-ladder-stitch.html
Hope that helps! 🙂
Wow……you’re good. That is amazing!!!! So awesome of you to pass this and all of your other inspirations to us. Very, very kind!!! Very, very talented. I am just sitting here with mouth open.
hi there, would you be willing to make me one and I’d be willing to pay you for it??
Sorry- we don’t do any custom sewing orders right now.
Do you ever sell the quilts you make? I would love to buy this Rosette look a like!
Lauren, what a sweet compliment- thanks!
We don’t do any custom work right now at all, though- sorry!
I just about finished mine!! I have the top done and I’m sawing a full sheet behind it so we can take the duvet out in the summer! I LOVE it! Thanks for the great tutorial!
Heather, I love that! Send over pics when you’re finished. 🙂
These are absolutely gorgeous! I would love to buy one of these one day!
Ballpark—How many pins are needed?
Sandra, hmmm… a few hundred??? I used a whole box of pins (but I don’t remember how many were in the box- haha). 😉
I bought fabric about 7 years ago to try to make this. Finally going to try to give it a go. Still in love with this!!!
I love this! I’ve brought out some buried projects these last few months as well (and this is a great one- time intensive but not difficult). Good luck!!!