
kojotutorial- upcycled "vintage" baby buggy
As an Amazon Associate I earn from qualifying purchases.
Did y’all guess that the baby pram was our recycled project for sytyc? Yep, that was us. Apparently everyone shares my conundrum of having a broken (or just ugly) plastic stroller… 🙂 Here are the details for upcycling yours into a vintage-y pram.

However, I still love the idea of having a vintage-y baby buggy. So I rounded up a dumpster-bound broken stroller, a basket we’d acquired on a recent trip to our local apple orchard, a table runner and placemat that haven’t made their way to my table in awhile, and went to work. 
This lovely little pram is the end result of my toils. It is the perfect spot for a baby doll to rest her head on a once-placemat pillow and snuggle under a formerly-table-runner blanket (black apple dolls welcome but not required). Additionally, it is tough enough for the wear and tear of real kids, entirely upcycled and FREE! Now, if only I could somehow dissuade them from their twin affections for Barney and toys that make obnoxious beeping noises, we’d be good.
To make one of these little buggies for yourself you will need:
-a toy stroller- if you don’t have one, these can be found in great abundance at thrift stores.
-a basket that fits snugly between the stroller’s handle bars.
-a table runner (or about a yard of fabric)
-a can a spray paint
-screws and washers
Tools:
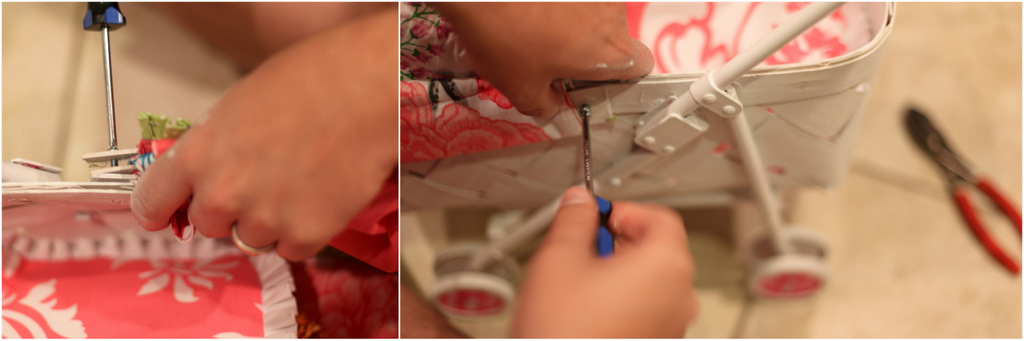
-a drill, to drill holes into the metal frame of the stroller
-a saw
-a sewing machine
To Create the Basket:

1. Discard the stroller liner. With a saw, remove the cross bars on the back of the stroller and the two rods that serve as the “seat” of the stroller. Keep one of the long cross bars to re-use as a handle bar later. Remove handle bars.
2. Remove the handle from the basket. Keep the pieces to use as the boning for the stroller hood. (mine was three pieces of wood that had been pressed together to form one handle. I separated them back into three pieces.)
3. Spray paint the basket, stroller and handle pieces. Let dry completely.
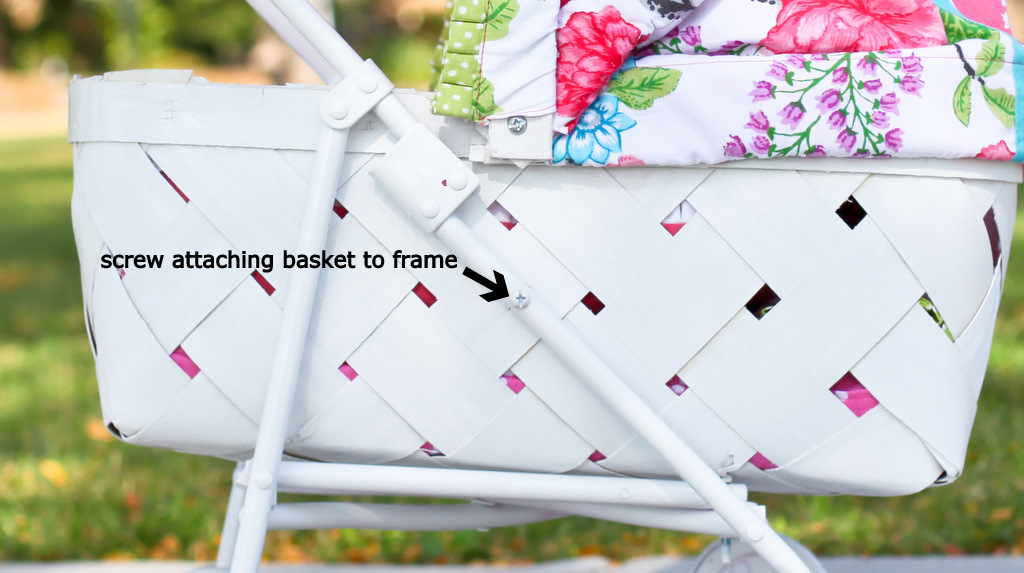
4. To secure the basket to the stroller, place basket into the stroller frame. Mark the middle on the metal bar of stroller frame and the place where it lines up on inside of the basket. Drill a hole through the metal rod and the side of the basket. Secure the basket and stroller together using a screw, a nut and a washer. If you feel like your basket isn’t secure enough, you can also drill holes and secure the bottom of the basket to the bottom of the stroller frame.

5. To create the long handle bar, measure the length between the bars and cut a piece of metal to fit between them. Create a tube using a scrap of the table runner fabric. Place the fabric tube onto the metal bar. Screw the new handle into place using a screw and nut. Pull the tube of fabric over the ends, to hide the screws.
To Create the Hood :
Note: The hood measurements are based on the basket and handles I had. You may have to adjust accordingly.
1. Cut the table runner in half. Match the finished edges together. Seam rip the inside seam of the table runner (the two seams facing each other) and re-sew the pieces together to create one piece of fabric. Measure out so that the fabric is roughly 21 inches from top to bottom and cut off the remaining fabric. The finished piece should be roughly 21 inches long and 28 inches wide.
2. Mark 2 inches in from the top edge and 4.5 inches in from the bottom edge. Fold in fabric half (length wise) to find the center and mark 1 inch from each side of the center.
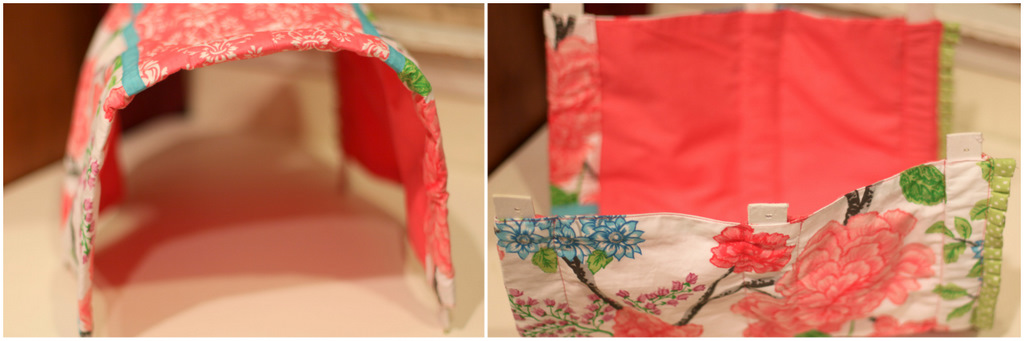
3. Finish the bottom edge by folding and ironing a 1/2 inch seam and then folding and ironing again to create a 2 inch tube. Sew on the inner edge. This tube will encase one of your handles.
4. Sew on the other marks (the width of the fabric) to create two more 2 inch tubes… these tubes will encase your handles and give shape to your hood.
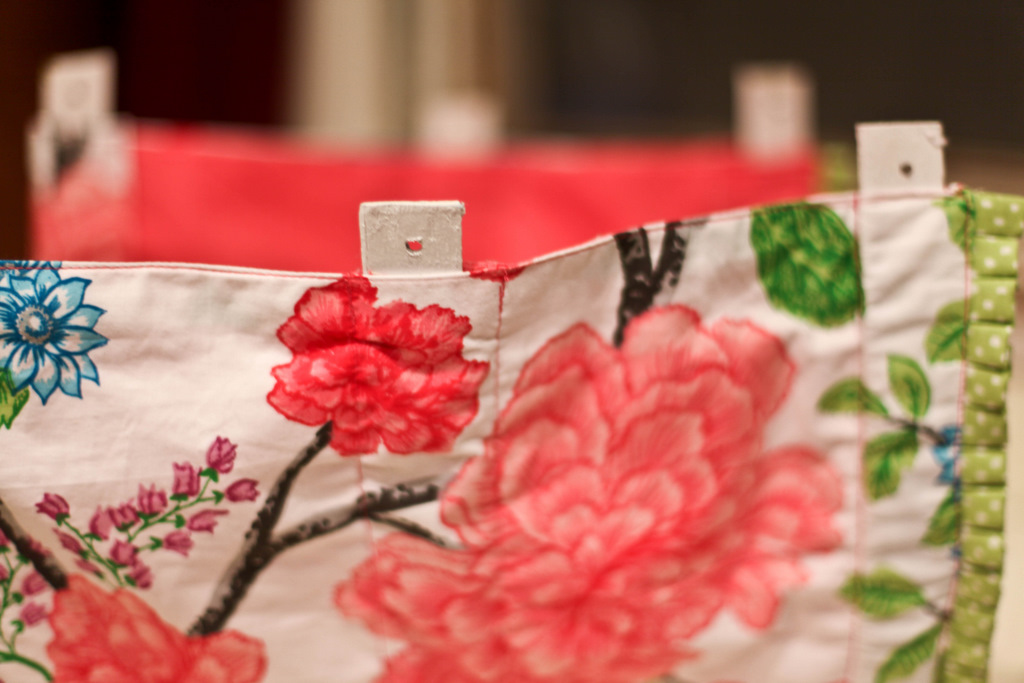
5. If you are using the old handles of the basket, drill holes into each end of handles. Feed the handles through the tubes in the table runner fabric. You should have three handles threaded through 3 tubes. (if you cannot use the handles, wire from a hanger will work as well- though, you may want to decrease the size of the tubes).
6. Gather all three handle ends together and attach to the middle of the stroller with a screw and bolt. Repeat on the other side.

7. There will be a lot of loose fabric where the handles come together. Tuck the loose fabric into pleats and hand sew to secure. For me, this took a lot of fiddling with the fabric until it looked right and felt secure.

8. Use the left over scraps of fabric to make a baby pillow. I found a matching placemat and made it into a baby quilt as well.

9. You’re finished! Give this buggy to an admiring toddler. Just fyi, my girls L.O.V.E. this buggy. They played with it for hours when I first gave it to them and it is still the most fought-over toy in our playroom. 🙂 With two daughters in our house and another one on the way, we may just have to make more of these!
this was genius. i totally voted for it and am planning on making one. love it!
Ladies, you never cease to amaze me. This is so adorable and clever. Fantastic!
Now that is one of the most adorable things I have seen in a LONG time!! I love vintage and this is so much more fun and classy than those baby strollers. I think this might be a fabulous Christmas gift for my girls….eeek….SO excited!! Thanks for sharing.
Lindsay
Beautiful.
So happy that I stumbled across your blog.
This is SO awesome!! I linked to your tutorial over at Craft Gossip Sewing:
http://sewing.craftgossip.com/tutorial-upcycled-baby-pram/2010/10/25/
–Anne
This is the cutest project I've seen in forever. I love it and it is so very original! Thanks for sharing!
Gorgeous!! Y'all are pure GENIOUS!! 🙂
WOW! How adorable!! I love it!!
That is beyond fabulous. Oh the cuteness of it. I am such a lover of vintage too…but the price tags. This is fabulous. I love how you did it and how it turned out. Off to check out this weeks entries.
totally have the same table runners! when i get sick of them i will have a new fun project to do! love your amazing projects!
~selina
This is one of my favorite projects ever. Keep up the great work.
this is just wonderful, so creative, and perfect for little girls! I used to have one as a little kid, they were/are popular in Europe!
so cute and clever! my girls would totally fight over this one. 🙂
I KNEW that one was yours! Voted for you too-it's adorable and so unique!
AMAZING!!
AMAZING!! I can't get over how cute and clever this is…I'll be linking!!
i am so making this!!!!
One of the most adorable baby gifts ever! I often give handmade stuff as gifts and this would make a great gift! Such a fun project! My little niece will surely love this! Thank you for sharing!
Lindo. Lindo. Lindo !!!!
Eu adorei o resultado, e principalmente o fato de ser um carrinho reciclado.
Obrigada por compartilhar e abrir os nossos olhos para a oportunidade de reaproveitar algo que já temos em casa.
Beijos.
This is amazing! I am kicking myself for the little stroller I recently gave to DI because I didn't want to make and sew a new fabric "chair". I would have loved to do this!
I love it!
I'm so excited about this! My daughter loves her doll stroller but destroyed the fabric chair part. Now I know how to fix it! Thanks!
That is absolutely adorable. My 22 month old would die over that. She loves her shopping cart and I have been wanting a little stroller for her. So sweet. I stumbled this post.
OMG, I want to take my daughter 'good' stroller apart and make her one of these instead!
THANKS so much for the tutorial- I think I will save it for her bday in the spring!
OMG, I want to take my daughter 'good' stroller apart and make her one of these instead!
THANKS so much for the tutorial- I think I will save it for her bday in the spring!
I wondered if this was you guys. I totally voted for you! I thought it was the most creative, cutest project hands down! Nice job.
A.MAZ.ING!!! My daughter's birthday is on the 17th and this would make the perfect girft for her! I'm off to freecycle and FB to see if I can find an unwanted baby stroller!
that is awesome! One of the most original things i have seen! good thinkin!
pure genious. i love it and im gonna try it. i have a worn out stroller that i have not thrown away yet, thanks for sharing this
what a genius idea!!! where did you get that basket? it's perfect!
I don't have anyone to make this for…but I've been sharing it with all my friends who are mommies or grandmas. They all LOVE it!
While voting..for you…my daughter saw this over my shoulder and was instantly obsessed. The last couple weeks I've heard "Mom… 'member that, that, that baby facing you stroller?… I want that." at least a trillion times… ok …..really like 20 or 30 but still!….. So we are on the hunt for a perfect basket…….Thank you so much for thinking this up and sharing!!!
wow! this is absolutely gorgeous!!So much cuter than any 'bought' pram. I am adding this to my list of 'to dos'.
This is genius! Love it.
My little girls' stroller JUST broke. Now I know how I'll fix it! Time to search for a basket. 🙂 Thanks for the ideas!
This is so adorable! I am squealing with excitement because my niece's birthday is today and i'm really want to make this for her!!! Wish me luck and thanks for sharing. You guys are awesome!!!
I saw you featured on Ucreate and I thought it was just adorable. perfect for a lovely little girl. 🙂 Thanks for sharing!
Adin B
I love this! It was posted on Little Lizard King today and I'm so glad I saw it. I think my daughter would love having this.
That's why I started selling the replacement seats on Etsy, those things have the cheepest seats I've ever seen, but now I might have to bring the other frame back from my Mother In Laws house and make a pram out of it. Totally awesome.
Awesome, I love it and I’ll get my kids help me make one out of their old play stroller.
Elena, thanks! I actually need to make a new one as well. 🙂
This is so adorable! Thansk so much for the great instructions! I have two broken doll strollers waiting to be re-loved!
Pam, I love that! I actually need to make another one of these as well!