
kojotutorial: floating yarn sign
As an Amazon Associate I earn from qualifying purchases.
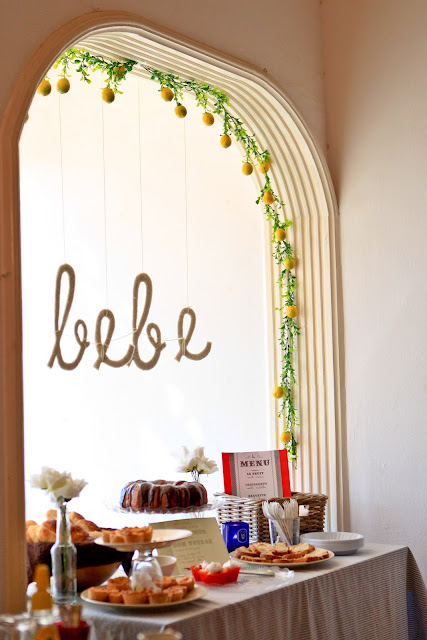
 Hi friends! I have to say, after planning the ‘pour la bebe’ french cafe baby shower, I am in culture shock at the lack of the DIY mentality here in the middleeast.
I’ve been trying to find creative ways to use materials I can find without the ease and convenience of a craft store or hardware store. This sign is an example of ‘life beyond big box stores.”
I love this floating sign because it is inexpensive, takes only a few very simple materials and it can be customized for any party imaginable. I used some recycled foam board from some packaging, but you can use any sturdy paper material. I also used yarn, but you could use any type of ribbon or even fabric cut into strips.


The steps are quite simple. Find a font you like and copy the font onto your cardboard (place the printed pages on top of the cardboard, then trace the outlines of the letter with a pencil, applying a decent amount of pressure with the pencil… when you remove the paper, the traced line from the pencil should be apparent). Cut out the individual letters. Wrap each letter in yarn until none of the cardboard is showing. You can be precise and make sure every strip lines up, or you can just wrap until everything is covered. Both ways look great.

Hang the letters above your serving table for a wonderfully inexpensive (and pretty simple) piece of party decor!
I love this! It looks awesome 🙂
Thanks Kate! 🙂
HI,
Can you please explain a little further about how you copied the font onto the cardboard? We are throwing our best friend a baby shower and are really wanting to make this! Thanks so much!
Hey Michelle- you could either press hard with a pencil and outline the letters (the line should transfer through the paper onto the cardboard) or just cut out your letters and trace them. 🙂
I love it that you’re going to make this for an upcoming baby shower! Too fun. 🙂
I find that if use a lead pencil to scribble over the back of the letter and cover as much of the paper as possible and then trace the letters firmly they transfer great with both an indent and a pencil line to follow. Good luck and congratulations to your friend
Could you please tell me the name of the font you’ve used?
I think it’s ‘little days,’ Lene. 🙂
Thank you…I’ll give it a google-search :o)
While you are at it try dafont.com they have so many pretty fonts for free. I use their stuff in tons of craft projects. They even have novelty alphabets made out of images that when enlarged make the best templates (especially the stenciled look images which make fabulous pumpkin stencils)
Hi Kristin! Darling sign – those letters look about a foot tall. Do you remember about how much yarn it took to cover them?
Thanks Suzie. And, nope, so sorry, but I totally don’t remember! Less than a skein?
Would you be able to do this with the letters attached? I wanted to do “Isabella” in cursive. Any tips/thoughts?
Grace, absolutely! If it were me, I’d make the script sign into an engineer print (a poster sized black and white print that you can get at Staples, and other office supply stores too I think, for $3). Then, I’d glue the sign to poster board, cut the scripty word out and wrap with yarn. 🙂
If you do it, send me a picture, I’d love to see it!