
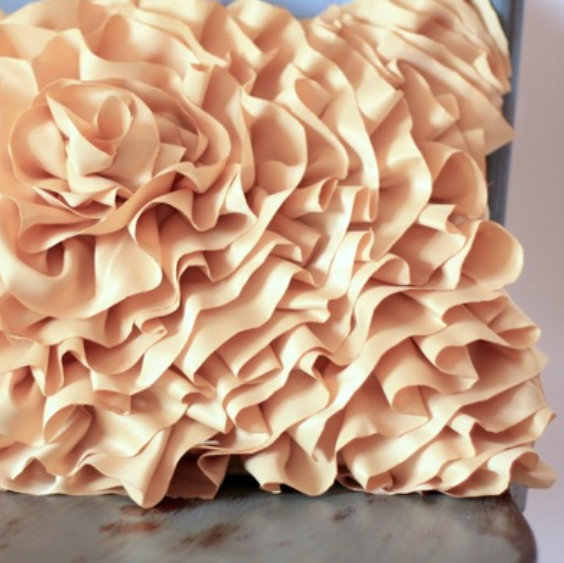
anthropologie inspired knotted bedding part 1 (making the knotted squares)
As an Amazon Associate I earn from qualifying purchases.


Y’all have been too funny about this bedding- thanks for all of your emails and comments and kind words. It sounds like you’re all ready to make your own as well- want to get started on that?
I should issue a warning up front that this endeavor is definitely time consuming… not difficult, per se, but time consuming for sure. That being said, today’s tutorial is for the how to make the pile of knotted squares that will make up your ‘quilt.’
To make the squares for the knotted ‘quilt,’ you’ll need:
-18″x18″ squares of jersey (I used 56 of these for my king sized quilt)… I got the jersey from two flat king sized sheets and a pile of white t-shirts.
-a 6″ plate
-a fabric pen
-needle and embroidery thread that coordinates with your jerse
*A tip before you start. Make the knotted squares assembly line style. Do all of your cutting, then all of your tracing, then all of your gathering, etc. It’ll make this move a little more quickly.
1. Cut out your 18″x18″ jersey squares. I used two flat t-shirt sheets and a stack of white t-shirts for my jersey. I cut out a sample square, labeled it as such with my fabric pen and then used it as a template to cut around for all of my other squares. One note- with all of the gathering that comes later, the 18″x18″ can be approximate- don’t worry about making perfectly uniform squares.

2. Center your 6″ plate in the middle of your square. Trace with a fabric pen. Repeat (and repeat and repeat).
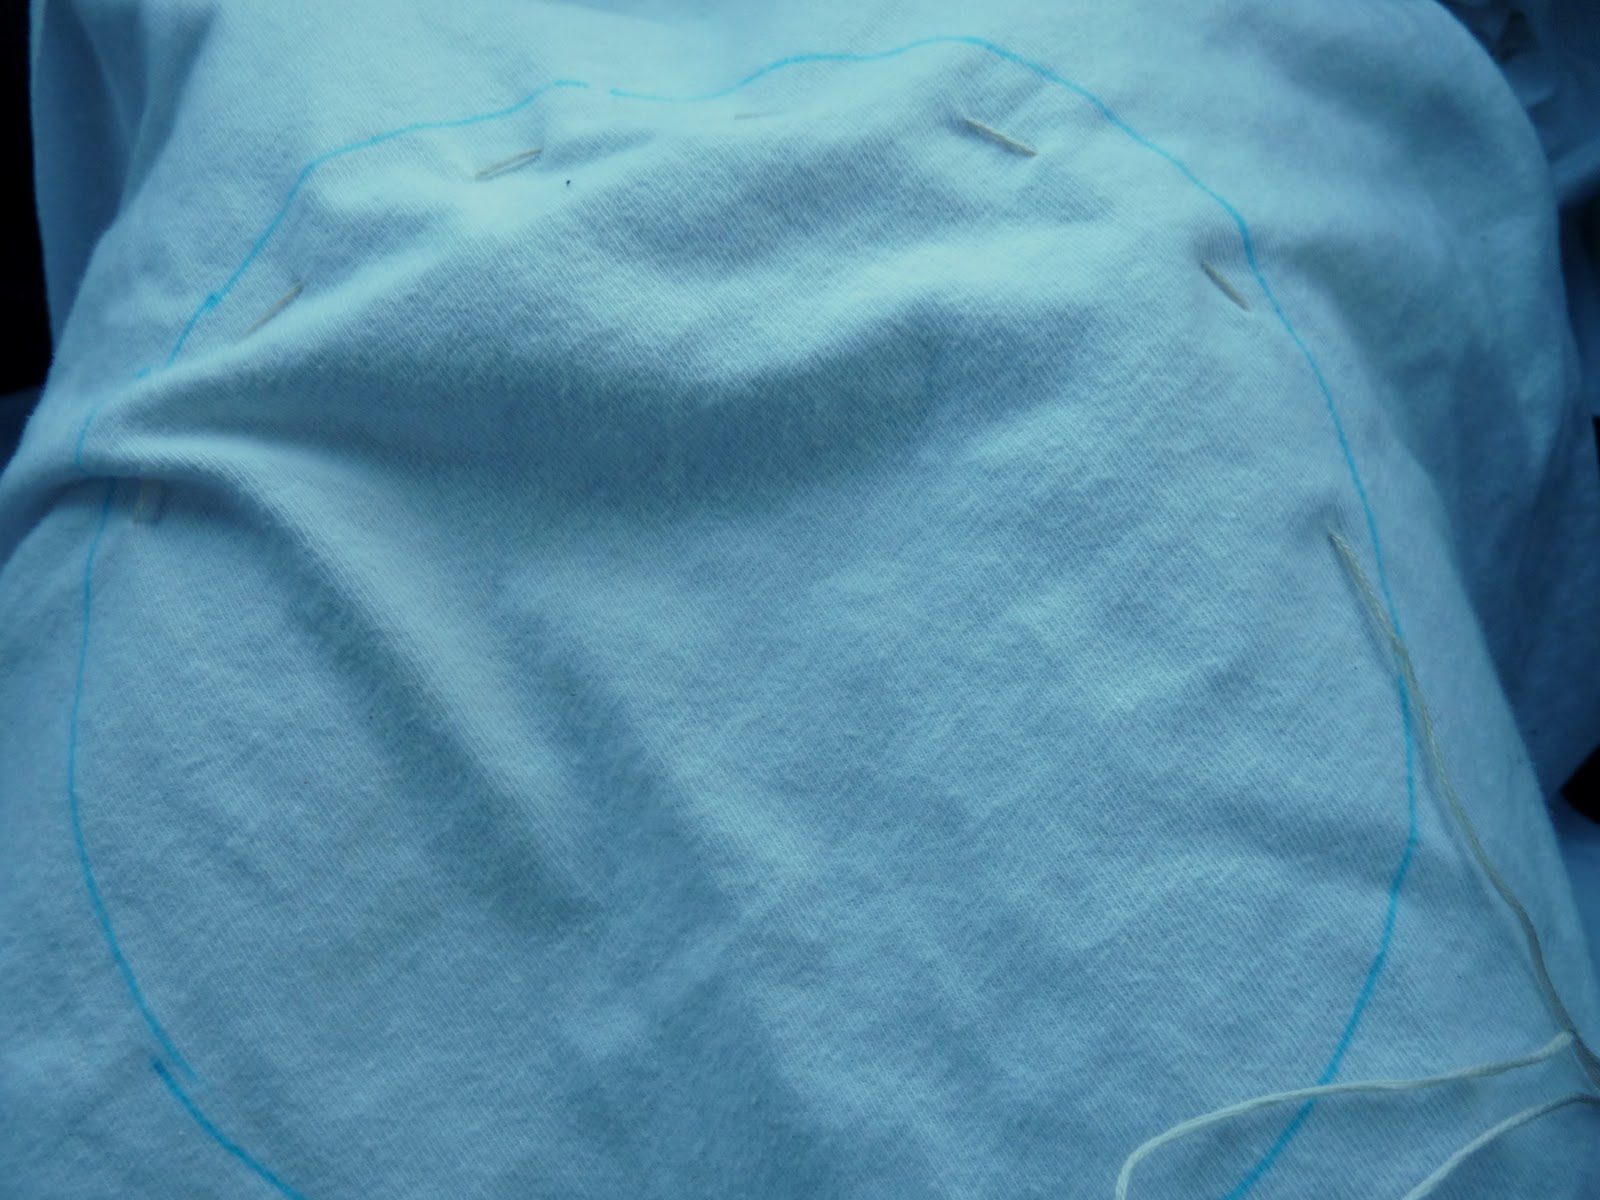
3. Using embroidery thread, stitch inside the perimeter of your traced circle. Use very long stitches.
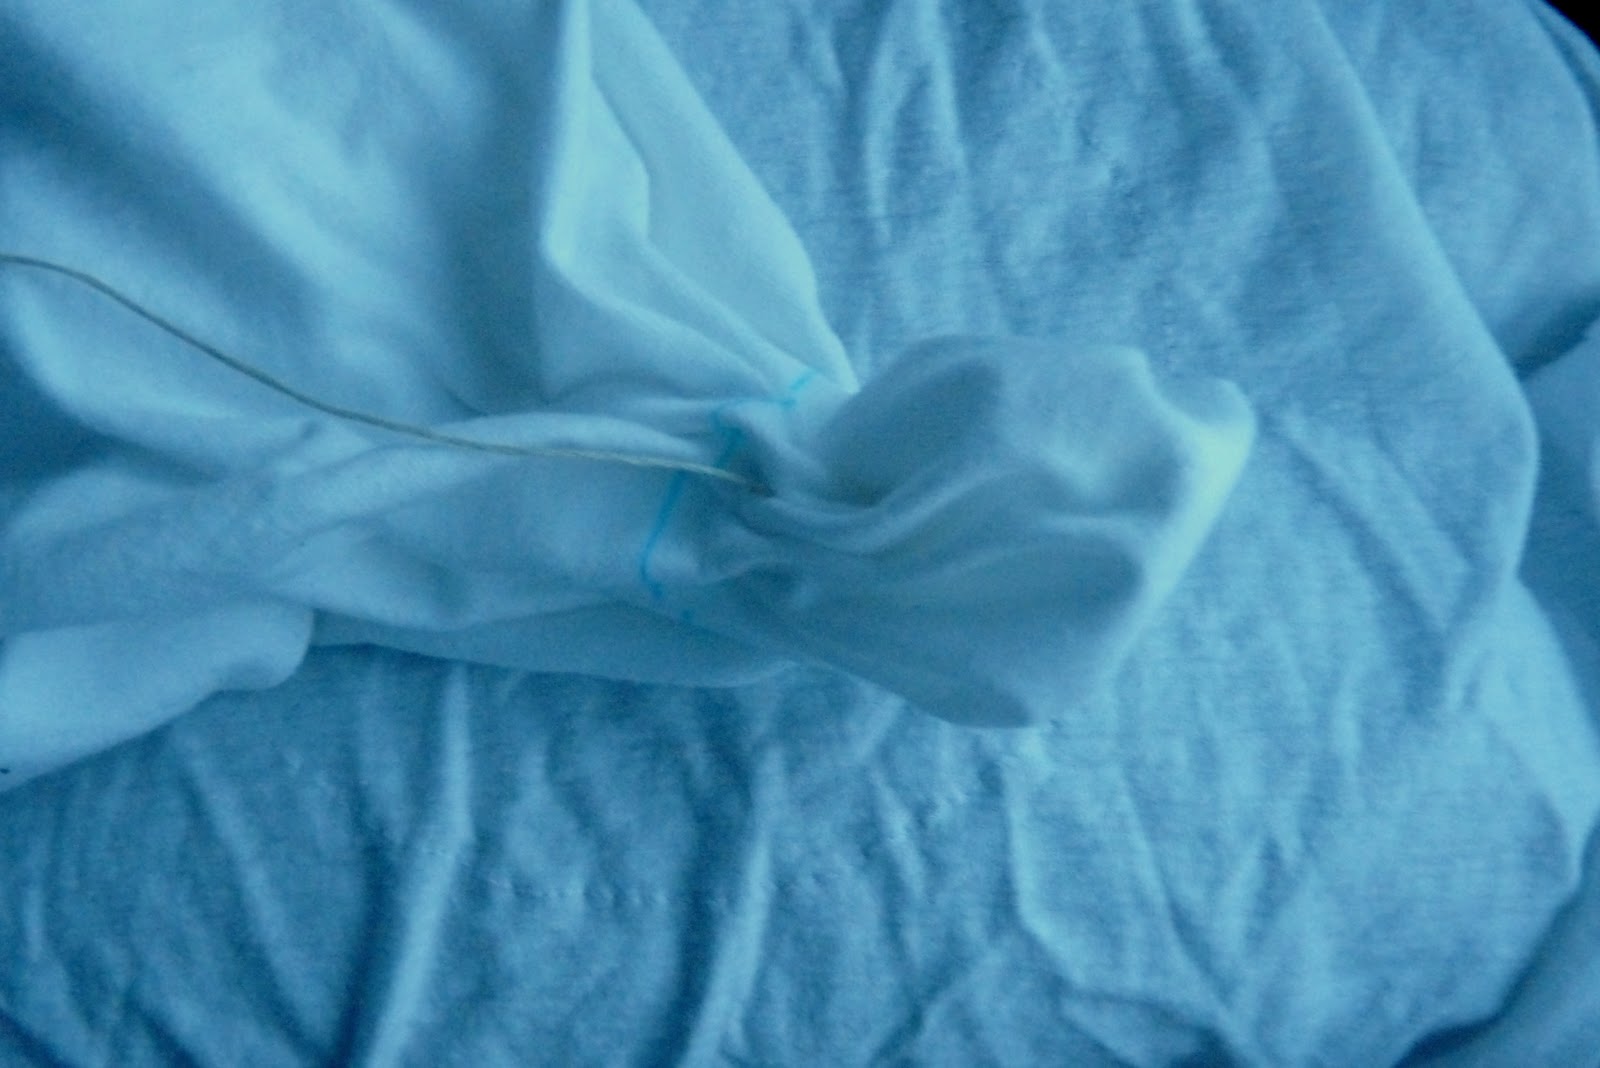
4. Pull your thread taut, resulting in a little pooch of fabric. Don’t remove your needle or tie off your thread yet.
5. This next part is a bit tricky to explain, but I tried to get good pictures. You might even find a better way (if so, let me know!) to make the knots.

This is what I did- I pulled the pooch of fabric to a point, Then, I poked down through the top center until the point was back down through the pulled-taut circle of thread.

Then I twisted the whole poked-down mess until it looked knot-like.
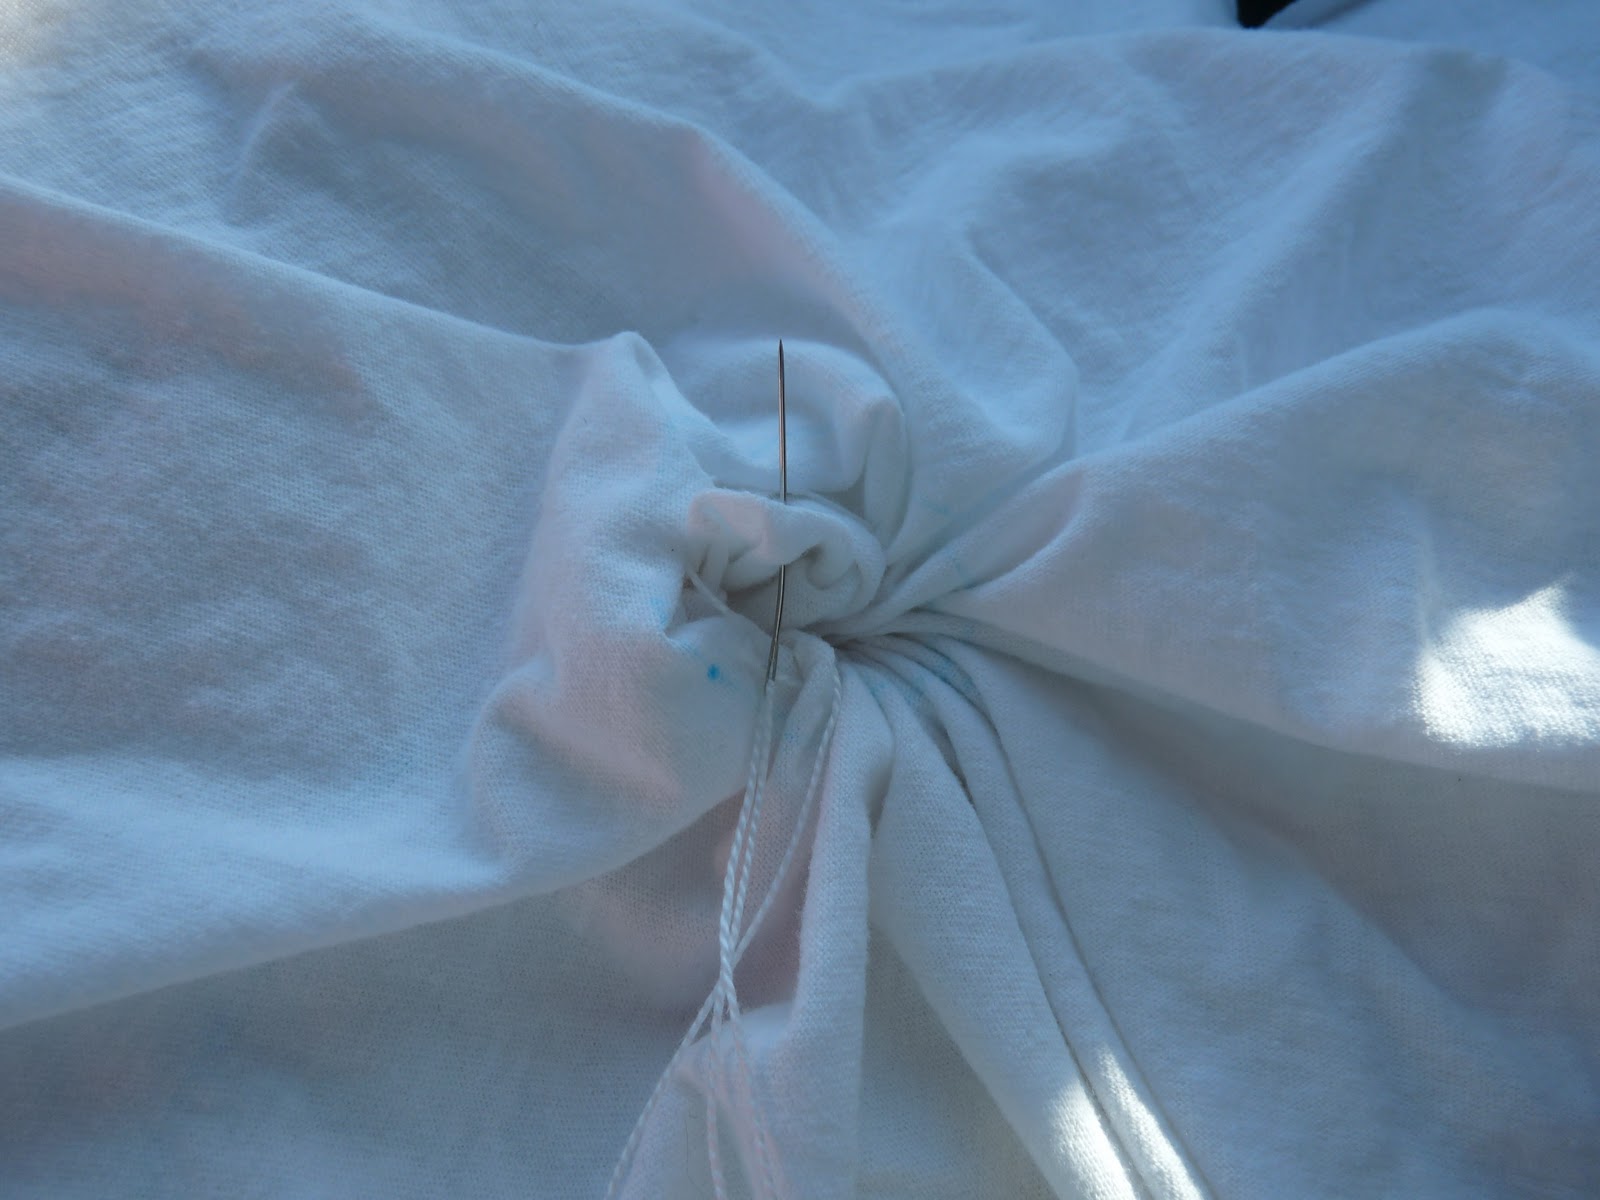
Then I secured the fabric with a stitch through the poked down point.

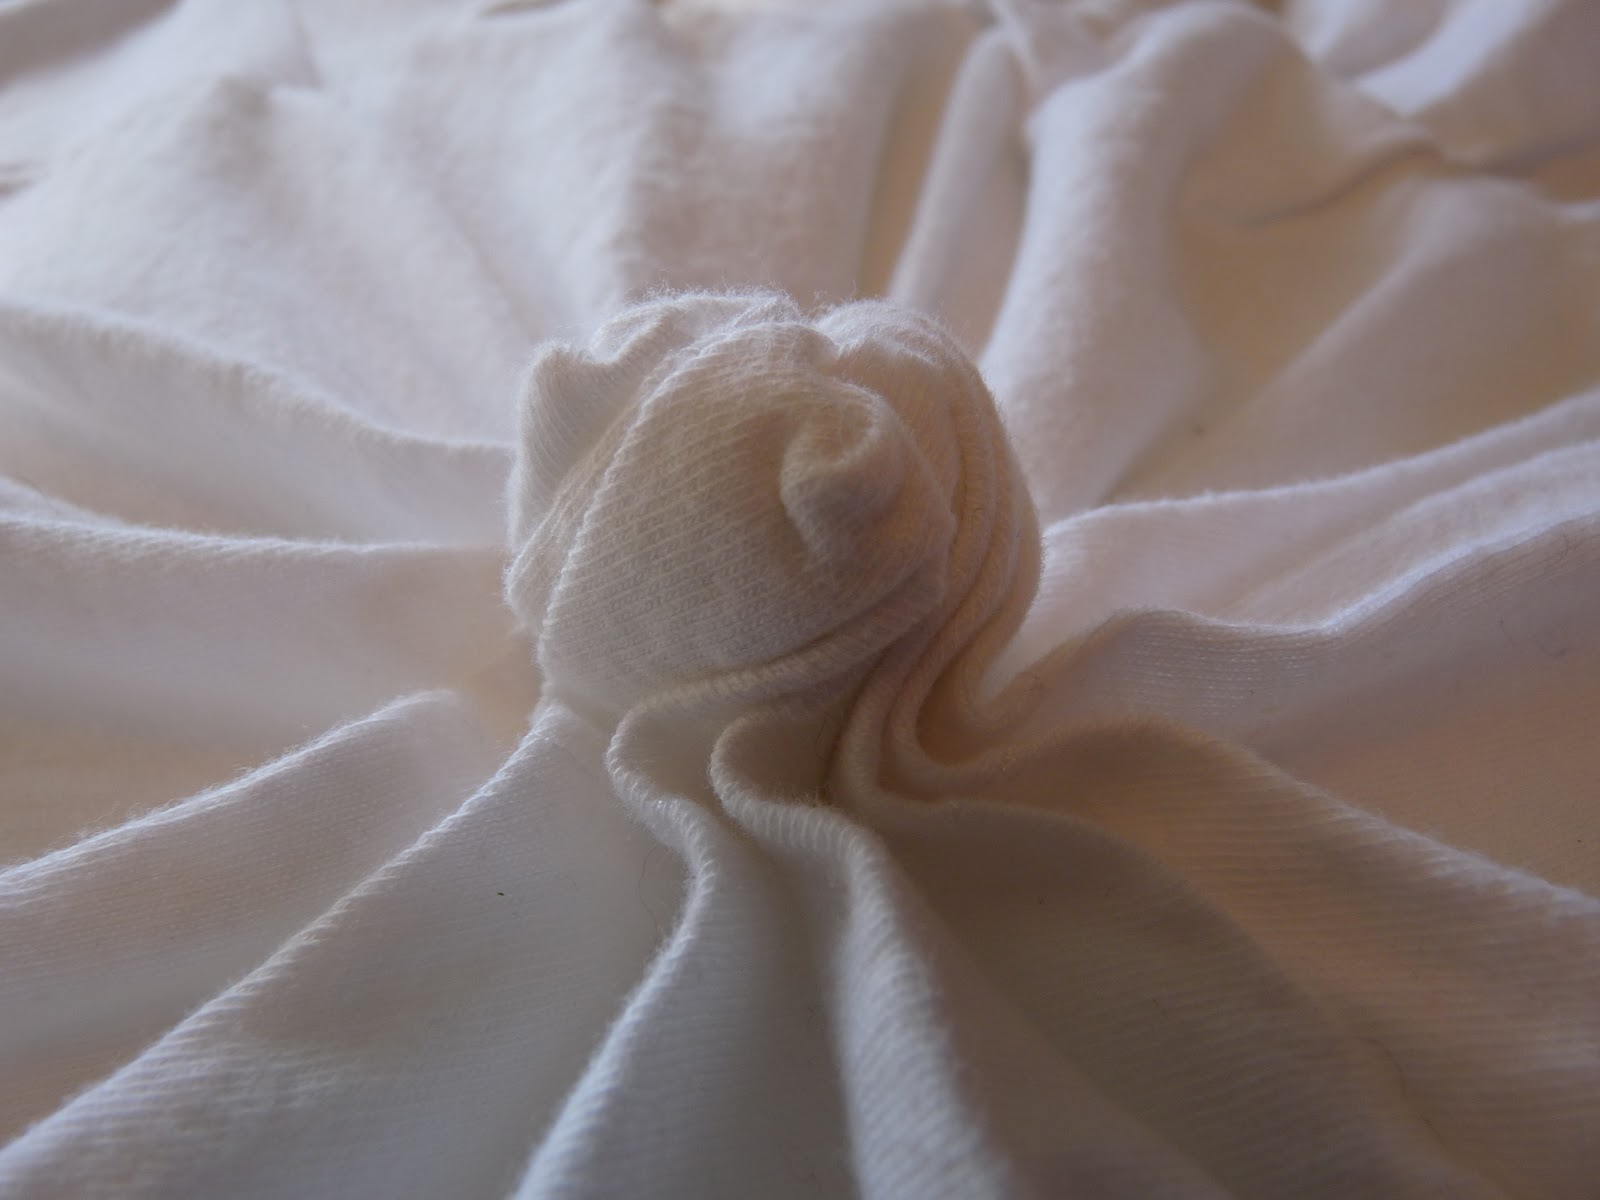
I continued to run the needle back and forth through the ‘knot’ until it seemed secure (usually three or four stitches through the middle of the ‘knot’).

6. Repeat and repeat and repeat. Fifty six times if you’re making a king sized quilt like I was.

Here’s part 2– assembling your ‘quilt.’
ps- I know that many of you out there are actual, legit quilters. I’m sorry if calling this bedding a ‘quilt’ is offensive to you. It’s rows of squares, and I used a bunch of quilting techniques when I was assembling it (which, since I’ve never made a quilt before, I found tutorials for online- haha!). But I am definitely not a quilter and am probably butchering both the vocab and the techniques. Go easy on me, ok? 🙂


really beautiful, love the white and the texture. I bet it's snuggly warm too!
Once Again, congrats! It's been fun competing against you!!
I have been waiting for this tutorial – can't wait to try it out for my own comforter!!
I now have a New Year's resolution for 2011…make this quilt!! Can't wait to see the rest of the tutorial!
that is freaking adorable. i'm new to sewing too, but this doesn't seem all that scary now that you've explained it. great job.
this is really beautiful. great job! tai @ taidye original
YAY!!! I'm soooo glad you won. You definately deserved it!!! This quilt is awesome!!!!! As soon as we get through Christmas this is going to be my first project. Unless I get everything done early (not couting on that since I am usually finishing up on Christmas Eve). Thank you sooo much forsharing the tutorial with us!!!!!
Oh my gosh! This is gorgeous! AND, you're so silly, how dare anyone think of calling you out on the "quilt" thing, you did a fantastic job!
This is so awesome! It looks like something that could easily keep me occupied on the 10 hour drive to my in-laws for Christmas… And my husband definitely loves it! Now we are just keeping our eyes open for clearance flat sheets! And I only have to make it for a queen size bed!
gorgeous!
You are so wonderful to share this with us all! So creative. It turned out just like Anthro's! Looks like I have a project for winter break now. 🙂
I just love how elegant this looks! It's like sleeping in a ballroom 🙂
This is so gorgeous and I can totally see this on my bed, but sadly I don't think I have the patience to try this out in a king-size. Maybe I could try it on a smaller scale…
Wow, that is freaking amazing! Congratulations!!! That is so elegant, thanks for sharing the tutorial
That is so BEAUTIFUL! I love it–what an incredible bedspread!
Just a quick note to let you know that a link to this post will be placed on CraftCrave today [12 Dec 01:00am GMT]. Thanks, Maria
This is absolutely gorgeous. You did an amazing job.
how amazing is that?? wow! i am impressed with your dedication. i love white bedding and this takes white "boring" bedding to the next level with all the dimension and lovliness!
BEAUTIFUL!!! So thankful for this tutorial!!! New bedding on the agenda for 2011!!!
That is beautiful! I don't quilt, nor have I ever had any desire to do so… but I sure do want to give this a try someday. If I ever get brave enough, that is. Because I have a king sized bed too… LOL!
That's awesome! I think I'll try this in the spring. Thank you!
How's it holding up in the wash?
@KatrinkaJane
I washed the 'top' part (the pieced squares) before I sewed it to the duvet, and then I washed the hole thing when I finished. I don't intend to wah it often, but it seems to do ok in the wash when I need to. 🙂
Hello,
Love this idea! How has it held up over the last few years if you still have it? Also, are you happy with the white? Did it still wash well?
Hey Fatima, I still do have it! And the white has held up great. I have bleached it a couple times, and it is still going strong. Hope that helps!
How many squares would you need to make for a queen size? Love this!
I'm awestruck! Wondering if any other type of fabric would work? Any particular reason why you used knit? And yes, I too am wondering how many squares it might take for a queen size one? Thank you for the inspiration!
@Edna
Hey Edna! We used jersey because we were trying to replicate the jersey one at Anthropologie… and I'm a sucker for soft. 🙂 I think you could probably try other types of fabric with similar results, though.
Also, no idea on the number of squares needed for a queen. The finished squares are about a 12"x12", but because of all of the gathering, you could have less pleats to make the finished size a bit bigger or more pleats for smaller.
Definitely let me know if you try it and find the answer! 🙂
Oh gosh. I can't tell you how much I am in love with this. I have been waiting for the tute since you won. I sincerely hope to make one myself here soon!
o my goodness!!! this is fan tas tic!!! I long for white bedding. Two year old son? No go. But this would look amazing in chocolate brown for winter. Must say i so don't have the guts for a full size. But when I have my next baby (hopefully a girl!) I am going to make one in mini size!! in pink….. think i might have to make a baby first!!! ooooohhh and imagine one in forest green for the couch!! would you make me one?
Breathtaking!! Awesome! I want one!
So cool! I wish I could sew 🙂
I really love this! Thanks so much for the tutorial. I'll have to find time to make this. I also shared the link on our Facebook page: http://www.facebook.com/pages/Our-Humble-ABowed/120919047970619?ref=ts
Beautiful job. Such patience!
I will be featuring your project Monday on Examiner.com.
http://www.examiner.com/howto-home-design-in-new-york/samantha-baldwin
I've been trying to figure out how to recreate one of these! Thanks for showing me it can be done!
Please allow me to thank you for showing this tutorial. I saw this duvet in a Country Living Magazine this past summer and fell in love with it instantly. I found your tutorial and then lost it, but thank goodness I found it again. I'm linking it to my blog, hope you don't mind.
i just made myself a couple of throw pillows using this amazing tutorial and they turned out amazing! i used a black velveteen and made an envelope opening on the backside. i plan to tackle the king quilt sometime… THANK YOU!!
I love this Duvet. I have been looking for white bedding for about a year and the instant i saw it I LOVED it. SO guess what i am making this week. I am actually doing it out of a white heavy muslin. so we shall see how it goes.
wow. got here from bromeliad, and i am inspired and speechless.
Very lvoely! You did an awesome job =)
Oh my goodness I love LOVE LOVE this!! I wonder if you could use other kind of fabric to make this. Would the fabric have to have give do you think for it to work and look right?
I so want to try this and this would be perfect for my bedroom!
bee blessed
mary
Thank you so much for time and effort taken to make this tutorial. Will try and make some cushion covers using this technique.
Wow, wow, and wow, again. This is amazing. I'm stopping over from DYI. It's been awhile since I've been over here – Hi girls! Do you answer the question in Part 2 – Is it heavy? Blessings, Kim
This looks AMAZING!!! And super easy! Awesome project, I'm so inspired 😉
I am a quilter and to answer your question, Yes, this is a quilt. An amazing quilt at that! I found your tut via: http://thelongthread.com/?p=6993
it is listed as 1 of the "100 Top Tutorials of 2010".
Congrats! Sure glad I found your blog and now can't wait to see what you come up with next.
p.s. I do see this quilt in my very near future. I love it.
p.s.s. Can I post a link on my blog to this tut?
Sandy
I LOVE you!!! I saw a picture of this duvet cover a week or two ago and was so crazy for it I was going to try and figure out how to make it. And then I find this!
Yayyy!! 😀 Looks perfect!
I saw this quilt on the Anthropology website earlier this week and LOVED it, the price…not so much. I figured it would be somthing I could make and then…taaadaaa! I found your website! I am starting today and as a way to make the proces a little quicker, I used a sheet of cardboard to make the square template, I then cut out the circle in the center, that way I could mark my squares with the circles in one pass 🙂
amazing idea! thank you for sharing
Holy moly! Nice job, I can't believe you made that, it looks amazing!
Congratulations. This is so beautiful. I dragged my mom over to come and see it. She's both a seamstress and a quilter and she said kudos to you because this was A LOT of work.
This is beautiful and I LOVE that you're sharing the how-to! This is my first visit to your blog (found you via @blessedlife2 on twitter) and I've just become a follower. Can't wait to see the assembly! Thanks so much for sharing this wonderful project. 🙂
wow this is amazing.
I love it, absolutely beautiful. Been wanting to do a quilt.
That is just gorgeous!! I think I'm going to do it!
this is INCREDIBLE! LOVE IT!
You can call it whatever you want to…quilt, coverlet, spread! It doesn't matter, it is knock -down gorgeous !!
Wow!!
Carol in GA
Ummm…I am SO making this. I have got to get off the internet I am getting creativity overload!!!!
I love it! You are very clever, indeed! I would love to give this a go, myself. You have inspired my next project. So happy to have found your blog, via TLC. x Marnie from Australia
Wow! How gorgeous is that?? Reminds me a little bit of an incomplete old pillow top I salvaged. Its done much the same way except, of course, on a smaller scale. Very Lovely!!
Absolutely Gorgeous! I saw this months ago in an ad and wanted it…the price scared me off! This definitely qualifies as a quilt! Great Job! I MUST try this!
GREAT IDEA. THANK YOU FOR SHARING. I AM YOUR NEWEST FOLLOWER AND I WOULD BE HONORED IF YOU WOULD LINK YOUR SUPER CUTE BLOG UP ON MY BLOG STALKIN' PAGE.
http://alaynahoward.blogspot.com/p/blog-stalkin.html
Who manufactured the bed in your pic please.
It’s vintage (a friend has had it since childhood).
I am in loooove with this duvet. My bed definately needs a revamp yesterday and I have had my eye out for a DIY duvet and this one makes my heart flutter! It seems like a lot of work but the payoff is priceless. Thanks to the other commenters about making throw pillows, throws and the awesome idea of making one for my daughters soon to be toddler bed. Thanks a MILLION! Can't wait to get started!
I am so happy you put up the instructions on how to make this awesome duvet cover!! I just fell in love with the navy blue on on anthro and now I can make my own instead and save a ton of money!! I just wanted to also tell you that I am a recent follower because I love your blog and I also linked this page and step 2 page to my blog!
I fell in love with your bedding a few months ago and I just finished my version. Thank you for being so creative and amazing. I hope it is ok that I linked up to your projects on my family blog. http://cavagepatch.blogspot.com/2011/02/bedding.html
this is so cute! the knotting gives it so much luscious texture and it makes the bed so cozy looking and inviting. I am your newest follower.
I finally finished mine! Thanks again for the great tutorial. You can see it here.
Great job! I love how it came out! Maybe this will motivate me to get my sewing machine fixed!! 🙂
Oh so glad I found this! Great tutorial and I linked it to my bedding project post too, well done!
this is the most amazing thing ever! i'm currently in the midst of finishing this project and if you're someone doubtful wanting to try this, here's why you should:
1.)it's easy…time consuming, but easy
2.)you save roughly $250
3.)it's a fun project
4.)the payoff is SO worth the effort
5.)the sewing is easy as pie (i don't even sew!)
oh, and a tip for the rosette making in part 1- push all of the pooch fabric out and then poke in the middle with your pinkie. take the little fold of fabric you created and sew it down. go back and re-adjust the rosette till it looks like you want it to!
-Gracie Beal at graciebeal.blogspot.com
Steller!
Hey –its Cheri from Its So Very Cheri–great job. It is beautiful.
One of our TOP 10 contest entries at http://www.thediyclub.com made one and gave kudus to you. I had to come over and see the original.
You gals need to enter the competition. We have a super fun competition coming up all summer long.
Cheri
My friend and I each started making this bedding last week. She has her squares all cut and half stitched. I have all but 10 squares cut (second set of sheets is in the drier) and I have stitched three. It is a big undertaking but it is going to be well worth it. Thankfully my friend is a sewing/quilting queen so hopefully that part will go smoother for me–I had to look up online the start and finish knots. . .so sad. THANK YOU for the awesome tutorial.
i seriously think you are two beautiful people for giving me this tutorial. i have been searching and searching for something fabulous and i guess i'm just THAT picky. or cheap. whatever.
this is awesome and now i can't wait for my mom to come show me how to use her sewing machine.
ugh, awesome!!
Question: when you make the knotted part of the square (the pooch), is the finished knotted square supposed to have the circle you drew on top or underneath? Meaning, do you push the gathered fabric through the stitching to the other side or just manipulate it on the same side to make it look like a knot? 🙂 BTW, the quilt/duvet looks amazing,and I love the tutorial! Thanks so much for pulling this together. I can't wait to make one myself! 🙂
How many squares would you need to use to make it a queen sized quilt? I only have a full sized bed and a queen duvet will fit it.
I'd really appreciate any input on this! I love this quilt!
This. Is. Stunning! I love it! Fabulous job! And really, your "knock off" looks better than the original! Awesome, awesome, awesome job!
Gorgeous! I can't wait to try this out. Thank you so much for the how-to details!
I have been in love with this forever and I am so excited to finally get started on mine soon. I featured you on my this week's pinterst loves #5 on my blog and would love for you to stop by say hi and grab a button. I will for sure send you pics when I get mine done in BROWN!
A mommy's life…with a touch of YELLOW
tyandwhitneyulrich.blogspot.com
where did you get the fabric for the pillows?
Wow, this is amazing!
Absolutely breathtaking! I've been toying with the idea of making a duvet cover like this. Your tutorial is awesome. I'm bookmarking this right now! I dabble in a little bit of quilting and don't see a problem with calling this a quilt. You do have to piece the squares together!
I'm a "legit" quilter & this is one of the prettiest things I've seen. Gonna make myself one SOON!
hello great tutorial!! i made a post on my blog using your tutorial to make pillows-you can find it here:
http://thegildedhare.blogspot.com/2012/01/anthro-inspired-pillow.html
michelle
Hey Michelle! Love the pillows! I haven’t had any trouble with the knots coming undone (and have washed it quite a bit). So weird! I did use embroidery thread- maybe that makes the difference???
Anyhow, I love any way to make things more sturdy- way to go!
And they look great!
About the thread…. unless I missed something, please forgive me if I did, you mentioned embroidery thread. There are lots of threads that people might find as embroidery thread. Embroidery thread for machines, the kind that Sulky, Madeira, is very fine and breaks very easily. It looked like you used a sturdier kind like a Pearle thread or maybe you used the 6-strand embroidery floss?
So glad you mentioned this- it IS embroidery floss. I’ll fix it in the post! 🙂
So, just curious but is the second part of this tutorial on how to assemble still coming or did I miss it somewhere along the way? i love this quilt and want to make it for my bed. I could make up a way to finish it but then i might ruin it 🙁 haha.
Hey Sara! Here’s the link to part 2 (I’ll add that to part 1 as well). Send pictures over when you’re done- we’d love to see them!
http://www.kojo-designs.com/2010/12/kojotutorial-anthropologie-inspired-knotted-bedding-part-2-putting-it-all-together/
Did anyone nail this project and want to sell? I want one for a baby crib!!!
haha! it’s a TON of work, so finding someone to make one for you is a smart move. 🙂
I was wondering how many squares do you think I would need to make a full size? I never made something like this before and would loveee some feedback.. Thank you 🙂
Hey Brittany! I love it that you might be making one of these. I don’t know how many squares it’ll take, but each finished square is about one square foot. Just divide your dimensions by 12 (inches) and you’ll have your answer. 🙂
Good luck!
Hi, do you happen to know the name of the fabric you used on the accent pillows?? It’s beautiful!
Hey Beth! The pillows are from Anthro, not handmade. Sorry to disappoint!
The quilt is beautiful! I was wondering where you found those pillows? Or did you make them and if so, do you have the print name? Thanks
Sorry, I should have just read all of the comments. 🙂
🙂
This is beautiful! I have a question: Is this easy to wash? Easy enough to just throw in the washer…or dry clean instead?
Oh gosh, I couldn’t ever have dry clean only bedding (not with the two Smoochies). Anyhow, I think I’ve washed it three or four times. The bonus of the white is that it can be bleached as well. 🙂
Kirsten,
I don’t care WHAT you call it…you are SO creative! You have no idea how many white undershirts that my husband goes through. I could just “knot” them as he throws them and some day have a quilt!!! 🙂
You go girl!
Hahahahaha! 🙂 Thanks friend!
Okay, Kirsten, I highlighted this post on my blog.
robin 🙂
http://robinsnestquilting.blogspot.com/2012/04/t-shirtsdiscountsthe-flu.html
Thanks Robin- what a write up. 🙂
Wow, it is so beautiful! It looks beautiful and soft. You deserve to win!
Stunning and so innovative of you. As a quilter, no offense taken, it’s just your take on the art of quilting!
Thanks Eileen! 🙂
There are NO Quilt Police! It fits the bed, it was made with pieces and has a ton of love sewn in it. I really like it.
Haha- thanks Emcee! 🙂
How does this knotted quilt hold up when you wash it? I wash all of my bedding at least once per week, sometimes more (we have 3 kids under 7 and I’m kinda a freak about my bedding being clean). I have had several colorful Pottery Barn quilts that fade quicklly. I have decided to switch to all white bedding so I can wash them to death without the fading….I love your quilt but am curious how the knots hold up before I do all that work!
Thanks!
Hey Justina. If you use embroidery floss (the six stranded kind), the knots hold up really well. Plus, I LOVE it that the white is bleachable. Glorious. I don’t wash my bedding every week, but haven’t had any problems with the knots holding up so far.
One word of caution- the bedding does take awhile to dry. That’s the only holdup I can see. 🙂
Send me a picture if you make one!
LOVE
k
So I have big plans of making this quilt in the next month but I’m wondering where to get the jersey sheets? I checked Target and I thought theirs looked really cheap and Walmart’s were okay but you had to buy the whole set. Any suggestions?
I got mine at Target, but I’m sure Walmart’s are also fine- the whole set is no problem- you need TONS of fabric. 🙂
Can’t wait to see yours!
kirstin
How many squares do you think that I will need for a full size bed? I think this is awesome and have already started the process of making the squares, but I do not think that I will have enough. If you could let me know I would really appreciate it! I’ve never done this before and could use a few pointers.
Thanks Again,
Casey
Hey Casey- no idea on the full sized bed since I haven’t made on that size. The squares end up being about a square foot in size, so you could measure the width and height of the full duvet and divide by 12.
Let us know how it turns out!
Do you think it would work with regular sheets instead of Jersey?
Yep! 🙂 The knots might look different (since jersey has so much stretch/give and regular sheets don’t), but all of the seams are hidden, so there’s no reason you need to use jersey. 🙂
I love, love, love your knotted quilt and used your tutorial to help me make some shams. Thanks for the inspiration. You can check out my shams here http://bigwhitehouseonthehill.wordpress.com/2012/07/09/adding-some-softness/
When winter rolls around, I’m tempted to make a quilt like your to match.
I saw your shams (did I leave a comment, I meant to) the other day and love them- the framing is fantastic! And yes, definitely try the quilt this winter- it is high maintenance but fabulous (I love the way the knots of your shams look with your clean bedding, though! So fresh!). 🙂
Hi – love the “quilt” I am inspired. I have this identical bed but mine has metal pieces and marble balls in-between the ornate detail. In a recent move, a rod was misplaced – did you disassemble yours or have any idea where I might be able to find a replacement rod. I’ve tried antique shops and online antique dealers but no luck yet. Thnx
Shureka- sent you an email about this! 🙂
Hi! Thank you SO much for posting this! I just finished making one and I absolutely love it! I had so much fun making it 🙂
https://sphotos-a.xx.fbcdn.net/hphotos-ash4/394298_4549719426112_519560956_n.jpg
Katie, it’s SO PRETTY! I love your headboard too!
Who cares if some people get offended. I quilt I can say that loosely. This is a beautiful quilt. If I didn’t have so many other projects I’d be rushing out for supplies. I am putting this on the list of things I want to do before next year. It’s so pretty.
Thanks Danielle! If you make it, send me a pic- I’d love to see yours! 🙂
Would micro-fiber work well? Absolutely love this! Doing it!!
Courtney, I think any fabric would work, actually. The microfiber might be heavier and give it a little bit of a different look, but I don’t see why it wouldn’t work.
If you make it, send a picture over!
I am making a duvet cover of this, but all of the duvet covers are too big or too small. According to this tutorial, with all the squares together the top will be 96″ by 84″. Should I just order the duvet anyway and hope it works? Because on part two you are sewing it to the duvet, and whether I do that or make a duvet cover it still won’t work. Can anybody help?
Hello
I was googling around looking for anthroplogie quilt ideas for my niece and found yours. I just think it is perfect !!! By chance do you make them for other people ? I know it has been awhile since you made this one but I would love to talk to you if your interested.
Thank you
What a compliment Tina!
Sorry to say, we don’t do any custom sewing right now. 🙁
This is incredible! I am so impressed and am going to give it a try on my king. Do you remember how much embroidery floss you used?
Aimee, I bought a spool of white and didn’t use all of it. 🙂
how much did this project cost you?
I had the sheet on hand as well as most of the t-shirts… I had to buy the actual duvet ($30) and maybe $10 in supplies? So $40?
Here’s my finished duvet. I used an existing comforter and added a king size sheet to the underneath to sew the old comforter within. I sewed a nice fold at the top and bottom of the duvet so the inside comforter doesn’t move.
https://pinterest.com/pin/35958496997234986/
Love it April! It looks great…
It is gorgeous great tutorial as well. I think if I made it I would make it into a Duvet cover.
Love that idea, Bonnie! 🙂
Where did you buy the sheets at? How much where they?
I got them at Target- I think they were $25 for the set. 🙂
This looks so perfect! Just as good as the original! Thank you for sharing your tutorial. It’s very in depth.
Sara
Thanks Sara! 🙂
this is such a super idea – definitely cheaper than the anthro one, with the satisfaction of having made it yourself! I know you used a jersey but do you think other fabrics would work as well? I’m keen to make one with a silkier, lighter sort of finish…something good for summer. Great work!
Bridget, after sleeping under this for the last couple months (aka, having it rolled up at the food of my bed), I LOVE the idea of doing it in something lighter. 🙂
And since all of the edges are finished I can’t imagine why that wouldn’t work. If you make one, will you send me a picture?
I have this quilt from anthroplogie and the little rosettes are falling apart and I can not figure our how to fix them do you have any suggestions?
Perhaps run a threaded needle around the entire perimeter of the rosette and tighten???
I did it! Thank you so much for the great tutorial and beautiful pics!
YAY Greta! Did you post any of the pics on line? I’d love to see your take!
This is gorgeous! I learned how to sew 4 years ago when I was pregnant with my oldest child, so I still have much to learn. Ive made two quilts for our full size bed, the second one being more elaborate. I told myself I’d never do it again! But this post has changed my mind! Do you think it would work well with other fabrics? Or would jersey be the best bet? I want to do it right the first time. I have some cute printed cotton fabrics I was thinking of using.
I think that you could use whatever kind of fabric you want… if you’ve already put together a couple of quilts, you will be totally fine on this one. 🙂
I’ve read some of your more recent comments and my question was answered! Do you think that using a different type of fabric would give it a much different look with the knots?
It is a possibility that the knots will look different with a different fabric. 🙂
This is absolutely beautiful. If only I had the patience & time.
Thanks Lea! It is totally labor intensive, though- way to know yourself. 🙂
So, I am secretly redoing my sister in law’s bedroom and I am trying to do it on a very strict budget. I love the rosette bedding from Anthro but it obviously doesn’t fit my budget. I am currently 14 squares away from being done with all the knotting (I found that doing 14 a day for 4 days made it tolerable lol). BUT the reason I am responding is because as insane as this is, 2 days after deciding to take on this project I was at Lowes and you will never believe what I just so happened to find…18 x 18 inch COTTON SQUARES!!!! I couldn’t freakin’ believe it! They are sold as high end painters rags but are made with cotton brand t-shirt material and sell for $4.00 for 12 of them. So I bought them up and saved all the cutting. I just wanted to let people know that they can cheat a little 🙂
http://www.lowes.com/pd_459015-968-82512/40LWS_4294715830__?productId=4542088&Ns=p_product_qty_sales_dollar|1
What a great find Mikenna! Glad you found the answers to the question. 🙂
BTW has anyone made this as a queen size quilt and can tell me how many squares I will need?
Lol, Nevermind, I just read the FAQ section :/
This is a wonderful piece. I’m thinking of making it with cotton gauze. Just a question though as I’m a little confused. (easy to get me confused these days) When you poke the pooch back down through the circle. It says you then twisted the whole poked down mess until it looked knot like. Soooo was that on the top or underside where you poked the fabric through? I’m trying to get a visual on how to do this. Sorry for such a silly question. Thank you
Hey Mary- you don’t poke it back through… you just tighten up the circle, push the top of the center poof back into itself (which is probably where you got poke back through- it’s just the very tip), twist and little and sew in place. Hope that helps!
hola me encanto tu edredon hermoso y gracias por tu esplicacion muy clara me parece que voy hacerme uno con tu permiso ya tengo muchos retazos de yersey mmachas gracias
Could you possibly make a YouTube tutorial? It’s such a lovely quilt, but I am much more of a visual interactive learner.
Christie, thanks for the kind words. If I didn’t hate how awkward I am on video, I might consider. 😉
This is so beautiful! After the holidays have passed I would really love to try and make one for one of my grand-daughters. Thank you for sharing.
Hi i would really love to do this but i have a twin sized bed what sizing should i make it
thanks
Hey Scarlett, the finished squares about about a foot (if I remember correctly). If you look up the dimensions of a twin duvet and divide by 12, you’ll have the number of squares. Hope that helps. 🙂
This is beautiful! A charming and inexpensive addition to any room! Lovely.
Have you washed it? Any washing tips??
I am going to attempt this one! Thanks for sharing!
Best Wishes,
Rebecca
Hey Rebecca- it is quite the project to take on, but the result is also fabulous! Since it’s made from t-shirts, I have had no problems whatsoever washing it (I have washed it several times- since it’s white and I have two little kids, I have even bleached it a couple times). Good luck! 😉
What measurements are recommended if I want to make this for a twin bed?
Grace, I don’t know. To figure it out, divide the measurements of the twin divided by 12″ (the size of the squares). Hope that helps!
This is gorgeous! Could you give a guess at how much fabric you used? I was going to buy fabric to make one, but am not usually a sewer, can’t figure out yardage well.
Hey Katy- since each of the squares are 18″ to start, I’d start there for yardage. It’ll totally depend on the width of the fabric you are buying! Good luck!