kojodesigns

luxe DIY

  • ABOUT
    • about us
    • contact us
    • disclosures
  • Sponsors
  • HOME
  • DIY PROJECTS
    • baby
    • bags, totes & purses
    • boys
    • fonts
    • gifts
    • girls
    • harry potter
    • kids
    • knock offs
    • printables
    • women
  • SEASONAL & HOLIDAY
    • winter
    • spring
    • summer
    • fall
    • gifts
  • PARTIES
    • pretty parties
    • pretty showers
    • party bars, buffets & stations
    • party DIYs
    • grazing platters
  • HOUSE
    • decor
    • furniture
    • house projects
    • rooms & tours
  • RECIPES
    • brunch
    • dessert & treats
    • drink recipes
    • main dishes
    • paleo recipes
    • salads
    • sides, dips & sauces
  • FREEZER MEALS
  • GIFTS
    • gift ideas
    • gift basket

April 22, 2010 by Kirstin

kojotutorial: butterfly ballerina (part 2)

As an Amazon Associate I earn from qualifying purchases.

Hopefully you joined us for the first installment of this little tutorial series and have the tutu part under your belt.  Now it’s time to add the butterfly embellishment to the top of the tutu!

For the butterfly you’ll need:
– strip of tulle (mine was 12 inches by 6 inches)
– 1 1/2 inch ribbon
– 1/4 inch ribbon
– thread
-glue gun

1. Bunch the tulle in the center and pin it to the shirt, sew in into place.

2. Bunch the 1 1/2 inch  ribbon to make the two wings. pin them and sew them into place.

3. Bunch a piece of  the 1 1/2 inch ribbon and pin it in the center of the butterfly. Sew it into place.

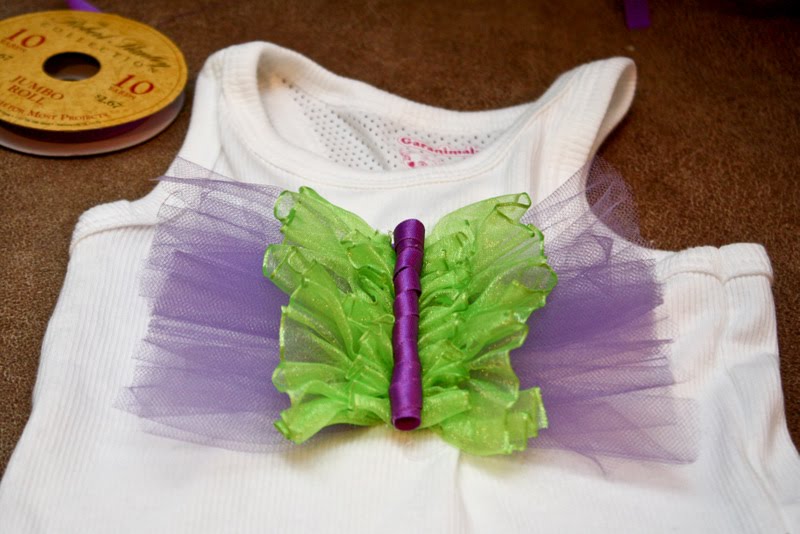
4. Wrap a piece of  the 1/4 inch ribbon around a pencil to form a ringlet. Hot glue the ringlet onto the butterfly center to form the body.  Done!

Stay tuned for the finale- the matching headband.

❮❮ Previous Post
Next Post ❯❯

Comments

  1. Sammy says

    April 22, 2010 at 5:22 pm

    So cute! It would be perfect for our Bring Spring Linky party over at Scraps N' Strings. Adorable!

    Reply
  2. Nancy's Couture says

    April 22, 2010 at 7:50 pm

    So adorable! I need to make my princess one.

    Reply
  3. Katie says

    April 22, 2010 at 9:17 pm

    Love it. Too bad I only have boys.

    Reply
  4. Bubba says

    April 22, 2010 at 10:40 pm

    How fun!

    Reply
  5. Embellished Bayou says

    April 23, 2010 at 2:03 am

    I just love this! I may have to make one for my niece for her birthday, thanks so much for the tutorials!

    Reply
  6. Cristin says

    April 28, 2010 at 10:35 pm

    how cute! my girls would love it.

    Reply

Leave a Reply to Katie Cancel reply

Your email address will not be published. Required fields are marked *

  • Facebook
  • Google+
  • Instagram
  • Pinterest
  • Twitter

follow kojo

Subscribe

shiny happy sprinkles

PRIVACY POLICY

Pretty Chic Theme By: Pretty Darn Cute Design