
kojo tutorial: a jcrew-y ruffle dress from a tshirt
As an Amazon Associate I earn from qualifying purchases.


I don’t have to tell you about my twin affections for j crew and ruffles… perusing their current catalog yields all sorts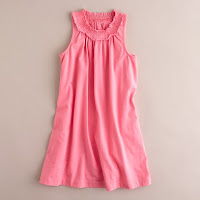

And actually, repurposing a yellow tshirt from the bag of goodies into a Sayla Grace-worthy dress/belt/barrette pile of ruffles was actually pretty easy. Here’s what I did:
1. Gathered my supplies:
-an old tshirt (men’s large)
-some ribbon (1-2 yards)
-a 12m sized dress to use as a tracing template
-scissors
-a fabric pen
-thread and a sewing machine
 2. Then I traced the ‘template dress’ onto the tshirt using a fabric pen. I folded the template dress in half, traced it onto the tshirt (also folded in half) and cut everything out folded in half so that everything would be symmetrical.
 3. I double folded (and ironed) the armholes for the both the front of the dress and the back of the dress (4 armholes in all). They’re about 4″ long. Then I sewed along each of these edges.
 4. I double folded and ironed straight across the top (again, for the front and the back). My ‘template dress’ had a neckline, which I ignored for the easier, straight across top. At this point, I ironed in the ribbon ‘sleeves.’
 5. I stitched straight across the front, securing the ribbon sleeves in place and creating the neckline. I started with the ‘front’ piece, secured the ribbons in place and stitched the back piece as well. At this point, the two pieces were connected by the ribbon sleeves.
 6. Following my tracing lines, I sewed along each side of the dress, making sure that the armhole was cut off at the same place on both sides of the dress.

 7. Now that the base of the dress was finished, I began ruffle-ing. Ruffle-ing is fun, but it takes some time. To make a basic ruffle, I used a stack of three circles (cut from the same tshirt I used for the dress) and puckered as I went using a needle and thread. That sounds kind of funny, and it took a little getting used to, but it worked. I stitched these flower ruffles to my ribbon sleeves and across the top of the front neckline using yellow thread.
 8. I also stitched three flower ruffles on another piece of ribbon (about a yard long) to make a belt).
 9. I stitched another ruffle (using 5 layers of circles instead of just 3) on a barrette to complete the ensemble.
 What a terrific way to reuse an old tshirt, right? I’m off to raid my husband’s closet for more supersoft, Goodwill bound tshirts. 🙂
 ***Three cheers for my beautiful model, Annie! Since Sayla Grace doesn’t live in the same town as me, Annie was the perfect tester (and model!) for this dress!
***Also, these are some of the places I shared the jcrew-y dress:
Oh my goodness! This is by far the most beautiful tshirt refashion I've seen! I am also passionately in love with ruffles and J. Crew. Everything they make is so classic and elegant!
This is gorgeous! Thanks for tutorial! I definitely want to try this out!
How adorable!
Very cute! I did the very same flower/ruffle technique a few months ago and it worked out wonderfully http://hopestudios.blogspot.com/2009/07/tutorial-tuesday-rosette-t-shirt.html
It made me go "Aww" out loud!
I wish I could sew…..
Too adorable!!
I love it…what an awesome idea!
I love this! It makes me wish I had a girl!
Wow… such a delightful post!
I am impressed with everyone's sewing abilities… heck I am good to figure out how to thread the needle. (yes that pathtic 🙂
If you get a minute, I would love you to stop by…
TTFN~~ Claudia ♥ ♥
How cute!! And your model is absolutely precious, too. I have GOT to learn to sew!!
Fabulous!! I posted a link to your tutorial on Craft Gossip Sewing:
http://sewing.craftgossip.com/tutorial-t-shirt-to-toddler-ruffle-dress/2009/08/27/
–Anne
OMG! This is absolutely adorable! I am going to have to make my daughter one now! Thanks for the great tutorial!
Absolutely adorable!!! You are quite talented. 🙂
BEAUTIFUL! I've been looking for something I could do with some of my old t-shirts. Thanks for the inspiration!!!
That's awesome…I am so going to make one of these for my baby girl! Thanks for sharing.
I love the color and accent! I am featuring this on somedaycrafts.blogspot.com. Grab my "featured"' button.
FAB-U-LOUS!!! This looks amazing. And what a cutie.
Thanks for posting to the party. I look forward to getting to know you better and if you want to know more about me than you'd ever want to you can click on the G-FORCE FAMILY button.
Cheri
Wow, you are so talented! I could NEVER do this! This is too cute and so is your model! I'll bet that little dress is so comfortable as well. Thanks for sharing!
THis is awesome! & i'm so glad you linked up to my party! But please but my blog button on the post!
I picked you as one of my favorites this week. Go see what I had to say and then grab the I've been Featured…button
Cheri
I am making this for sure – I LOVE it! thanks for the tutorial
LOVE this! I just posted pictures of my daughter wearing the one I made. http://www.ohholland.blogspot.com
Thanks for the tutorial!
I LOVE this! Too bad I am running out of old t-shirts to use! 🙂 Can't wait for garage sale season! I'm so excited to make one!
This seems to be a great site for purchasing stuff for kids like baby whole sale clothing with fine quality – available with all top brands Barbie, Ben 10, Goofy T-Shirt, Peppa Pig, etc.and i would surely like to try their service…i had been relying on http://www.1stkidswholesale.co.uk earlier and they too offered good stuff.
are you kidding me! this dress is just YUMMY! i can't wait to make one!
~selina (sis#1)
This blog is really nice!!!!it drive me crazy, i love the new styles and the dark colours. I think we identify with evey dress that we usually wear.
But i must to say the sensual dress in my favorit style.
excellent!!!!
Thanks so much for the great tutorial! I just made one of these for my daughter, who is 5. My one question is, did you stitch the ribbon to the dress at all or did you just tie it around her when she put on the dress? I'm not sure how/where to stitch it on or if I should just use it as a separate belt?
Thanks!!
Jess
jessicacook17 AT hotmail DOT com
Thank you for the great instructions. I love the dress and the little girls is beautiful!
These are great tees! I love T-Shirts. The first one on the list seems like it works only with a specific look but very creative anyway.I love all of them, I laughed quite a bit reading them.
design t shirts
Hi Jordan and Kirstin,
I just wanted to thank you for posting this tutorial. This is really awesome.
Its really neat how you took a task that beforehand I would have guessed was like a 7 or an 8 on the easiness scale (a scale from 1 to 10 with 10 being the hardest) and you made it into more of a 2 or a 3.
That's skill at its finest. Great job!
How do you make the little "flower ruffles" I dont know what to do once the 3 circles are cut out…I want to attempt this but it most def needs ruffles for extra cuteness. Thanks
-Skyie099@aol.com
aka newbie
I know this is an old post, but that dress is adorable!
Just saw this today and OMG – the cutest thing EVER. I just started sewing for my little girl the other day and have made two skirts and two dresses so far. Your dress will be my next project. Time to go through my husbands closet!
Annie is soooooo adorable!!! and I loooove how the dress turned out, it is so cute 🙂
AMAZING!! Thanks for sharing! kristy from http://www.apronsandapples.blogspot.com my crafty, diy healthy blog!
What an adorable dress! You're so talented. 🙂
Yay! I love cutting up clothes. I cannot wait to make this! It's just gorgeous!
Miranda
http://www.justdrinkacoke.com
The dress is so adorable and the ruffling is creative. Thanks for the tutorial. I am new to sewing and would love to make this for my little girl!
And thanks for this tutorial too. I made beautiful roses as yours! See them, if you are interested http://shulgan.blogspot.com/2012/03/blog-post_25.html
They look great! I love your little yellow dress! 🙂
How did you attach the belt ribbon? I’m having a little difficulty with that.
Hey Jaimie! It isn’t attached, just tied on. It’s a little rough to run ribbon through the washer- this makes it so that you don’t have to. 🙂
Excellent that makes sense thank you!!